Welcome to the vCard Management section, where you have complete control over your digital business cards. Effortlessly add, update, or delete vCard records to ensure your online presence is always up-to-date
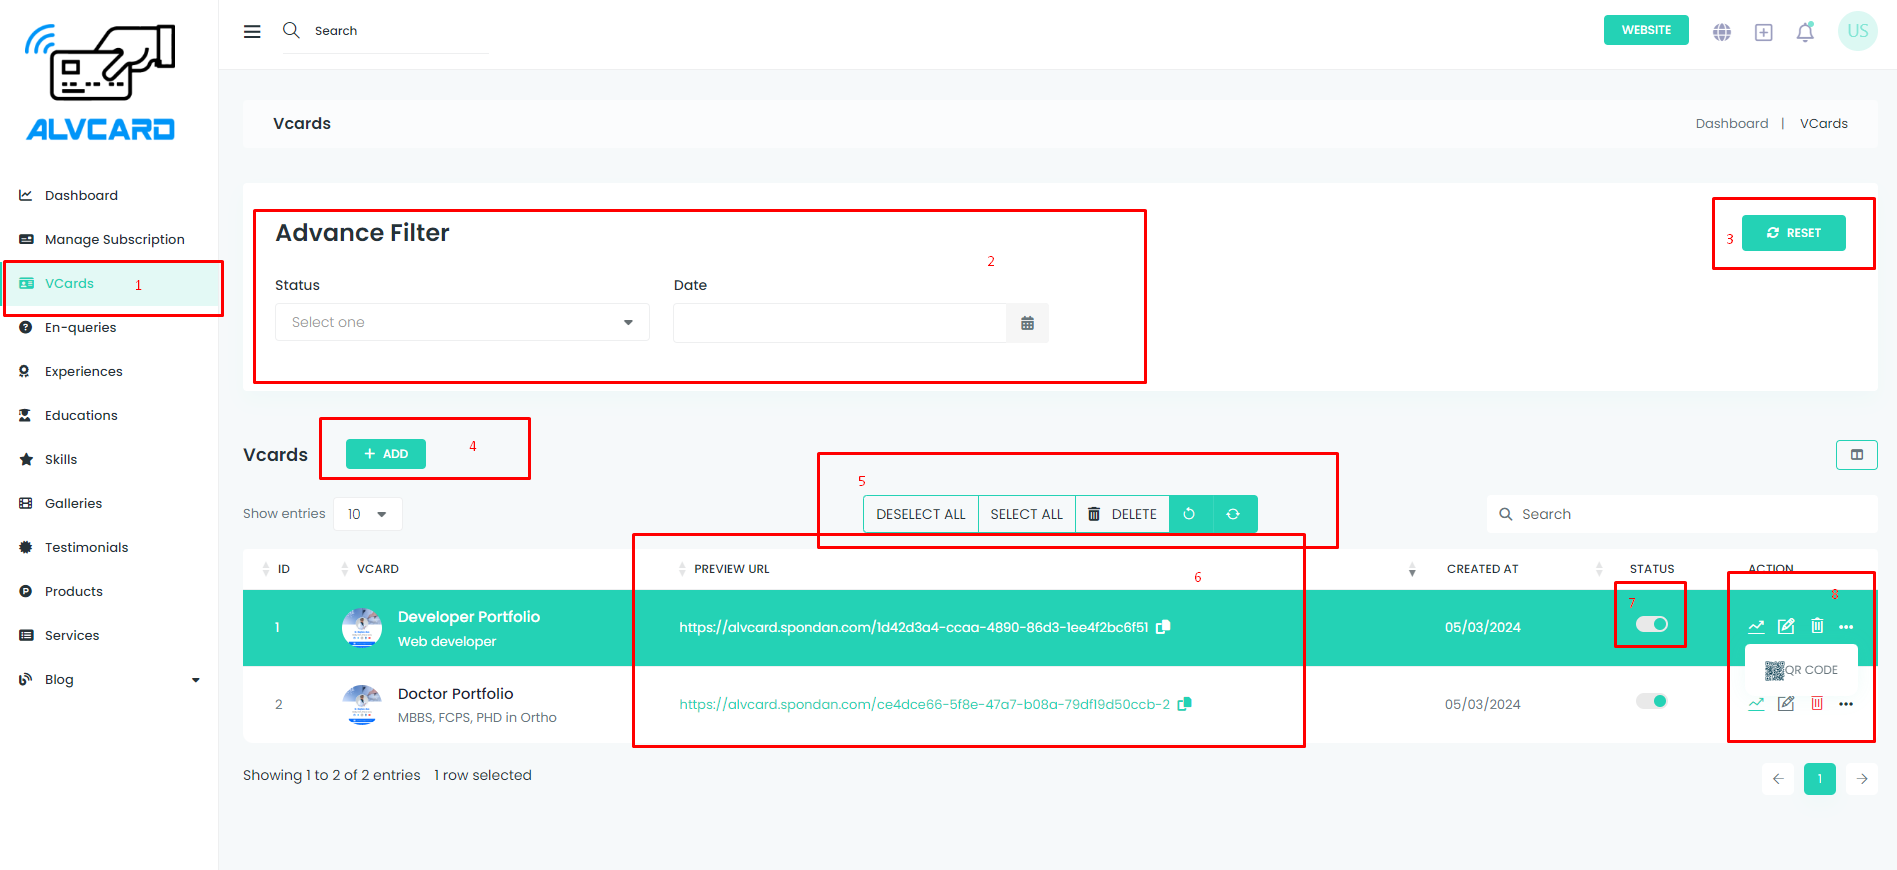
In Section 1, effortlessly navigate through your vCard list. Get an overview of all your digital business cards in one centralized location.
In Sections 2 and 3, refine your view by filtering data based on status and date. Easily locate specific vCards and maintain an organized record. Reset filters to return to the full vCard list.
In Section 4, click the "Add" button to seamlessly navigate to the vCard creation page. Initiate the process to add a new digital business card to your collection.
In Section 5, efficiently manage your vCards by selecting, deselecting, and performing multiple deletions. Streamline your vCard list based on your preferences.
In Section 6, easily share your vCard by copying the preview URL. Share your professional information with colleagues and contacts effortlessly.
In Section 7, dynamically manage your vCards by changing their status. Update the status to reflect changes in your professional information.
In Section 8, take action on your vCards:
Welcome to the vCard Creation Page! Follow these simple steps to fill in your desired information and create a stunning digital business card:
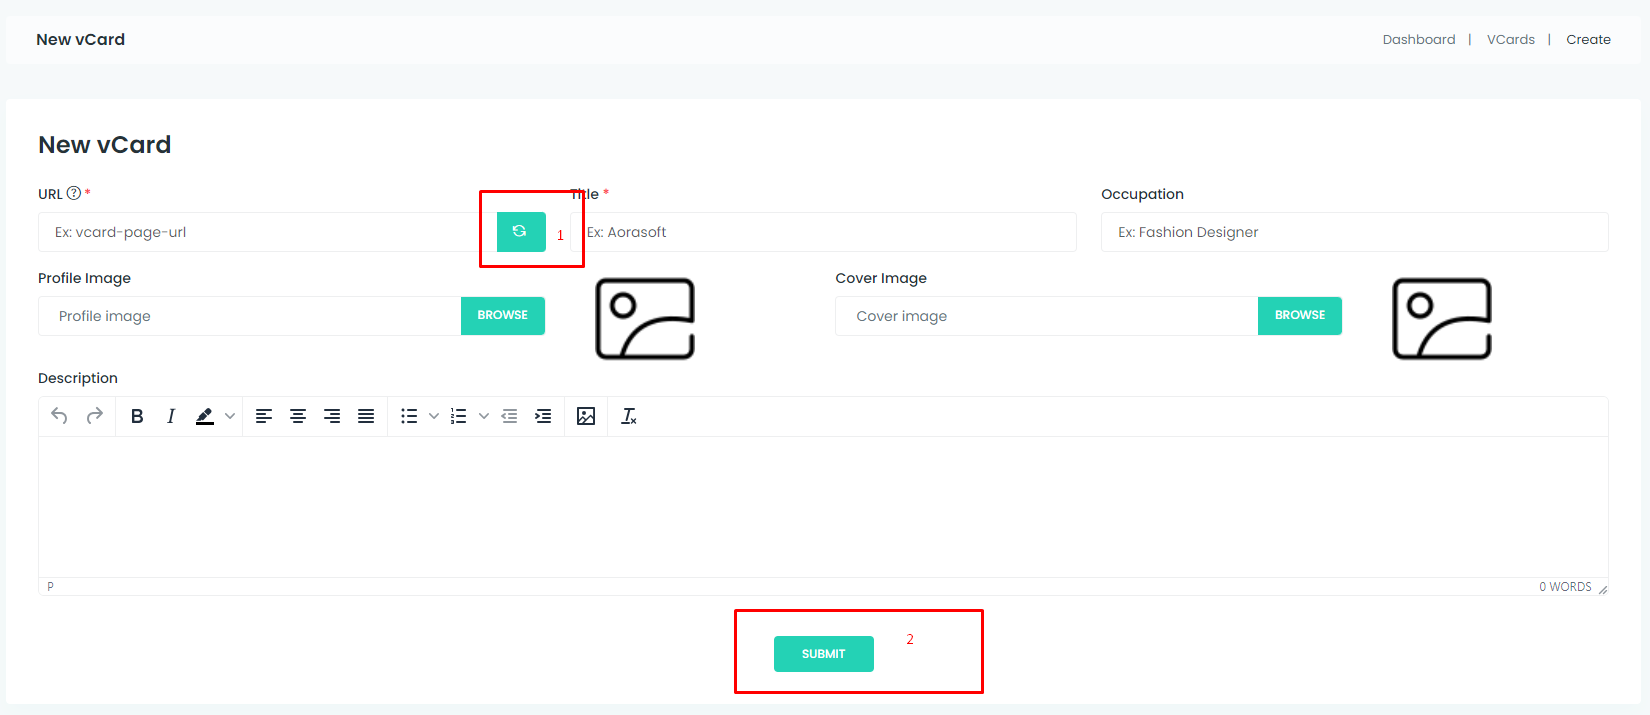
In Section 1, take advantage of the option to generate a unique URL for your vCard. Click on the "Generate URL" button to create a shareable link for your digital business card. This URL allows easy access and sharing of your professional information with colleagues, clients, and contacts.
Welcome to the vCard update Page! Follow these simple steps to fill in your desired information and create a stunning digital business card:
Note: The user will exclusively have access to the section that corresponds to their purchased plan.
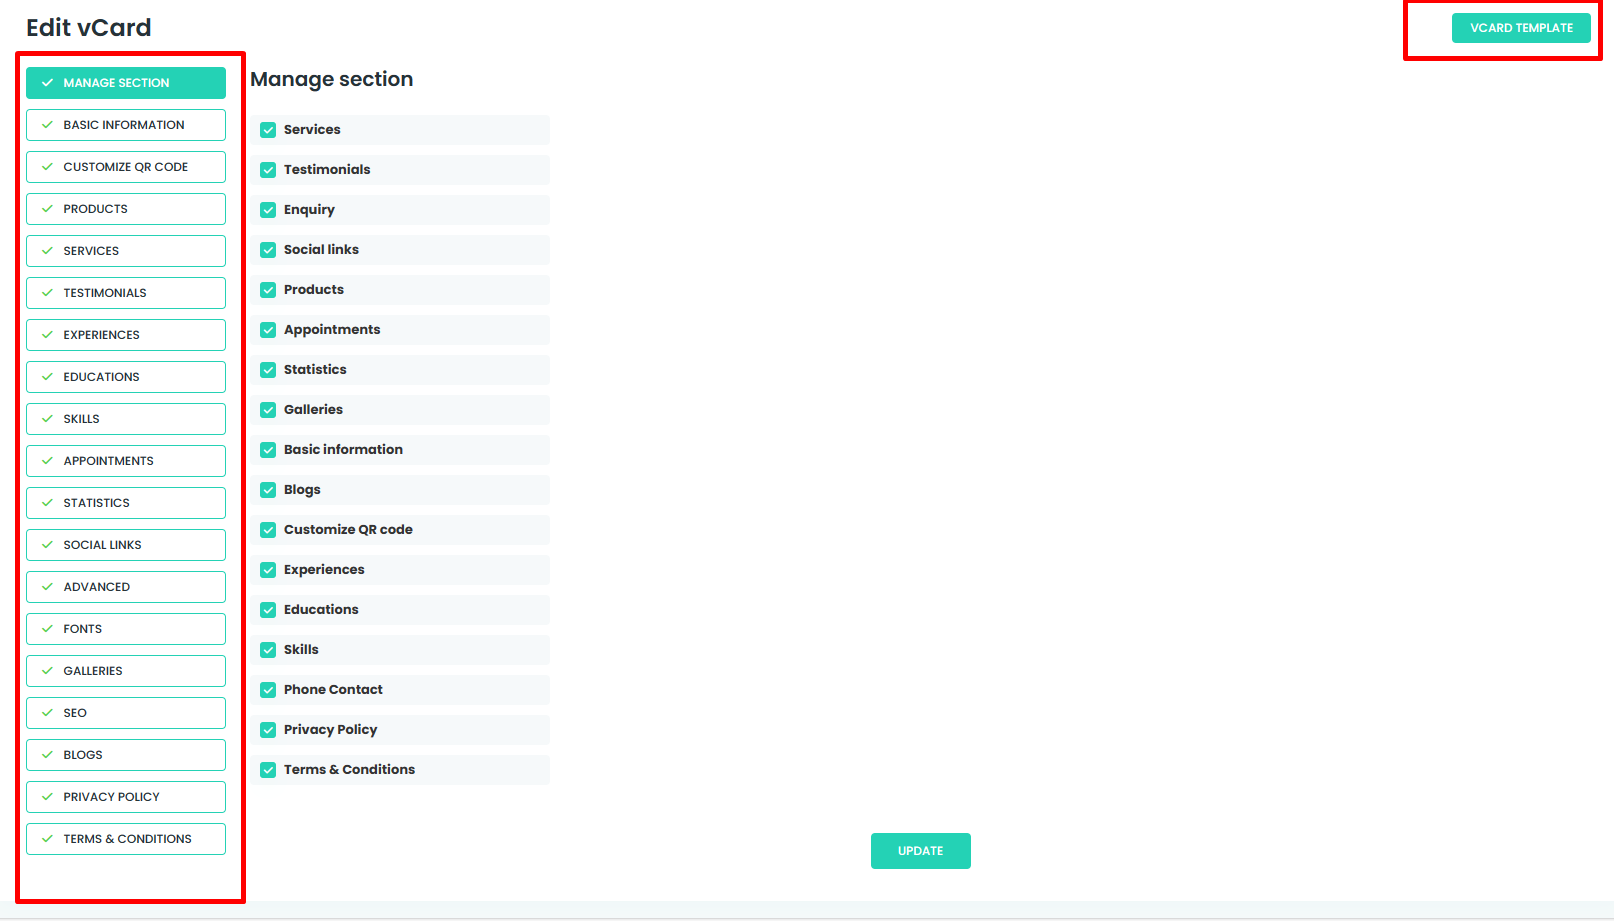
Hide/Show Sections: Customize your vCard by deciding which sections to display or hide, giving you full control over the content showcased.
Update Basic Information: Keep your vCard up-to-date by easily modifying your card's fundamental details in Section 2.
Set vCard Template: Choose the perfect template for your vCard in Section 3, ensuring a visually appealing and personalized presentation.
Customize QR Code: Personalize your QR code in Section 4, adding a unique touch to your digital business card.
Manage Product Data: Section 5 allows you to add, update, or delete product information, ensuring your offerings are accurately represented.
Manage Services Data: Keep your service details current by using Section 6 to add, update, or delete service information.
Manage Testimonial Data: Showcase your testimonials effectively in Section 7, where you can add, update, or delete client testimonials.
Manage Experience Data: Section 8 enables you to add, update, or delete your professional experiences, providing a comprehensive career overview.
Manage Education Data: Keep your educational background accurate by using Section 9 to add, update, or delete education details.
Manage Skill Data: In Section 10, add, update, or delete your skills to highlight your areas of expertise.
Set Appointment Schedule: Efficiently manage your appointments by setting your schedule in Section 11.
Set Statistics: Utilize Section 12 to set and display relevant statistics or metrics.
Set Social Links: Enhance your online presence by adding, updating, or deleting social links in Section 13.
Custom CSS & JS: Section 14 allows you to add custom CSS and JS to tailor the appearance and functionality of your vCard.
Set Font Family and Font Size: Customize the text appearance in Section 15 by setting your preferred font family and size.
Manage Galleries Data: Section 16 lets you add, update, or delete image galleries, showcasing your work or achievements.
SEO Information: Optimize your vCard for search engines by entering SEO information in Section 17.
Manage Blogs Data: Keep your audience engaged by adding, updating, or deleting blog entries in Section 18.
Set Privacy & Policy: Clearly define your privacy policy in Section 19 to communicate how user data is handled.
Set Terms & Conditions: Establish clear terms and conditions for your vCard in Section 20, ensuring a transparent user experience.
Welcome to the vCard analytics Page. These analytics sections collectively offer you a comprehensive view of your vCard's performance, enabling you to make informed decisions and optimize your digital presence
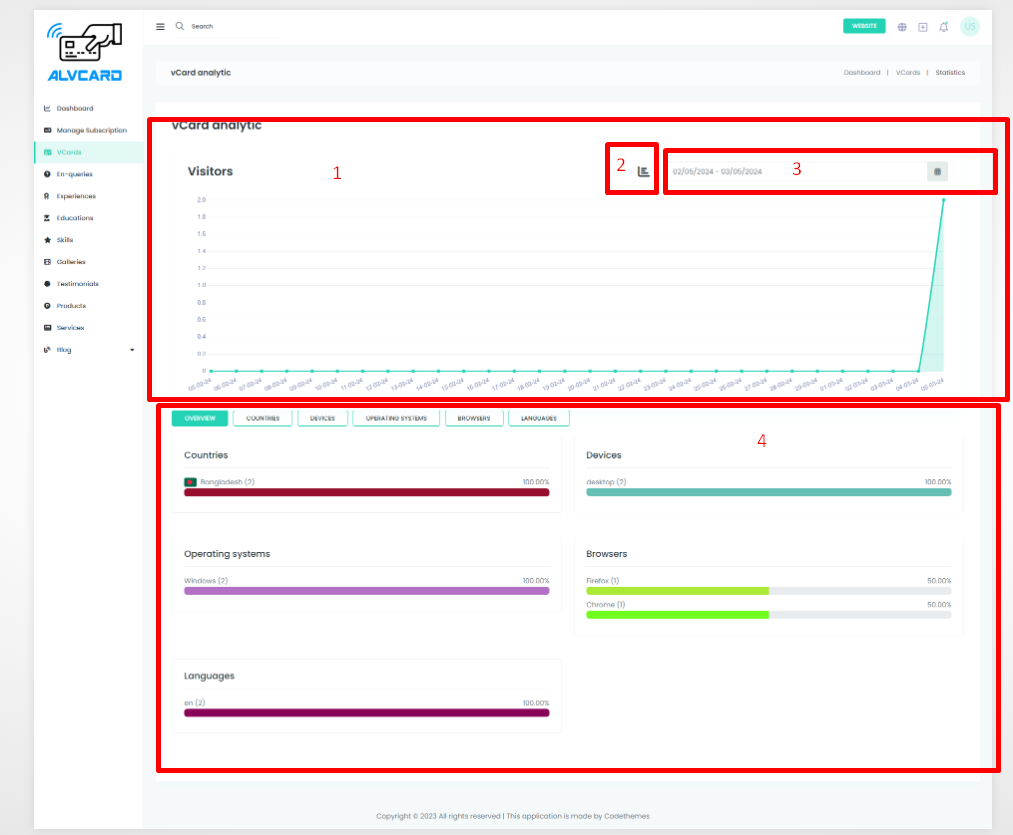
VCard Visitor Graphical Representation: In Section 1, gain valuable insights into your vCard's performance through graphical representations of visitor data. Understand your audience and engagement at a glance.
Change Graphical Presentation: Section 2 empowers you to customize your analytics experience by allowing you to change the graphical presentation. Tailor the representation to suit your preference and analytical needs.
Filter Visitor Data: Use Section 3 to filter and focus on specific aspects of visitor data. Fine-tune your analytics to extract meaningful information relevant to your goals.
Visitor Information Details: Section 4 provides a detailed breakdown of visitor information, including countries, languages, devices used, and operating systems. Understand the demographics and preferences of your vCard audience.