The course of a stream is Advance progression in a particular direction; forward or onward movement. LMS Course titles provide readers with a brief general description of the subject matter covered in the course area. Accrediting and governance entities, other academic institutions, current and prospective students, prospective employers, and a variety of other individuals outside of the University review LMS course titles. Also called the core curriculum of the study refers to a series or selection of courses that all students must complete before moving on to the next level in their education or earning a certificate.
Course Category:
An online class is a course conducted over the Internet. They are generally conducted through a learning management system, in which students can view their course syllabus and academic progress and communicate with fellow students and their course instructors. If they are regulated and accredited by an awarding body, they are no different from those studied on campus.
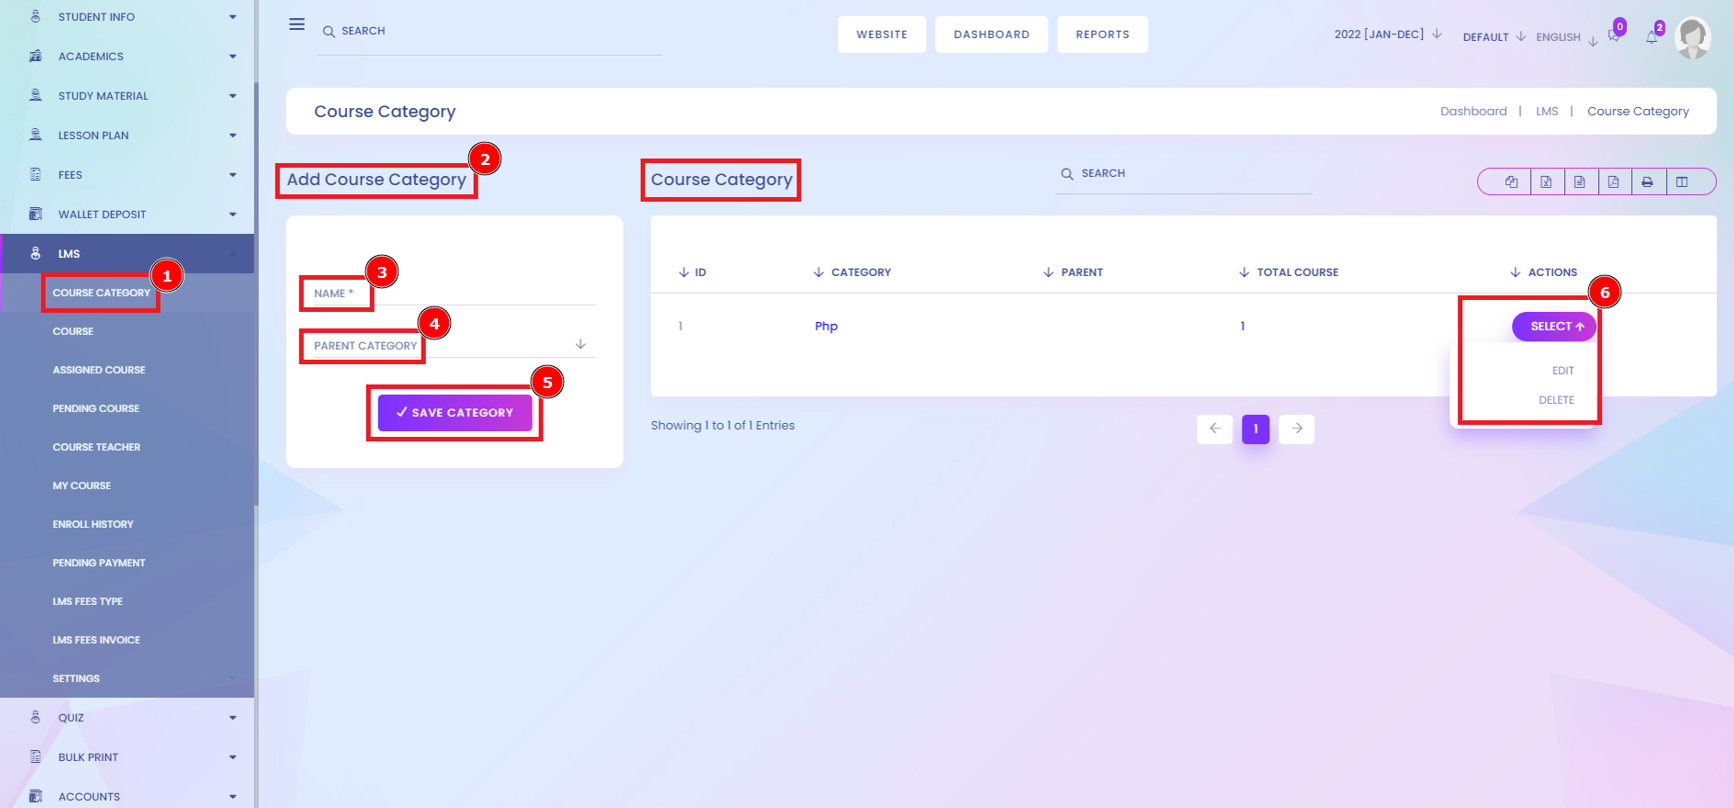
Short Direction: {Infix Edu> Dashboard> LMS> Course Category> Add Course Category> Name> Parent Category> Save Category> Select> Edit> Delete.}
If you want to add courses to these lists, follow the number of picture instructions. Click on the Course Category[1] to see the Add Course Category[2], set on the Name[3] below the fill in the box, select the category[4] & Save it[5]. You can also rewrite your category course on the select[6] option to edit or delete it. Course categories organize courses for the category system on the LMS setting for all the site participants. The default course category on a new one is "Miscellaneous" (although this can be renamed). A Course creator, Administrator, or Manager can put all courses in the Various category.
Course:
Whether you choose a hosted platform or a self-hosted LMS Course, you can build, advertise, and sell online courses from your own site. An online course delivers lessons on a web browser or mobile device, which can be accessed anytime and anywhere. It is designed as an online environment for convenient learning asynchronously.
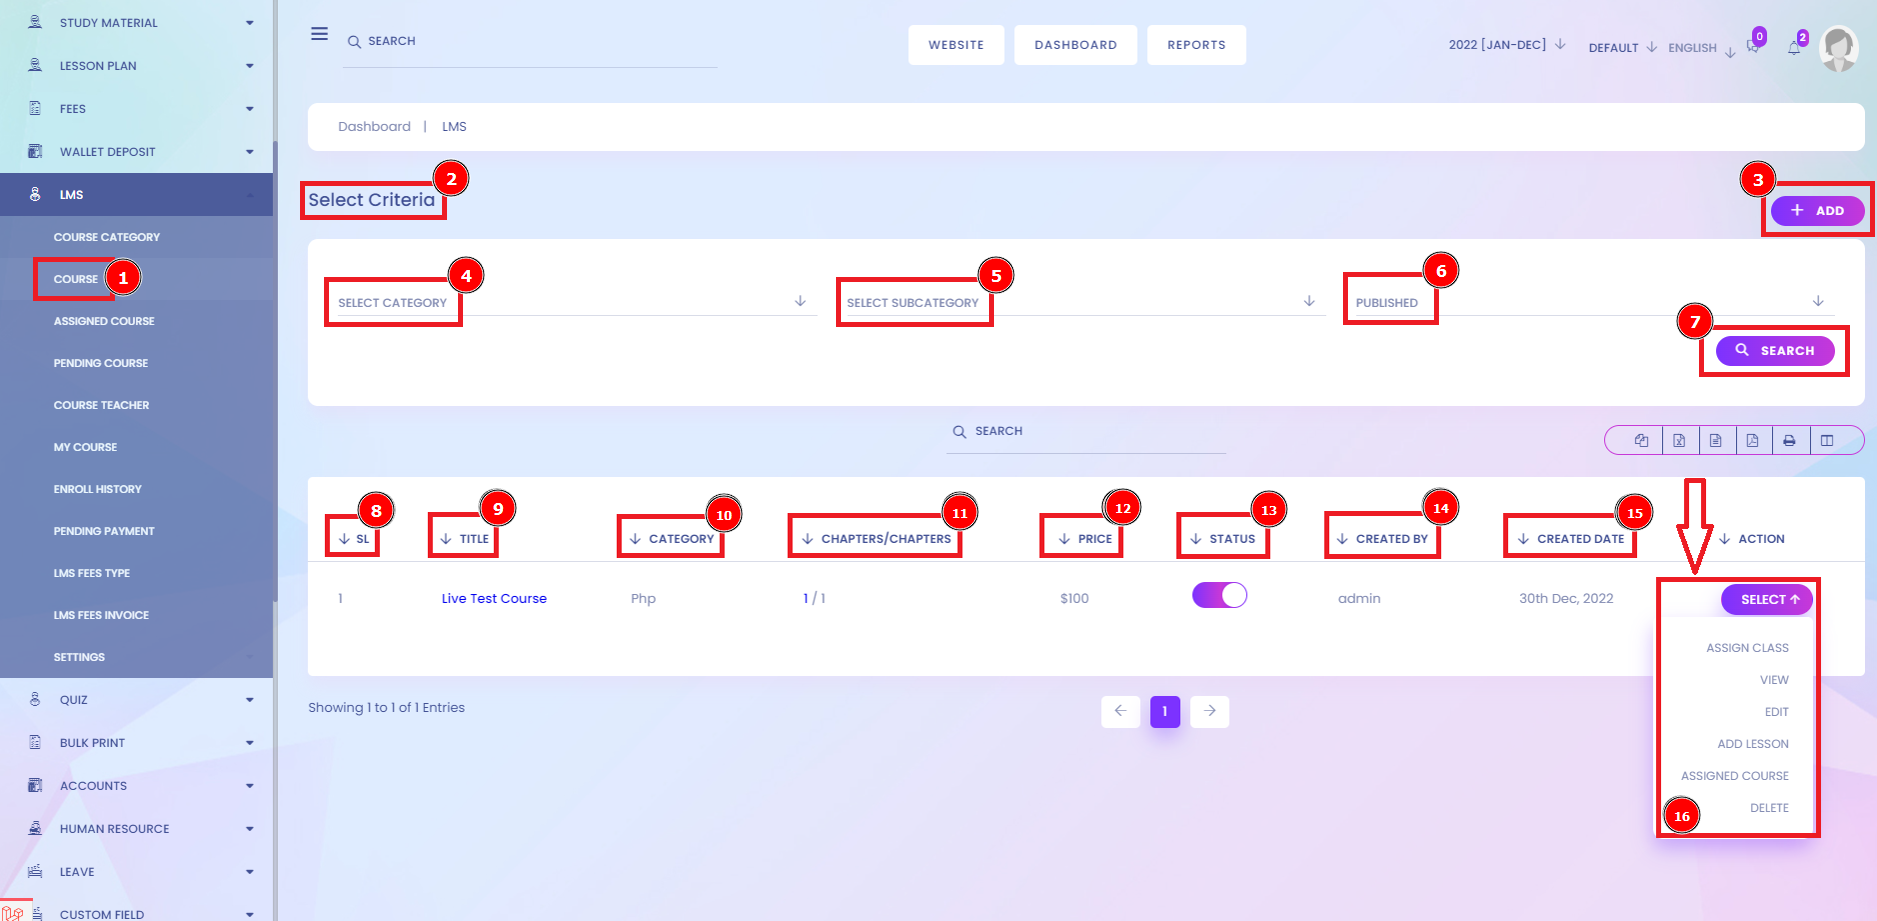
Short Direction: {Infix Edu> Dashboard> LMS> Course> Select Criteria> Add> Select Category> Select Subcategory> Published> Search> SL> Title> Category> Chapters> Price> Status> Created By> Created Date> Select> Assign Class> View> Edit> Add Lesson> Assigned Course> Delete.}
A learning management system (LMS) is a computer-based operating system used by training organizations to register, track and monitor activity in the training function. LMSs have evolved from earlier systems to include course and student monitoring, resource management, assessments, completion rates, and more. If you want to search your course[1] as selected criteria[2] or Add[3] new courses, then click on it, or if you want to search the course and then fill on the Select category[4], Select Subcategory[5], Published[6] & hit the Search[7] button. You can organize all the modules as nicely. Go to the LMS dashboard to find the Course option to click on it. You will see the SL[8] of all course lists, the other side of course Title[9], Category[10], Chapters[11], showing the course price[12], Status[13], Create By[14] the name Date[15] who build it. Click on the select[16] button to revelled the course editable functionality like Assign Class, View, Edit, Add lesson, Assigned course & Delete options.
Add Course:
How do I add a course to LMS? LMS Course Creation To create a course, log in to your learning management system and select the Courses menu, which you can find on the left-hand side of your screen. Select the Courses list, and a new window will open & fill in all course information, which is mandatory for the student can understand about course module. Good courses make sure to appeal to visual, kinesthetic, and other learning styles by providing various multimedia content and carefully designed assignments that help students learn in the way that works best for them.
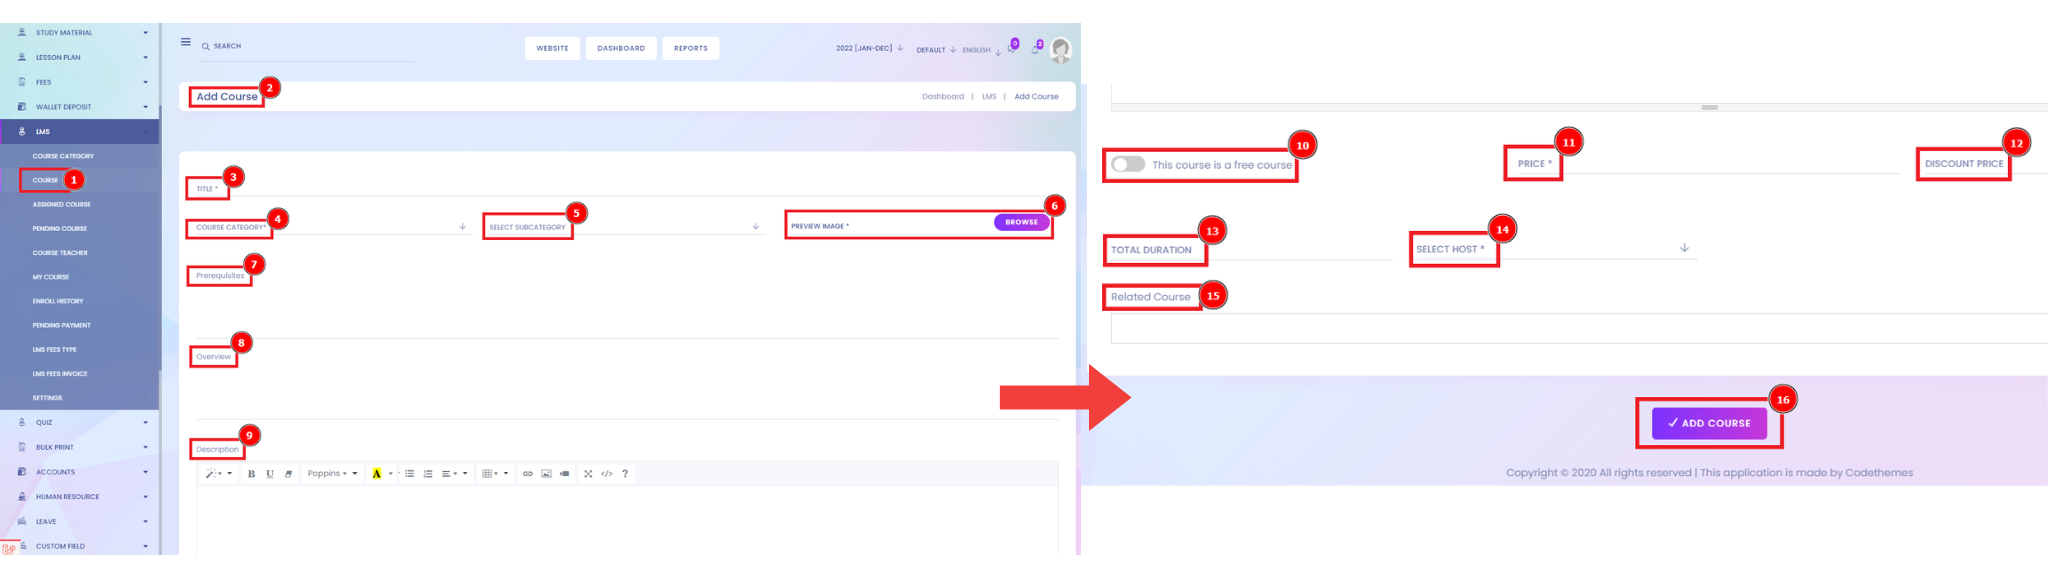
Short Direction: {Infix Edu> Dashboard> LMS> Course> Add Course> Title> Course category> Select Subcategory> Preview Image> Prerequisites> Overview> Description> This course is a free course> Price> Discount Price> Total duration> Select host> Related Course> ADD Course.}
If you want to add a new course, go to the LMS dashboard to click on the course[1] & it will open a new interface. You will see the Add Course[2] on the right side. Hit the Add button to open a new page to fill in the all-requirement list as Title[3], Course category[4], select subcategory[5], and Browse on your desktop to attach your course-related thumbnail to preview image[6]. You can also write down the course overview[8] & a long description[9] of the course, clarifying or representing the student. There is a manual option to decide whether your course is a free course[10] or not. Put the course price[11], Total duration[12], select host[13] & add some information about the related course.
Assign Class:
Select elements with a specific class followed by the name of the classes designed by the short formation. You can also specify that only specific Course elements would be affected by a student. To do this, start with the element of Assign class which you control on the price or discount prices section. Assign course allocates organizational resources in which each resource is assigned to a particular task.
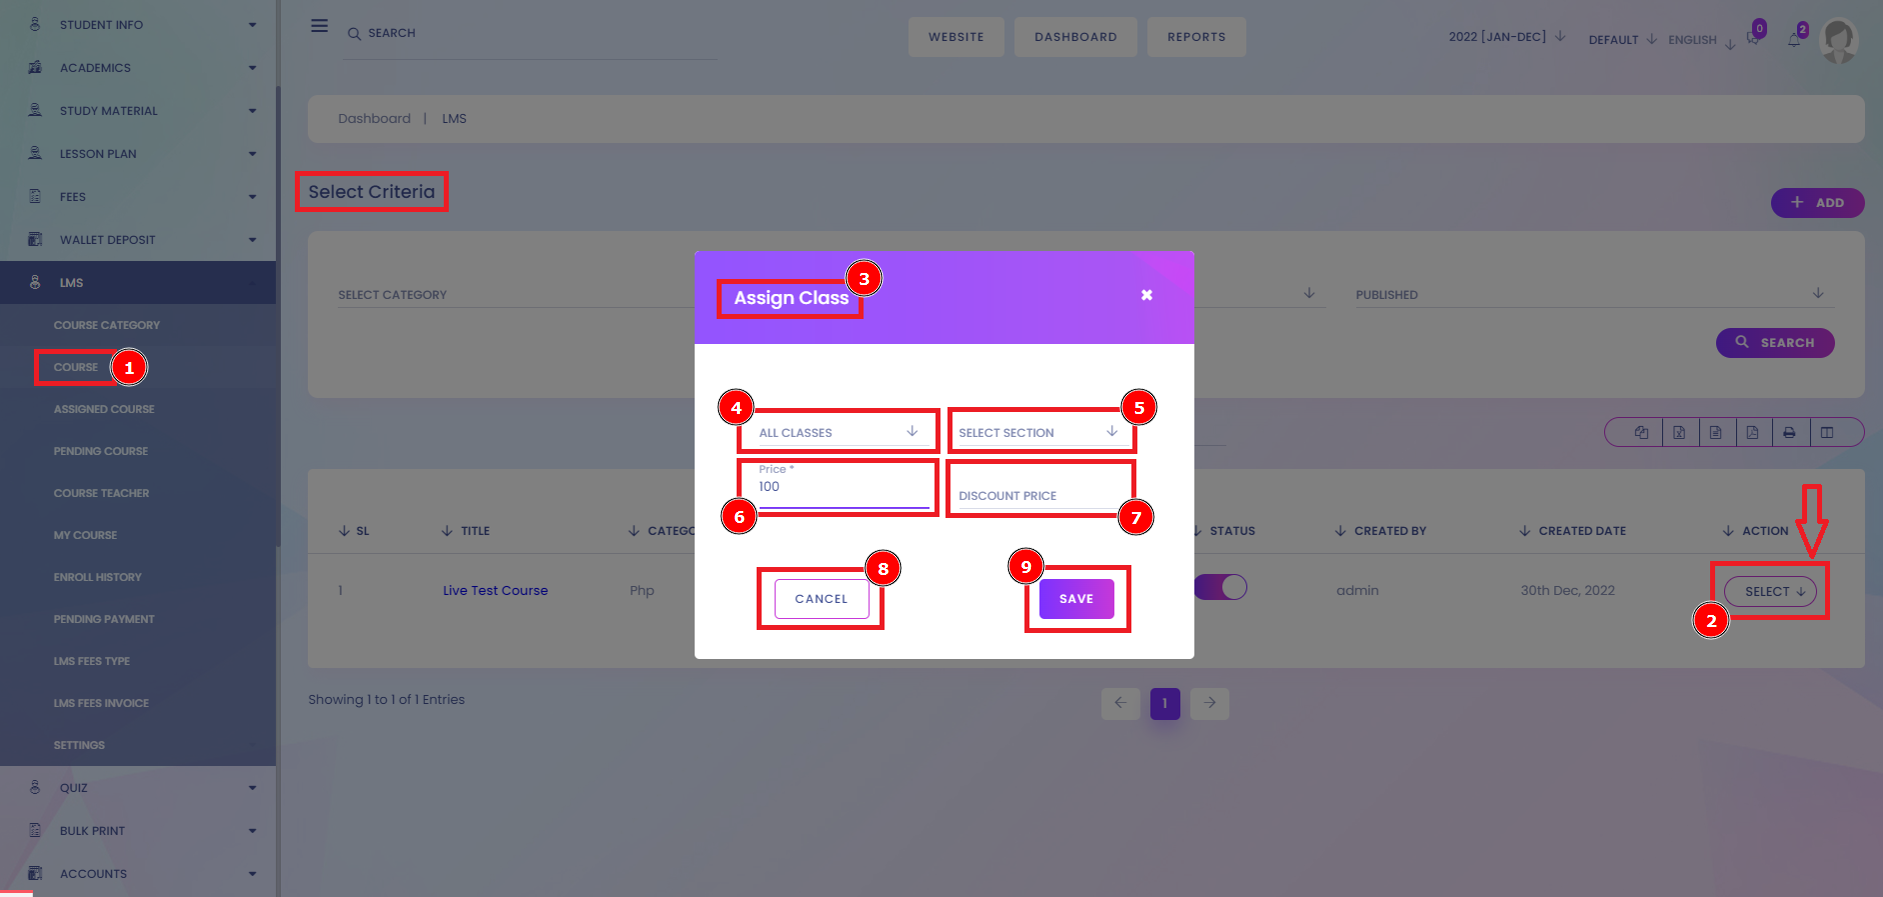
Short Direction: {Infix Edu> Dashboard> LMS> Course> Select> Assign Class> All Classes> Select Section> Price> Discount Price> Cancel> Save.}
If you want to assign classes to be more organized, then go to the Course[1] to Select[2] section to find the first segment about Assign Class[3]. To be more accurate, reorganize by clicking on All classes[4] to find the class one or two, then more classes. Select Section[5], put on the prices of the courses [6], or you can discount[7] it. You can cancel[8] it or Save[9] it.
Course Details View:
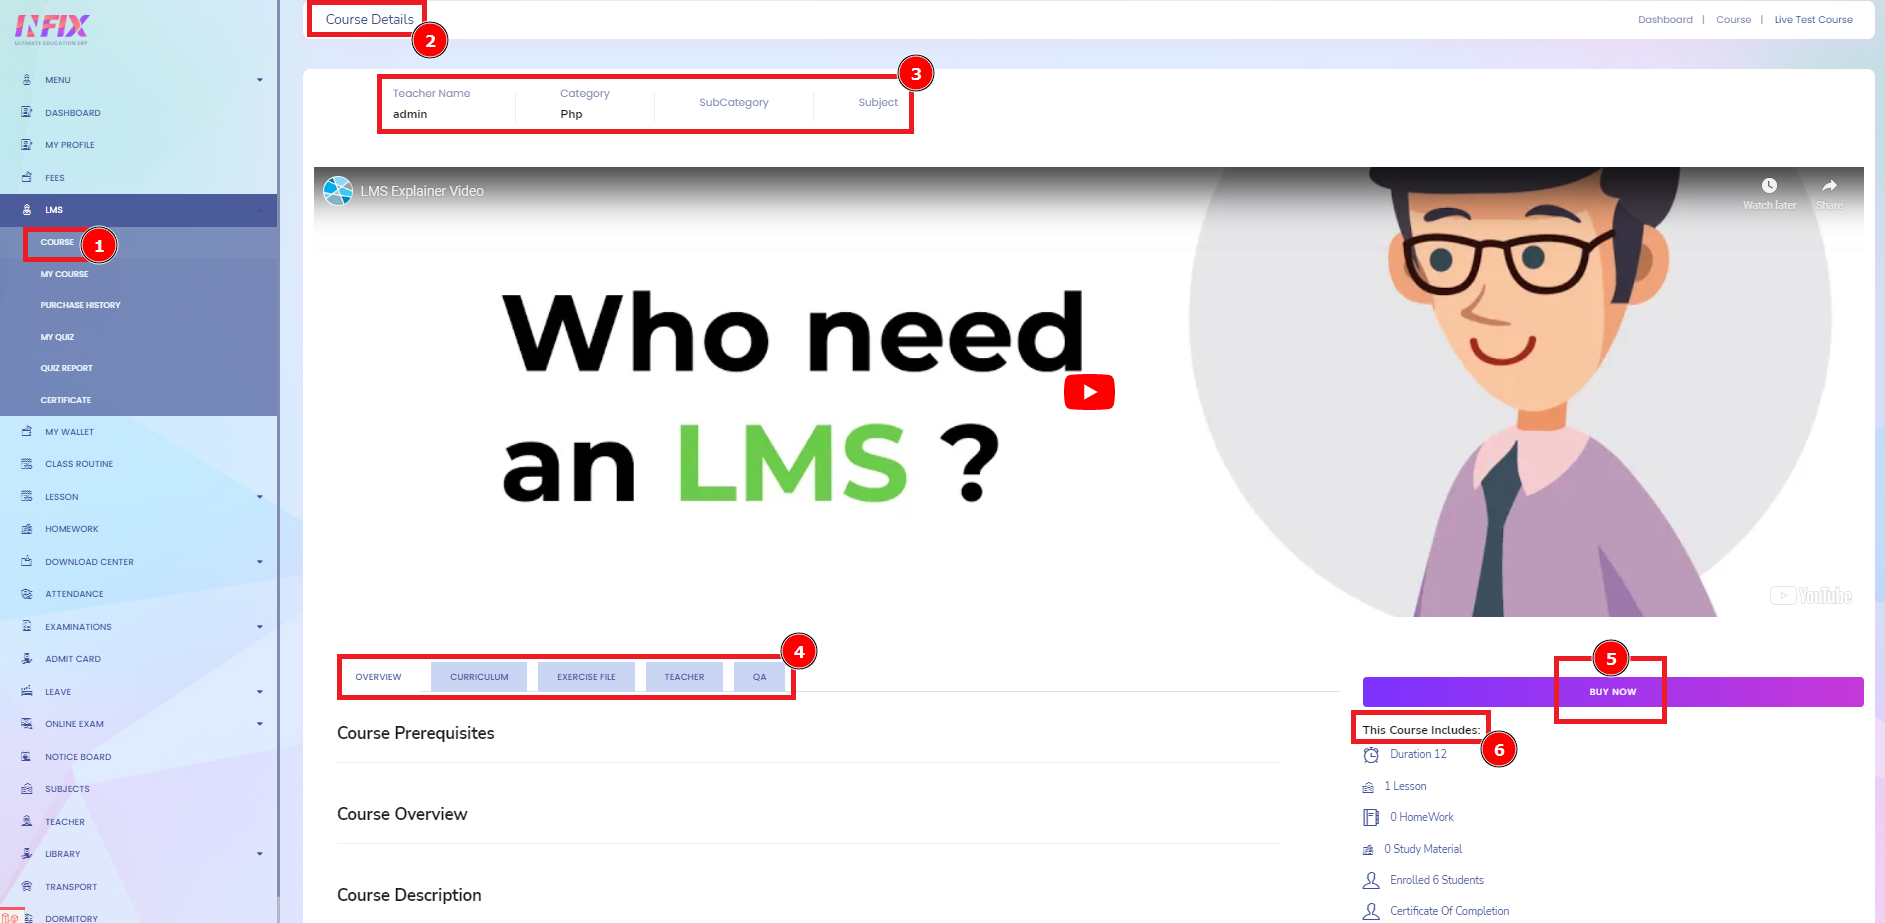
This course system is functionalized by getting new courses to go to the course interface & find the courses listed. If you want to buy a course, click on the course select option. Find the options to hit the View option to buy your course. There is all information here to understand a student by the way to acknowledgement to introducing the course. Course Details means the course details as set out in our separate course details document.
Short Direction: {Infix Edu> Dashboard> LMS> Course list> Select> View> Course Details> Teacher Name> Category> Sub Category> Subject> Overview> Curriculum> Exercise file> Teacher> QA> Buy Now> This Course Includes.}
If you want to buy a new course, you must go to the course[1] listed to find the select option under the View option & click it. You will see a completely new interface with course details[2] & a short introduction to the course module. You can also see the course Teacher's name[3], Category, subcategory & subject. Also, you will have to understand the course overview, course curriculum, exercise file, teacher & QA[4]. Quality assurance is the term used in both manufacturing and service industries to describe the systematic efforts taken to ensure that the product delivered to the customer meets the contractual and other agreed-upon performance, design, reliability, and maintainability expectations of that customer. The picture number chronologies to five ensure buying[5] the course. This Course Includes Duration, how many Lessons, HomeWork, and Study Material & the last one is Students Enrolled.
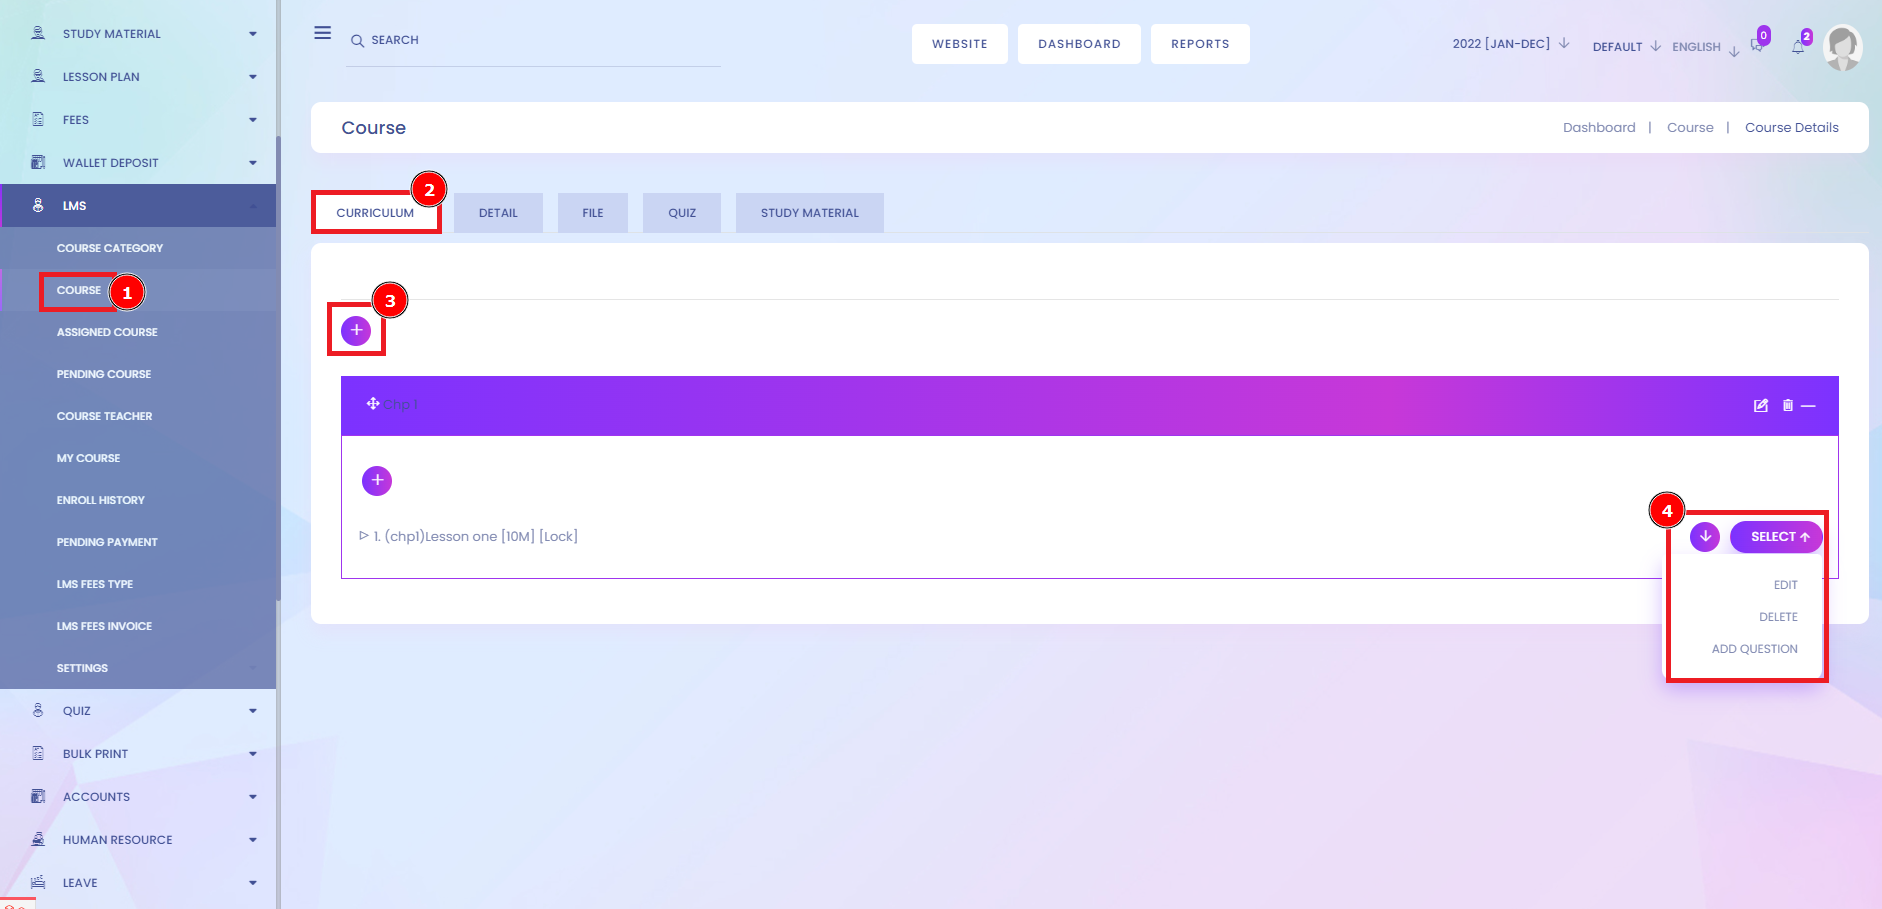
Add Lesson:
One of the significant advantages of online learning is that professionals can learn from schools worldwide and find the program that best meets their needs without uprooting their lives. In contrast, those studying on campus are limited to local options or must move to another city for a full-time program. LMS gives you all your facilities to find the particular lesson.
Short Direction: {Infix Edu> Dashboard> LMS> Course> Select> Add lesson> Curriculum> Plus> Edit> Delete> Add Question.}
If you want to add a particular lesson, follow the instruction to Add a lesson. Go to the LMS Dashboard to find the course[1] option. You will see the all-course list; find the select option to click on the Add lesson. The main course can be a part-by-part lesson, so the student wants to find the specific part. It can add to your subject-wise lesson. It will automatically open on the new interface to see the curriculum[2] & hit the plus mark[3] to add a new lesson. After all, select[4] the option to edit, delete or Add questions to your lesson.
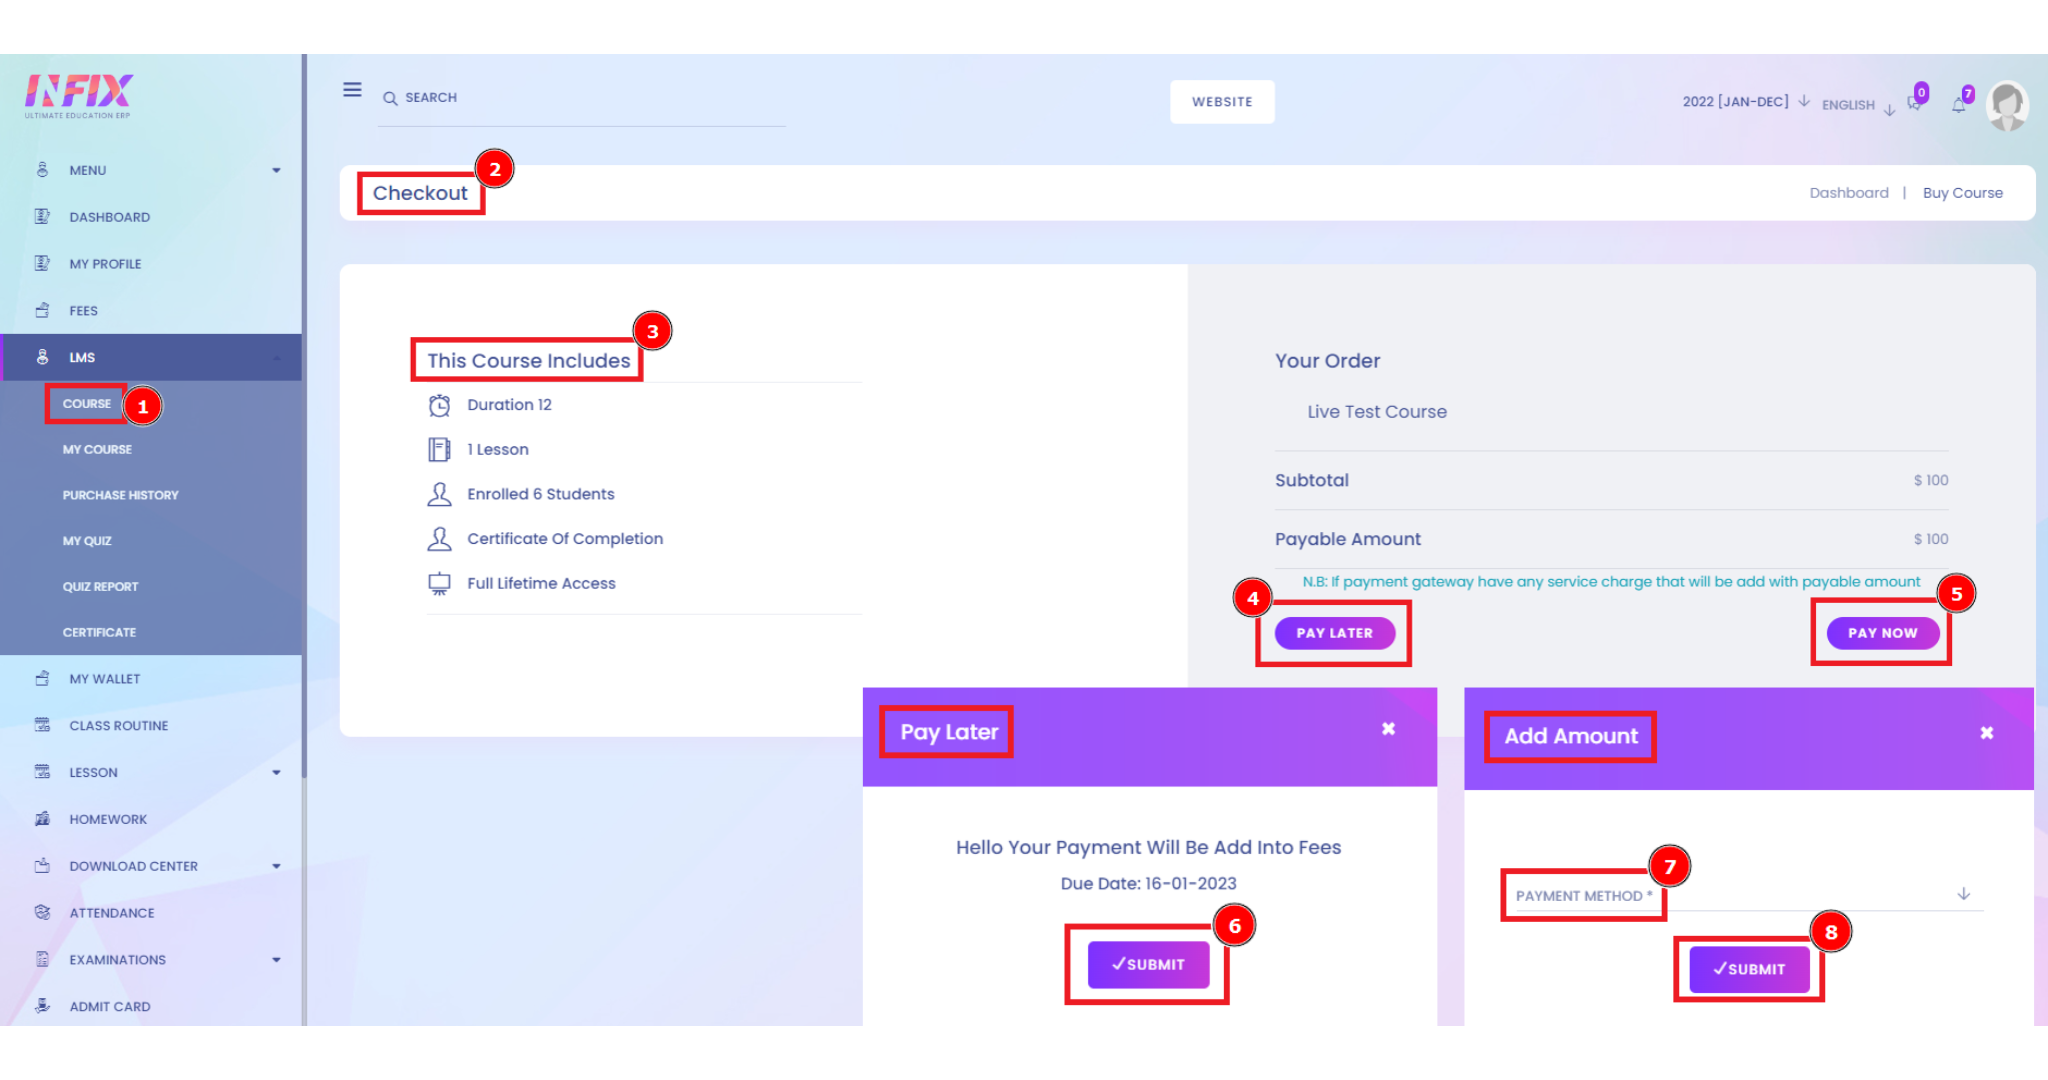
Course Payment Procedure:
Payment Procedures are the procedures for obtaining payments from one or more of the Portfolios in which a Participant maintains an account established from time to time by the course module. Electronic payment is a digital transaction between two parties, with e-payment types including ACH, cards, bank transfers, digital wallets, mobile payments, and more. Although cash still comes out as one of the top payment methods, the report notes that more than half of payments (57%) were made with payment cards, such as debit, credit, and prepaid.
Short Direction: {Infix Edu> Dashboard> Student ID> Course> Course List> Buy Now> Checkout> This Course Includes> Pay later> Pay now> Submit> Payment Method> Submit.}
If you want to check out the payment method system, go to the LMS Course module to buy your course[1]. You can check out[2] that course short information about the title of this course, including duration, lesson, enrollment, certification of completion, and total lifetime access. So your order will pay later[4] or Pay now[5]. If you want to pay later, it will notify you of the date of payment due date submitted [6] it. Either you want to pay it right now, then click on pay now to go to the payment method[7] to select the payment system which you are looking for as like cheque, bank, Pay Pal, Stripe, Paystack, wallet & at the last thing to do on the hit of submit[8] button.
Quiz:
The most common type of quiz questions, multiple-choice questions, or MCQs, as they are popularly known, are amongst the most effective ways to test learners. They present multiple possible answer options for one question, one of which is correct, and the others are just 'distractors'. In simple terms, an online assessment evaluates a person's abilities, behaviours, or characteristics. This test is conducted over the Internet by using available web technologies. An assessment may set out with clear objectives, such as: To test the knowledge or learning of a candidate.
Short Direction: {Infix Edu> Dashboard> LMS> Course> Select> Assign course> Select> Add lesson> Quiz> Assign Quiz> SL> Quiz> LMS Participents> Quiz Mark> Minimum Percentage> Assigned By> LMS Creared> Action.}
If you want to add a quiz to the LMS course module, click on the Course[1] setting to open a new page showing the curriculum, details, file, certificate, teacher, quiz[2], Study Material, and Homework. So you want to add the assigned quiz[3], then click on it. However, there are the below from here to all quizzes showing the SL[4], Quiz[5], LMS Participents[6], Quiz Mark[7], Minimum Percentage[8], Assigned by[9] the name of the quiz are clarifying, also here are the LMS Creared[10] & the action[11] button to rewrite or deleted any of quiz. A quiz refers to a short test of knowledge, typically around 10 questions, with formats often including multiple choice, fill in the blanks, true or false, and short answer. A quiz is much shorter than a traditional test or exam and rarely impacts a final course grade.

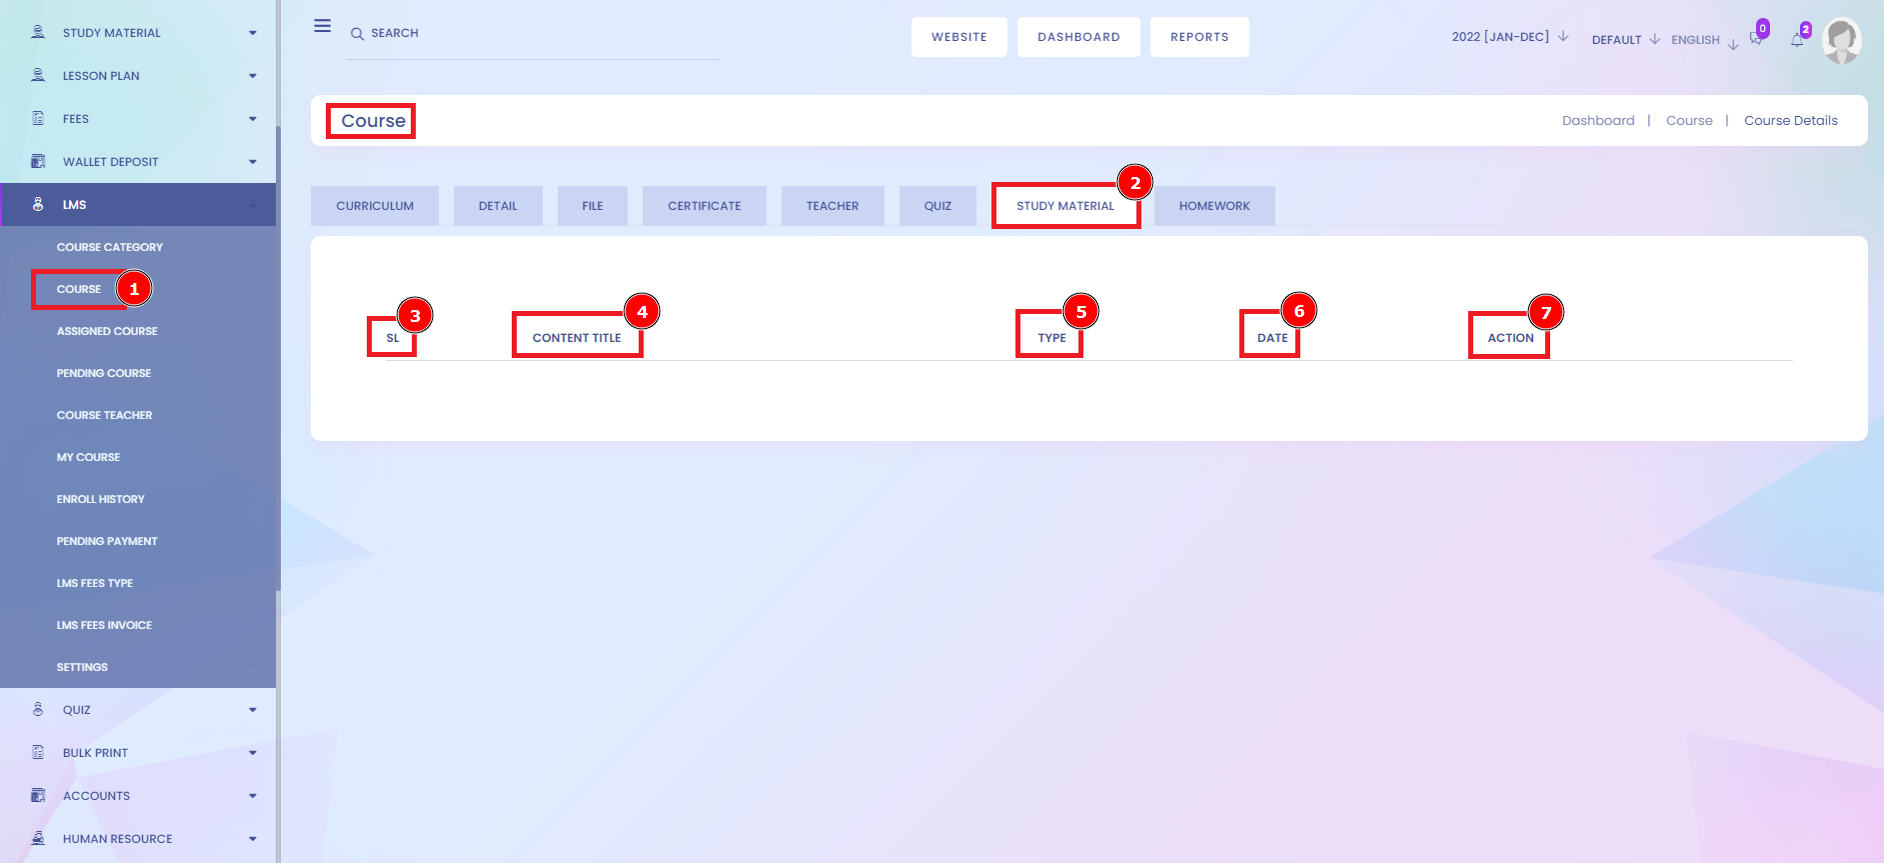
Study Material:
What are study materials? In simple words, it is the collection of materials, including textbooks, basic syllabus of subjects, patterns, additional information of in-class activities, etc., that teachers may use to help students achieve desired academic success.
Short Direction: {Infix Edu> Dashboard> LMS> Course> Select> Assign course> Select> Add lesson> Study Material> SL> Content Title> Type> Date> Action.}
Study materials for students are designed in an interesting, engaging, and student-friendly way so they can learn and prepare for the exam more efficiently. The study materials are prepared by subject experts keeping in mind the latest syllabus. So you want to add a quiz, then follow the picture instruction to numbering as like course[1], study Material[2], serial number SL[3] of all quizzes, it has to be a content title[4] or the type[5] of the quiz. It also shows the accurate date[6] & Action[7] options to rewrite or delete quiz functions.
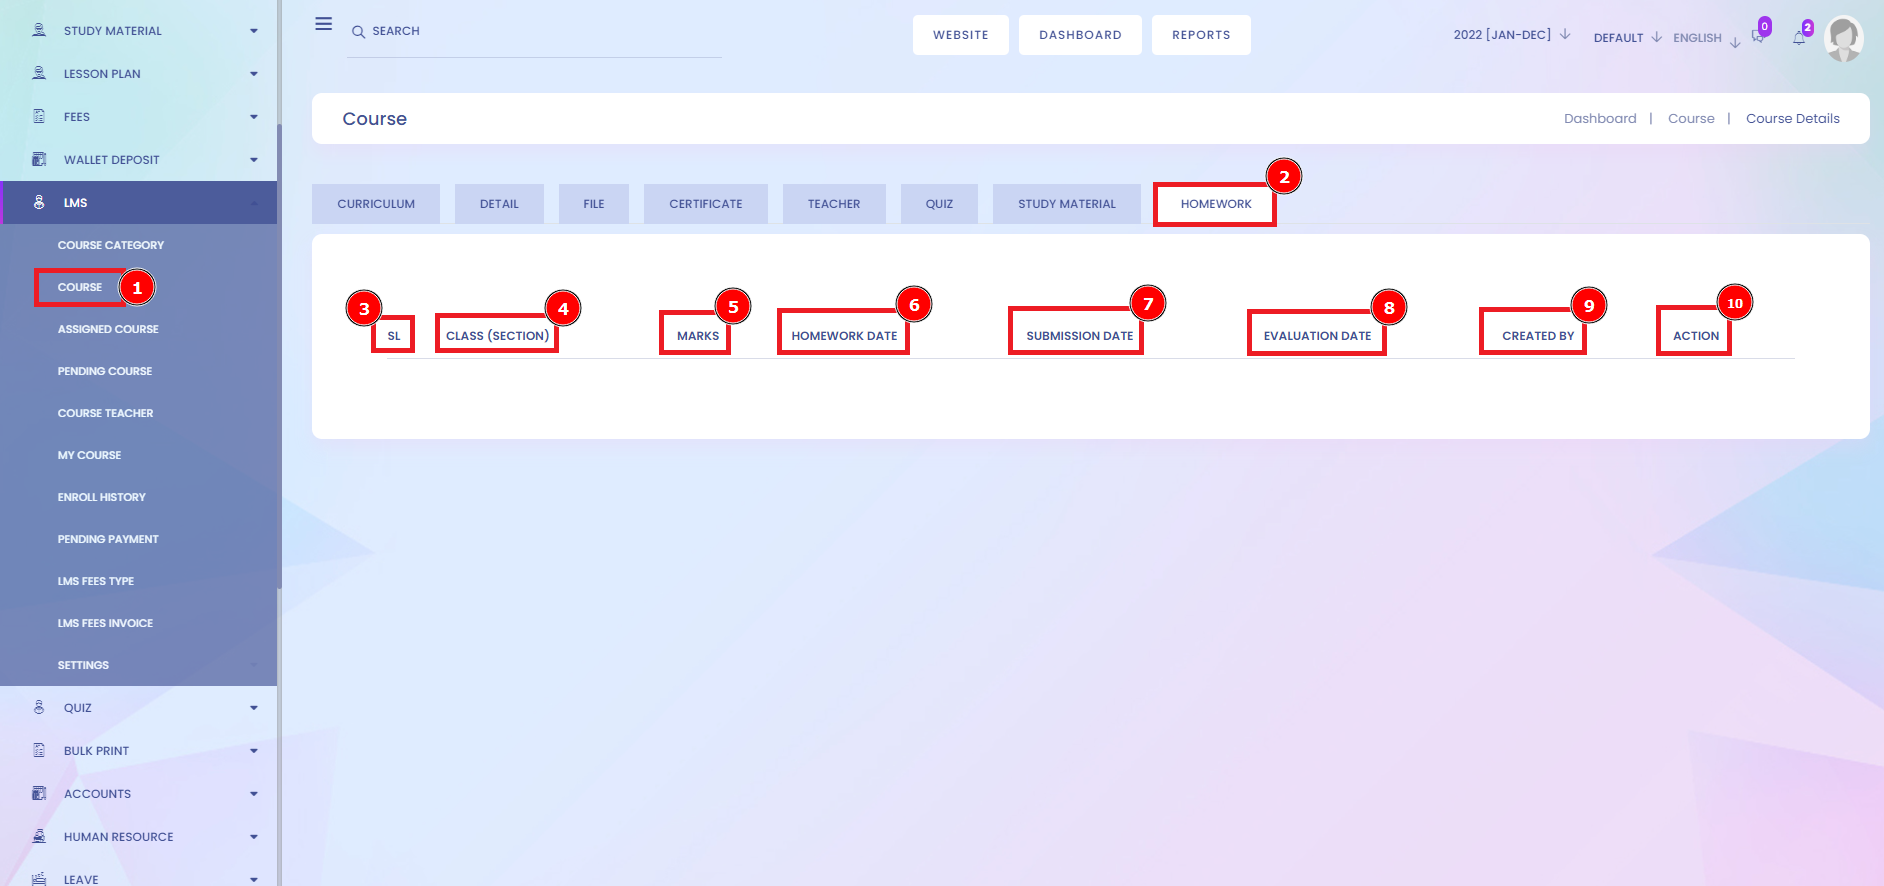
Homework:
Online homework is a rapidly growing educational use of the Internet. These homework assignments are submitted electronically and computer graded. This practice is growing in all academic areas, including business, math, chemistry, health, and other sciences. Students can carry their work with them wherever they go, whether at home or elsewhere, without having to turn in their assignments physically. Feedback in Real-Time Online homework assignments allows students to receive immediate feedback and, in some cases, grades on their work.
Short Direction: {Infix Edu> Dashboard> LMS> Course> Select> Assign course> Select> Add lesson> Homework> SL> Class (Section)> Marks> Homework Date> Submission Date> Evaluation Date> Created By> Action.}
If you want to assign homework for your student, it has already been decorated with the systematical approach, like going to the Course[1], you will see all course list, select assign course to go to the again select option to click on the added lesson, you will ultimately find the Homework[2] section. If you want to add any homework, then it will show the SL[3], Class section[4], marks[5], homework date[6], Submission date[7], and Evaluation date[8], created by the name[9] of homework which already assigns it. It is essential to modify the action[10] button to rewrite homework or delete it.
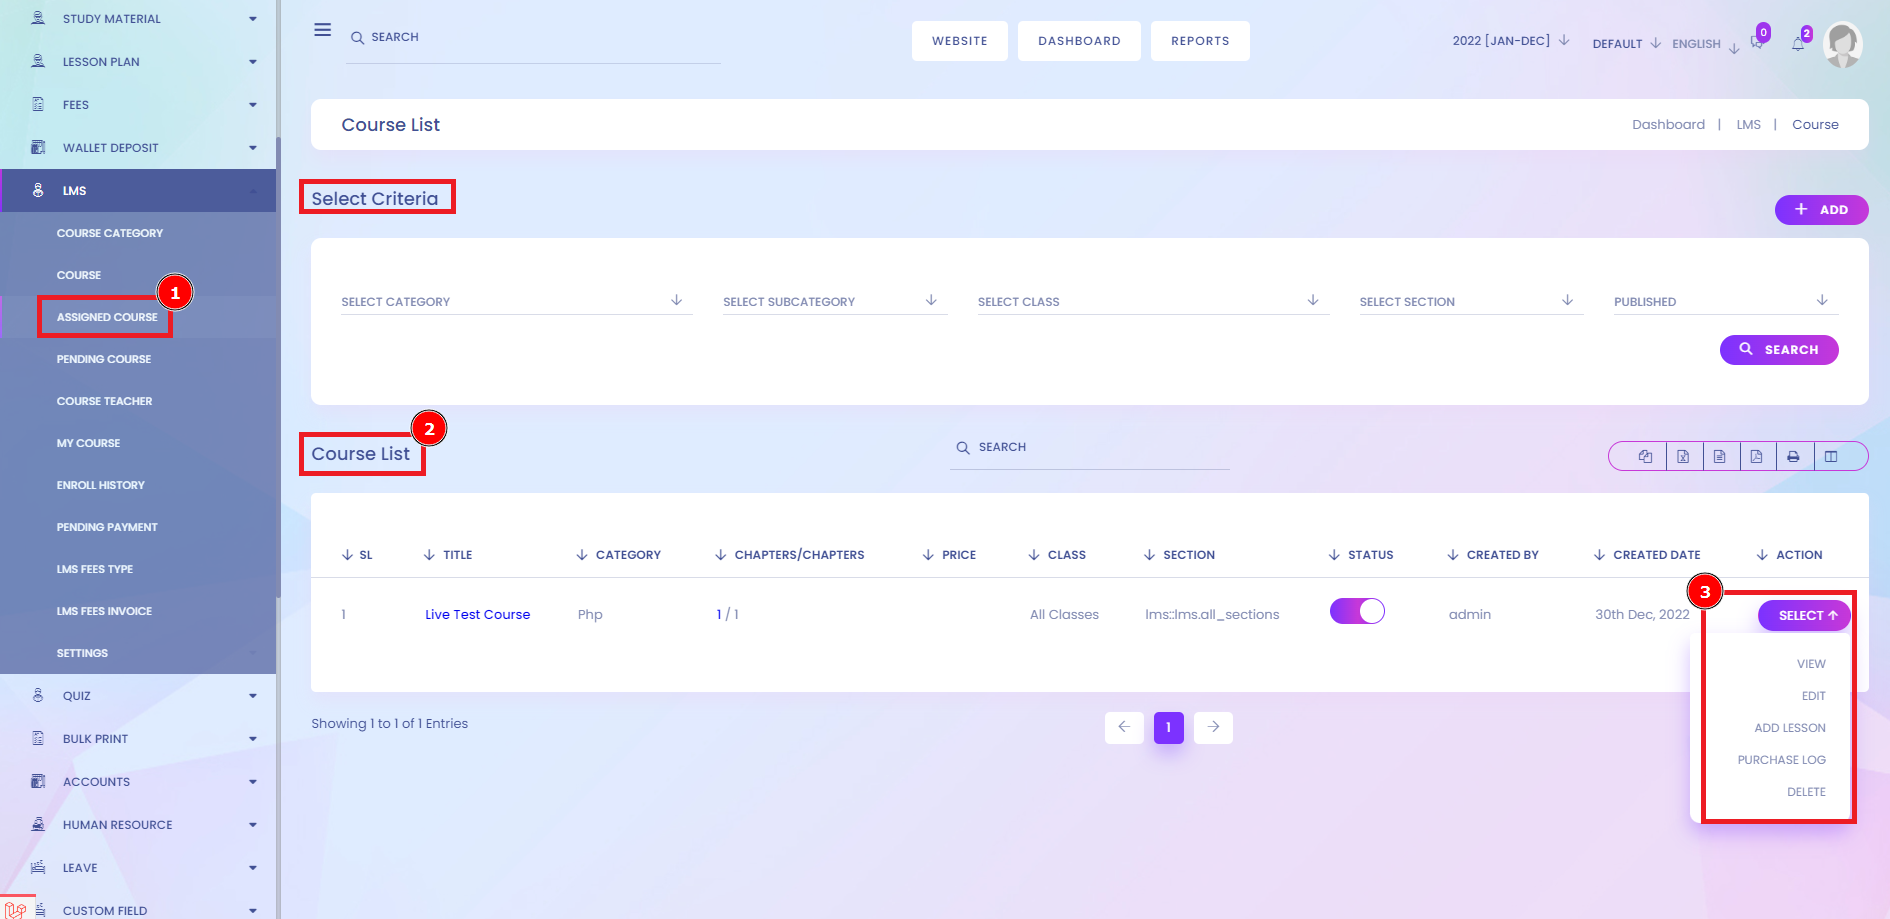
Assigned Course:
LMS is the total package of software that enables companies and educational institutions to create and manage lessons, courses, quizzes, and other training materials. There are several ways to assign courses to learners depending on the number of courses you need to assign and the number of learners to whom you need to assign courses. An assigned course is a foundation unit of learning that provides fundamental principles or knowledge for a technical speciality to assign them specifically.
Short Direction: {Infix Edu> Dashboard> LMS> Assigned Course> Course List> Select> View> Edit> Add lesson> Purchase Log> Delete.}
If you want to assign the course, then click on the Assigned course[1] to find the course list[2] & see the select[3] option below some additional options to view over, rewrite, add a lesson, purchase log or you can delete any of the assigned course lists.
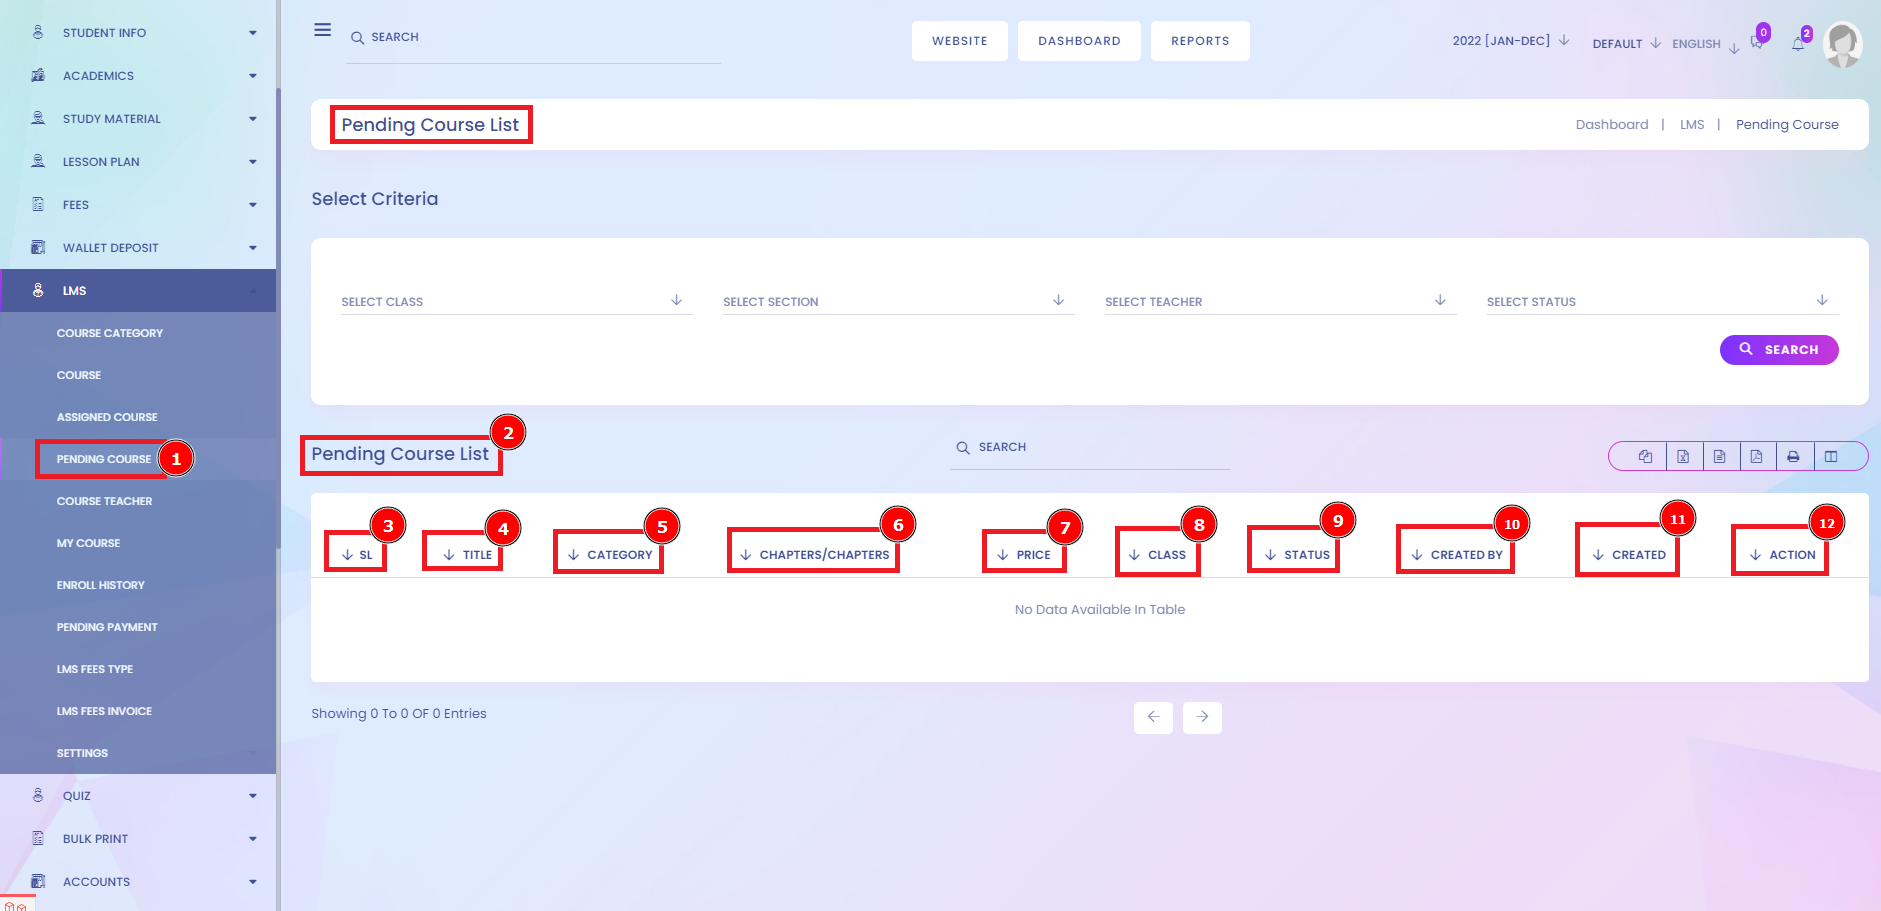
Pending Course:
Log into your Learning Management System with your Organization / Administrator account and click on the Users tab to select the users you wish to enroll in the preferred course. You will then see a list of all the users in your academy. If course requests are enabled, then requests are listed on the Courses pending approval page. This page may be accessed via the "Courses pending approval" button on the All pending courses page. There will show all pending courses listed under approval; then it will clarify the serial number to all required criteria.
Short Direction: {Infix Edu> Dashboard> LMS> Pending Course> Pending Course list> SL> Title> Category> Chapters> Price> Class> Status> Create by> Created> Action.}
This pendingcourse[1] procedure clarifies your unpaid courses organized to the pending course list[2]. The sequence of the serial number[3] decorates all courses, showing you the Title[4], Category[5], Chapters[6], the prices[7]. This list will indicate the total class[8], about the pending course status[9]. The courses listed manifest the created by[10] the date & created name[11] & Action[12] option.
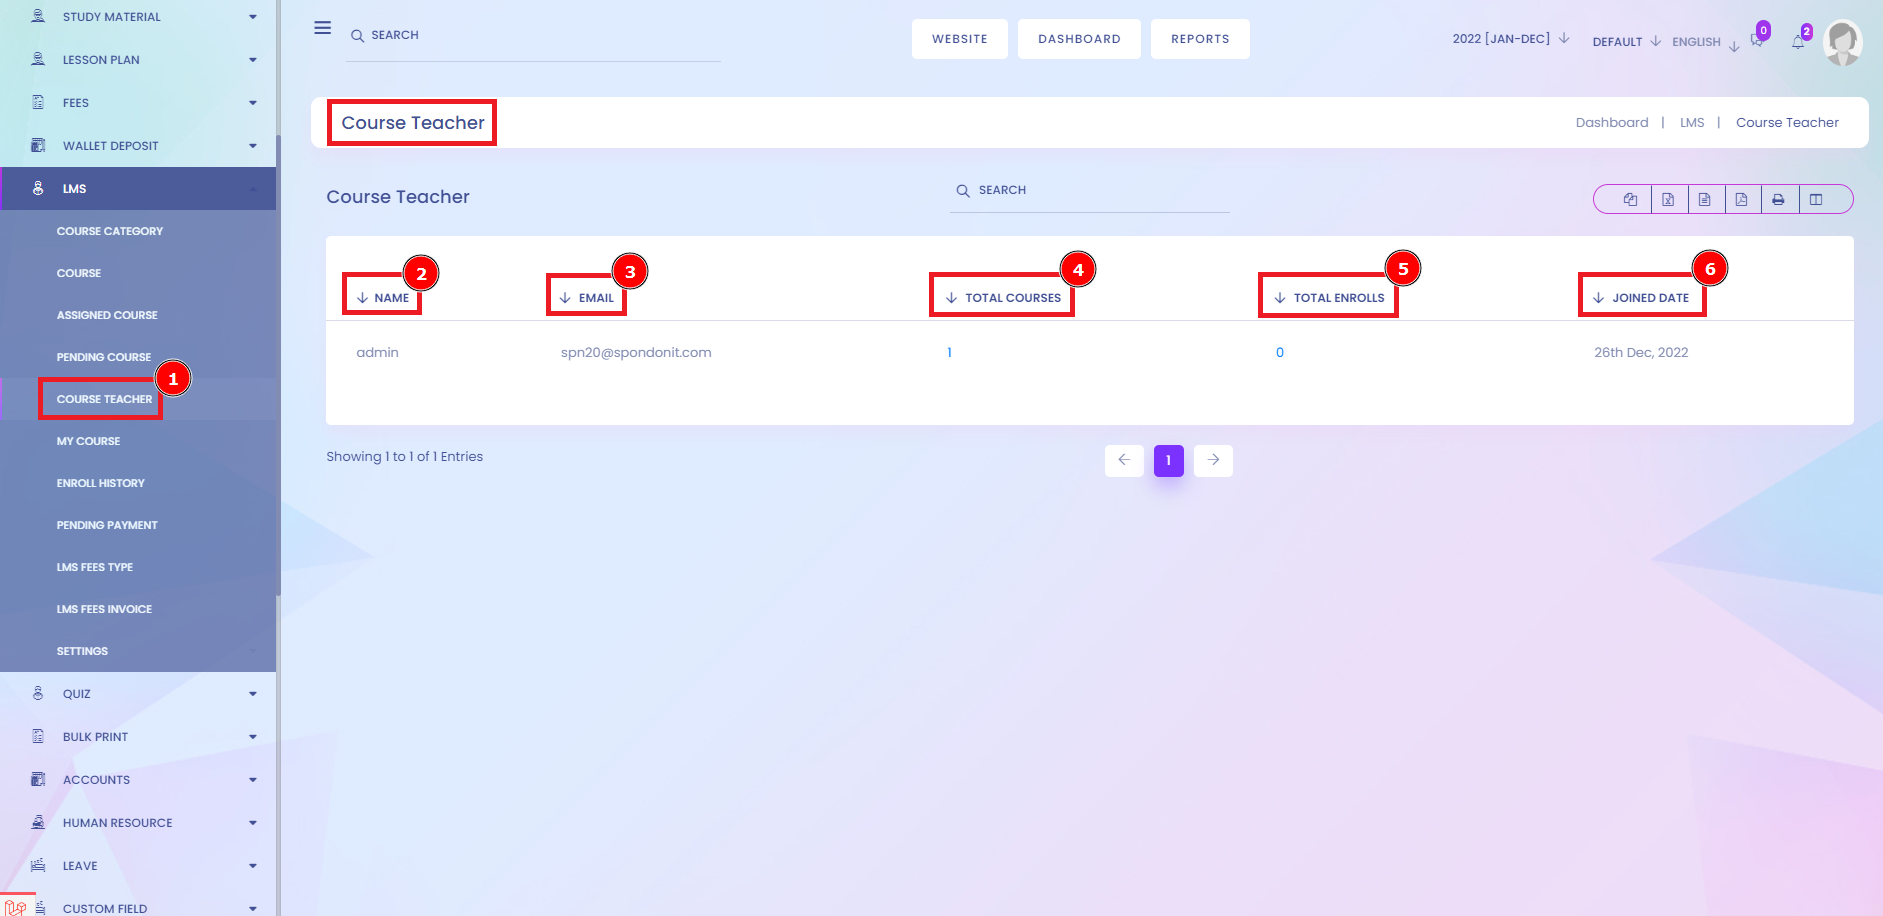
Course Teacher:
LMS plays a crucial role for teachers for the administration, tracking student records, presenting documents, reporting, and delivering course materials to the students. Everyone learns differently, so a good LMS should include options to configure accessibility, display settings, and evidence methods to suit a wide range of courses, learning styles, and accessibility needs. Look for an LMS that can be used for training, learning, and assessment together. To add teachers to your course, go to the Courses menu. This brings you to the courses list, where you can select the desired course for editing or creating a new one. After choosing the course, a new window will open. You can add a teacher to your course from there. The teacher training courses are available in different modes. The online mode for teacher training courses has become an effective and popular choice lately. The other modes are equally popular and effective, but the online mode offers immense benefits for becoming a preferable choice.
Short Direction: {Infix Edu> Dashboard> LMS> Crouse Teacher> Name> Email> Total Course> Joined Date.}
If you want to assign a new course teacher go to the LMS edu dashboard and find the Course Teacher[1] option, there are some specifications for the name[2] of the teacher & their Email[3] Address. This list will clarify your total course[4], total enrolls[5], and joined date[6]. An instructor is a teacher. One can be an instructor of just about anything. Still, it usually applies to teaching hands-on skills, like a water-skiing instructor or the instructor of the knitting class held at the community center.
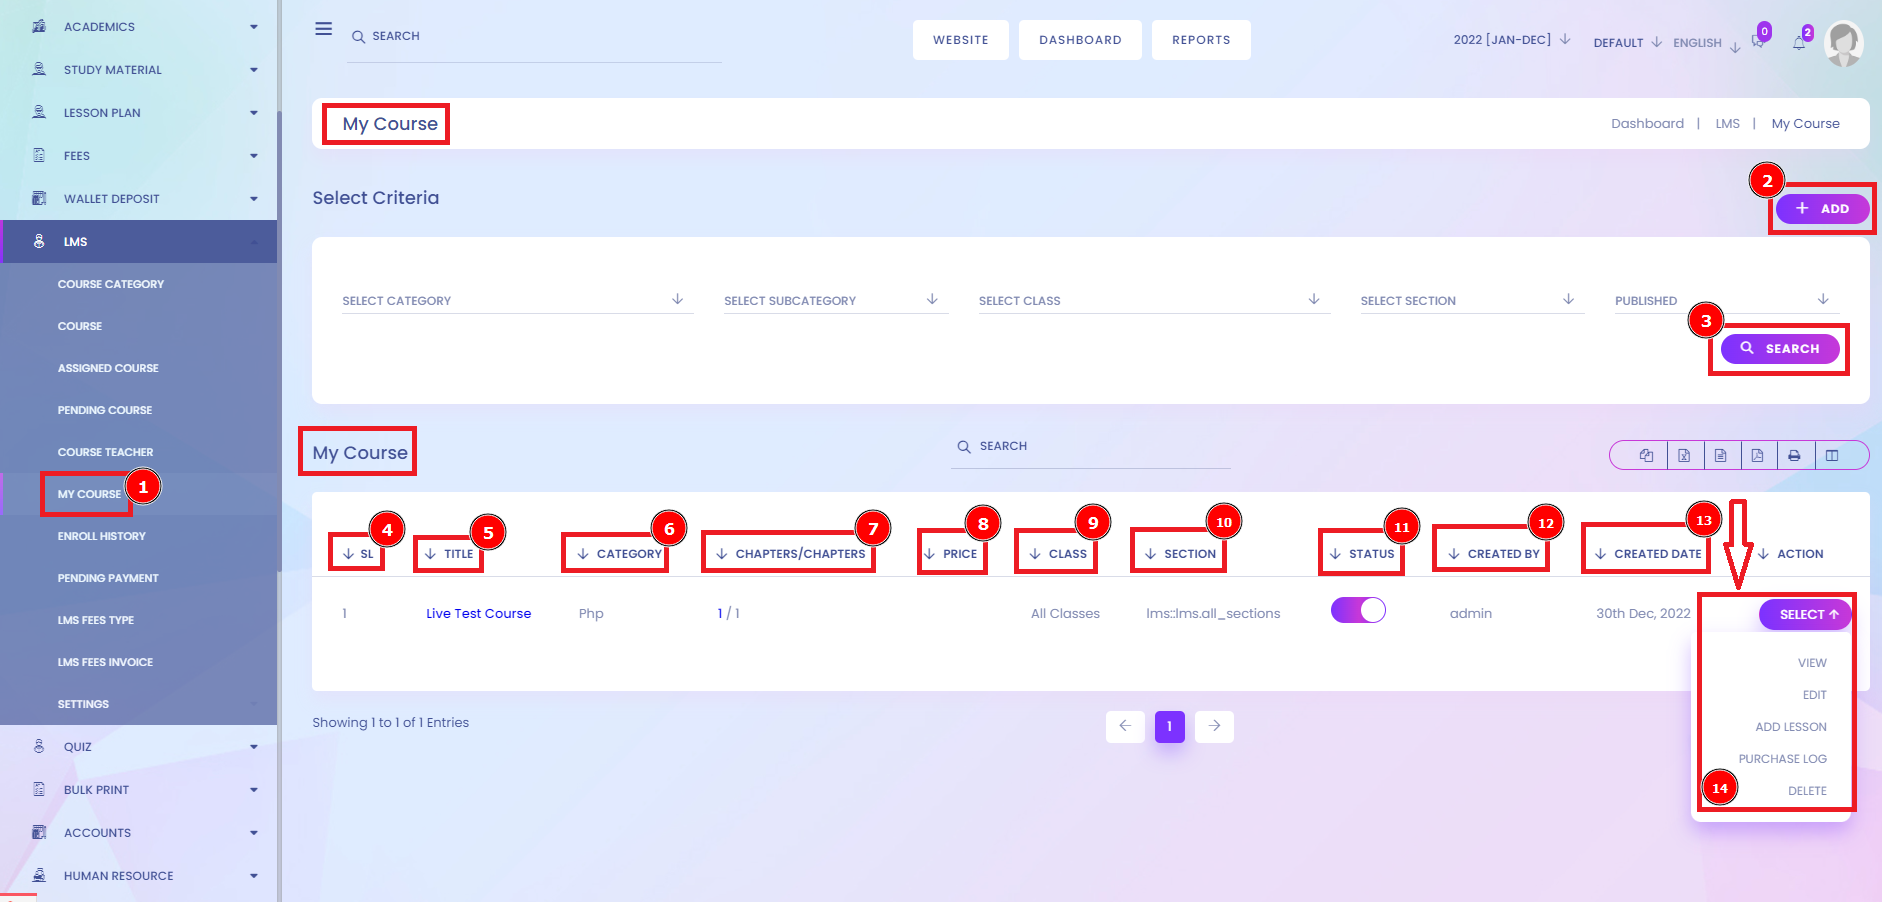
My Course:
An online course is a learning program organized according to a syllabus (usually in units) and takes place in a virtual space. Online courses can be informal and focused on one skill or as formal as leading to certification. Online education enables you to study or teach from anywhere in the world. This means there's no need to commute from one place to another or follow a rigid schedule. On top of that, not only do you save time, but you also save money, which can be spent on other priorities. Are Online Courses Profitable? Yes, they are. You can make money selling online courses if you're methodical and make a serious effort. Online courses offer one of the best business models to digital entrepreneurs.
Short Direction: {Infix Edu> Dashboard> LMS> My Course> SL> Title> Category> Chapters> Price> Class> Section> Status> Created By> Created Date> Select> View> Edit> Add Lesson> Purchase Log> Delete.}
If you want to add a new lesson or check out your courses list, go to the LMS function to click on the My course[1] section. You will see the list of all courses. Either you can check out all your course's serial numbers [2], Title[2], Category[3], Chapters[4], Price[5], Class[6], Section[7], Status[8]. Also, you can see the course creator's name[9] & published Date[10]. Although you can view the course with short information, rewritable, add lesson system. The course payment method clarifies the way to purchase logs & Deleted option.
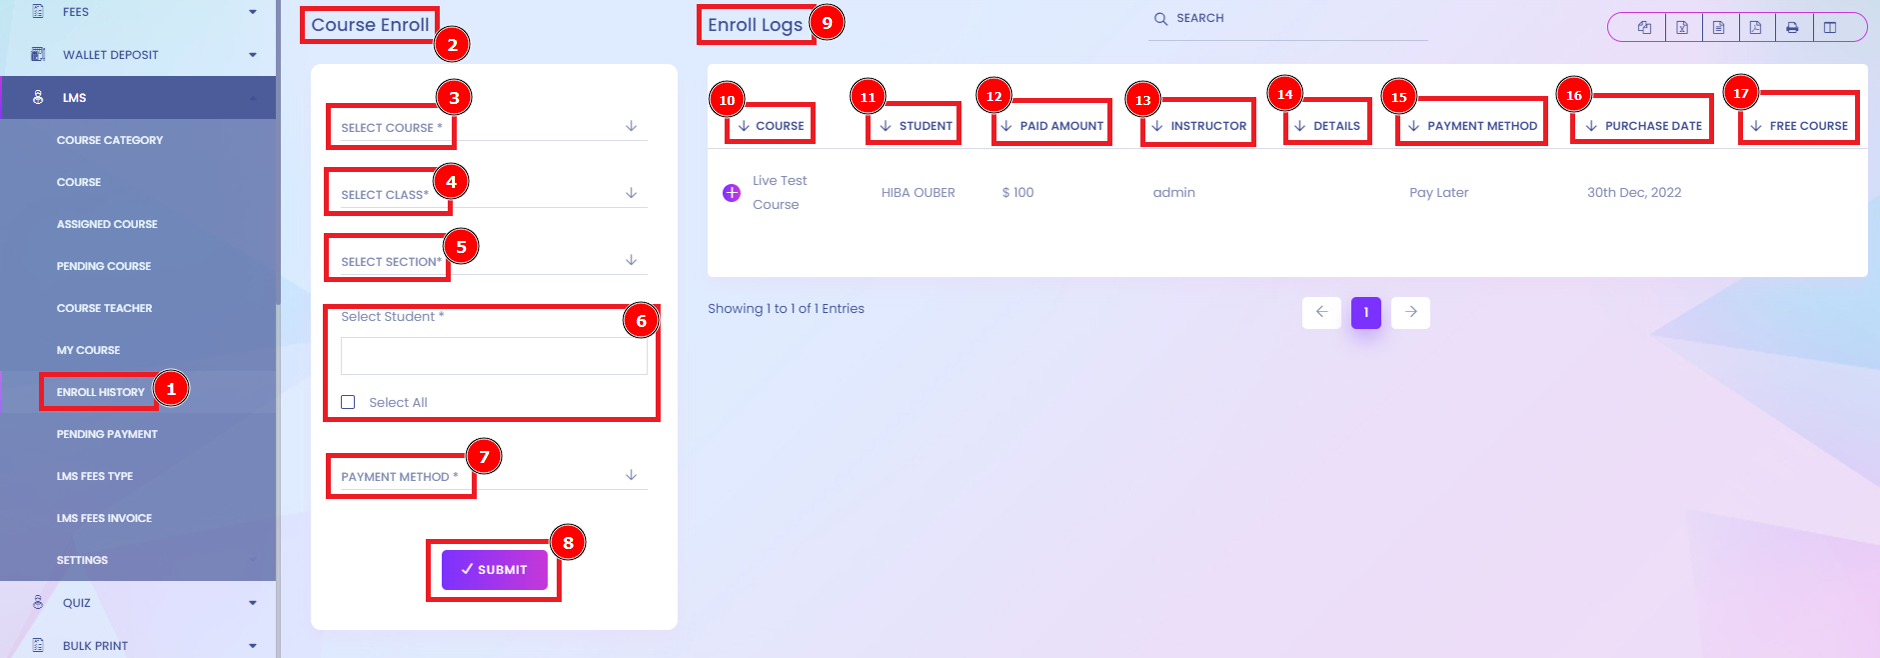
Enroll History:
The process of adding students to courses is called Enrolment. This is different from adding users to the site, known as Authentication. There are various methods for enrolling students into courses once logged in to LMS enrollment history. Online enrollment includes any system designed to collect information on students before they have enrolled in a facility.
Short Direction: {Infix Edu> Dashboard> LMS> Enroll History> Course Enroll> Select Course> Select Class> Select Section> Select Student> Select Student All> Payment Method> Submit> Enroll Logos> Course> Student> Paid Amount> Instructor> Details> Payment Method> Purchase Date> Free Course.}
If you want to enroll in the course, you must follow the picture instructions. Go to the LMS dashboard to find the Enroll History[1] & you will see the new interface to fill all the course requirements. Course Enroll[2] below the select course [3], select class[4], select section[5], and select student[6] to find any student to add your course module. Also, you can add all your student at the same time. There are several payment methods[7] to pay for the course Cash, Cheque, Bank, Free Course, Or Pay later. The right side is here about the enroll logos[9] to organize the list of Courses[10], Student Name[11], Paid Amount[12], Instructor[13], Details[14], Payment Method[15], Purchase Date[16] & the last one is showing the Free Course status.
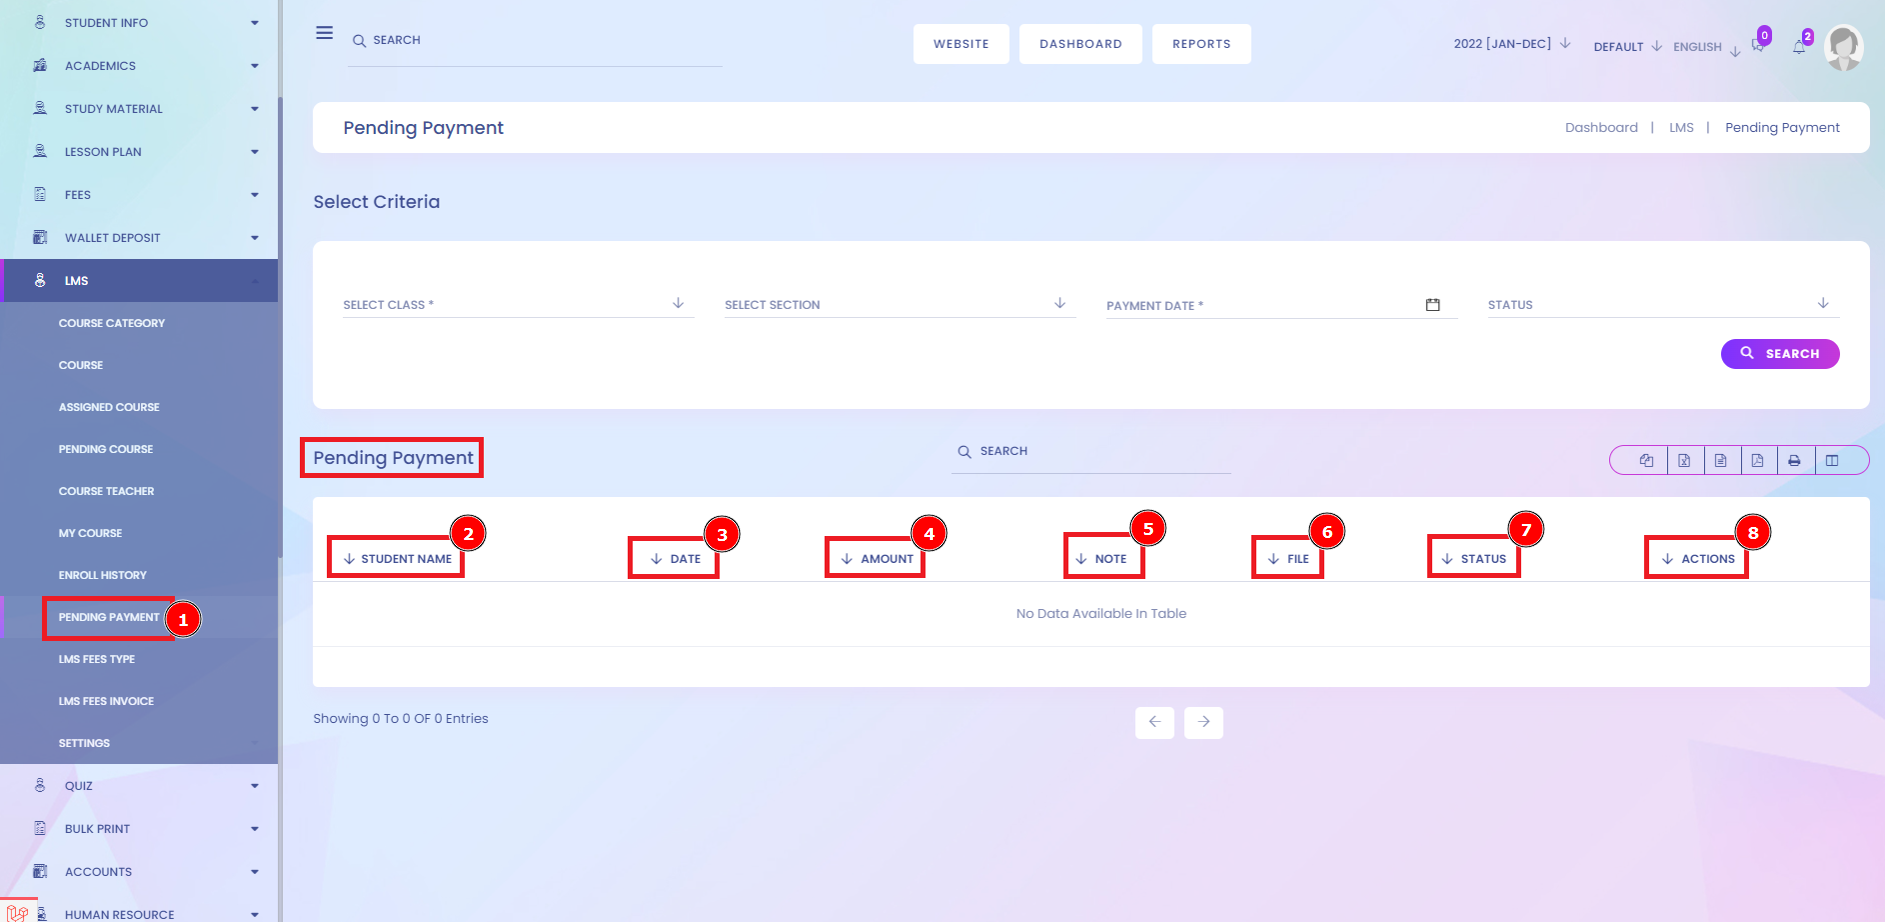
Pending Payment:
Pending transactions are transactions that have yet to be fully processed. Usually, a pending charge will show on your account until the transaction is processed and the funds are transferred to the merchant. This could take up to days but may stretch longer depending on the merchant and the type of transaction. You can ask them to contact your card issuer and reverse the transaction, depending on the situation. After they do, the pending transaction should disappear from your account, and the funds or credit will return. Payment is marked as “pending,” meaning the payment process still needs to be completed. In most cases, this simply means you must wait for this to happen.
Short Direction: {Infix Edu> Dashboard> LMS> Pending Payment> Student Name> Date> Amount> Note> File> Status> Actions.}
If the payment method is pending, you will check all pending payment[1] lists to clarify your understanding of it at the student Name[2], Date[3], Amount[4], Note[5], File[6], Status[7] & the last one is Action[8] to the pending payment procedure. There are several factors that affect how long a pending charge will appear on the Course system.
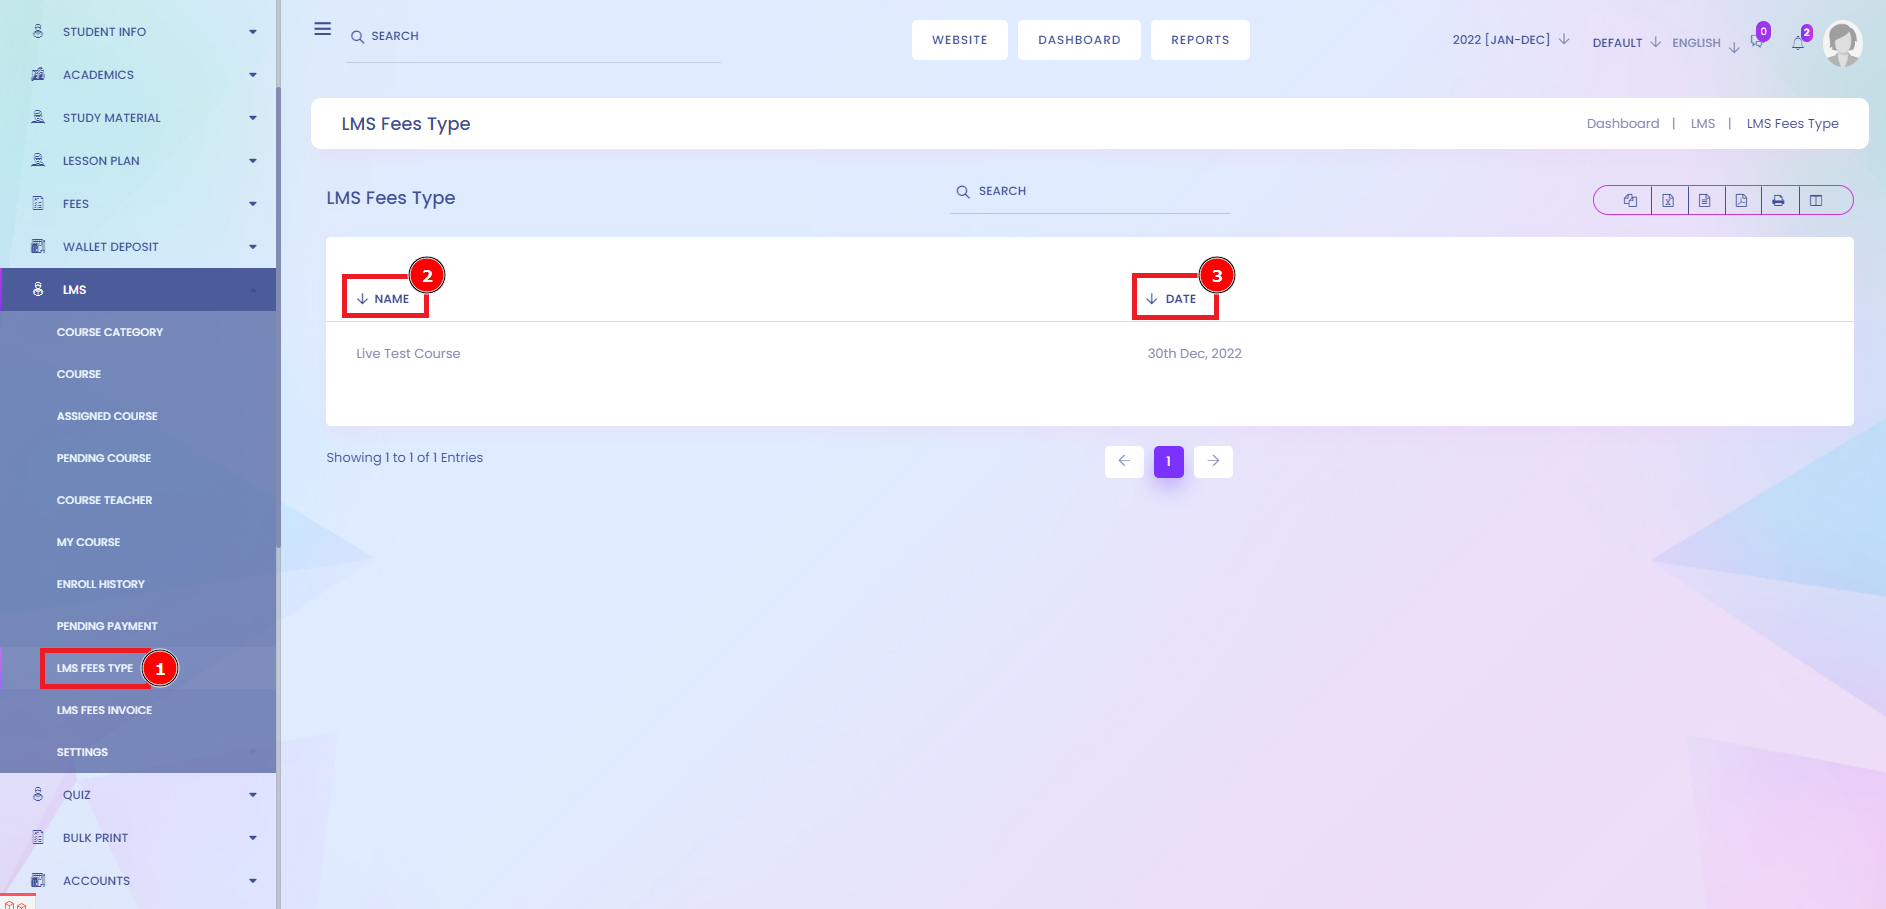
LMS Fee Type:
Payment is paying per use as they can range from less than $1 up to $10 per learner per course. A flat fee per learner that cost around $5 per month or even less if there are many company enrollees or a License Fee, a one-time fee to access the LMS for a set period of time per month or a whole year.
Short Direction: {Infix Edu> Dashboard> LMS> LMS Fees Type> Name> Date.}
There is the system setting to define LMS fees type[1] to understand who is paying the name[2] & Date[3] on the payment history.
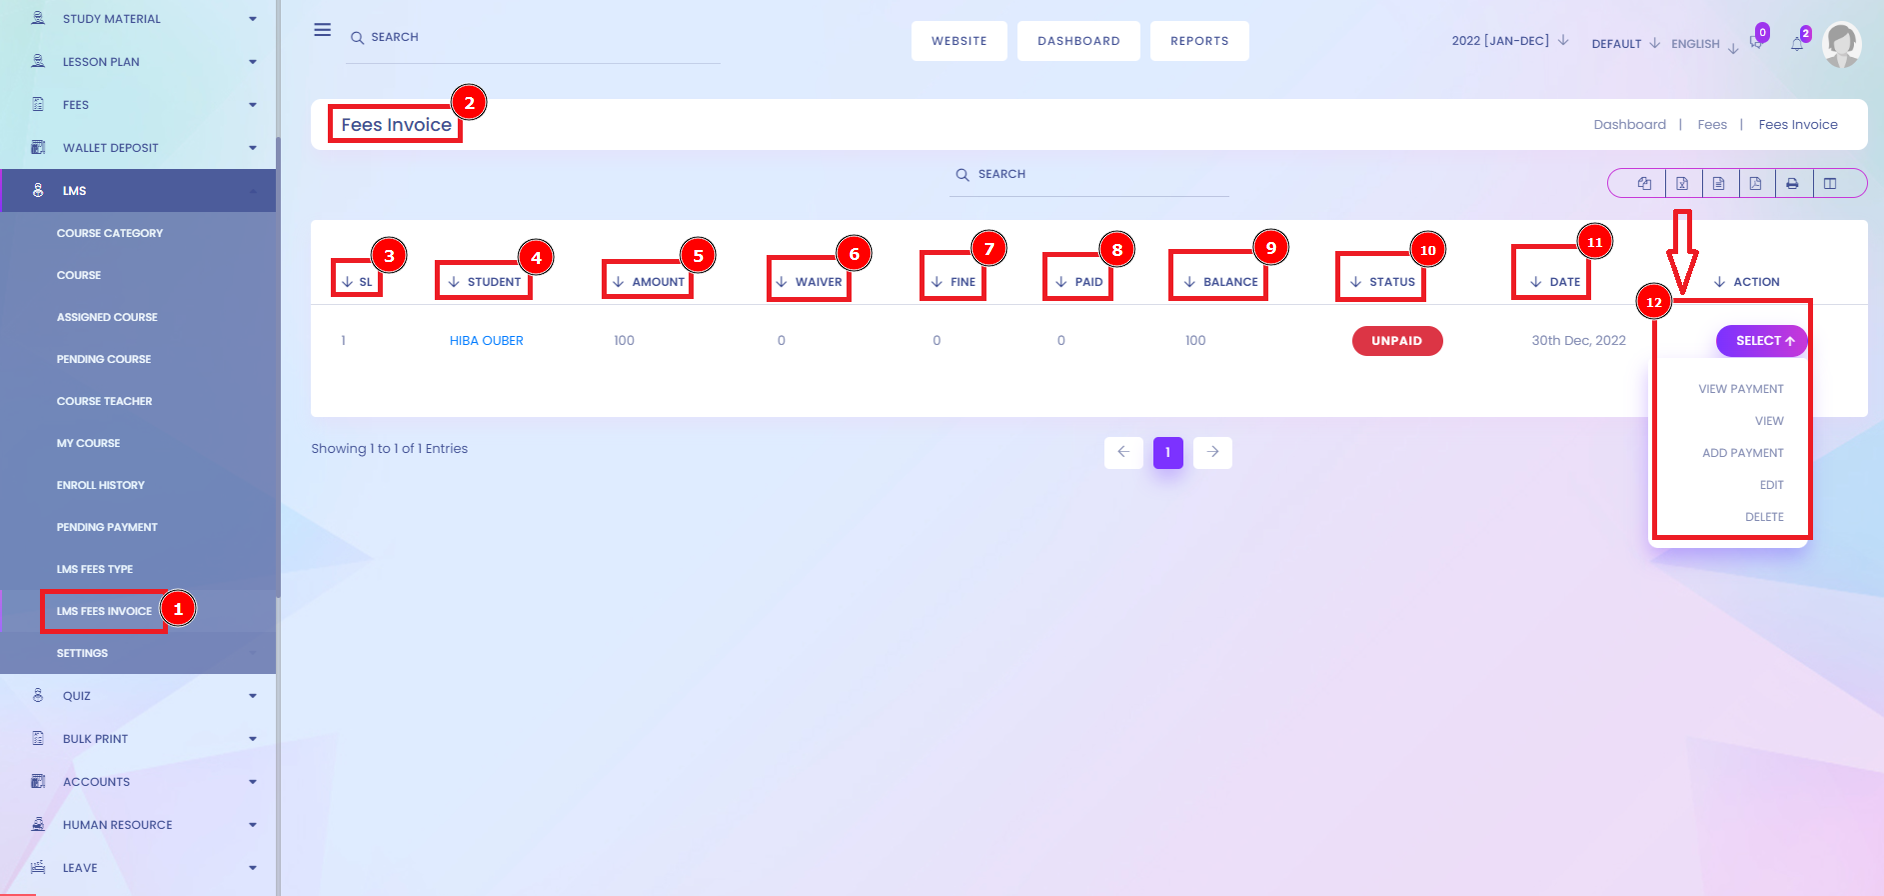
LMS Fees Invoice:
A student's fee invoice will show all tuition and fee charges, payments, and deferments associated with the term and courses in which the student is currently enrolled. The fee invoice will not show non-course-related fees. An invoice is an itemized commercial document that records the products or services delivered to the customer, the total amount due, and the preferred payment method. The seller can send either paper or electronic invoices to the customer.
Short Direction: {Infix Edu> Dashboard> LMS Fees Invoice> Fees Invoice> SL> Student> Amount> Waiver> Fine> Paid> Balance> Status> Date> Select> View Payment> View> Add Payment> Edit> Delete.}
If you want to check the LMS fees, Invoice[1], go to the LMS dashboard to understand the list of all student statuses. All functions are charted in a way like fees invoice[2], serial number as a short form of SL[3], it will show all names of students [4], the course amount[5], or there is any waiver[6] it also shows that if there is any fine[7] that it will be clarifying of that or the course had to pay [8] or not, show you the Balance[9] condition, about course status[10] is unpaid or paid. The course is to simplify the accurate date[11], and the last function select[12] state on the View payment, View, Add Payment, Edit & Delete options.
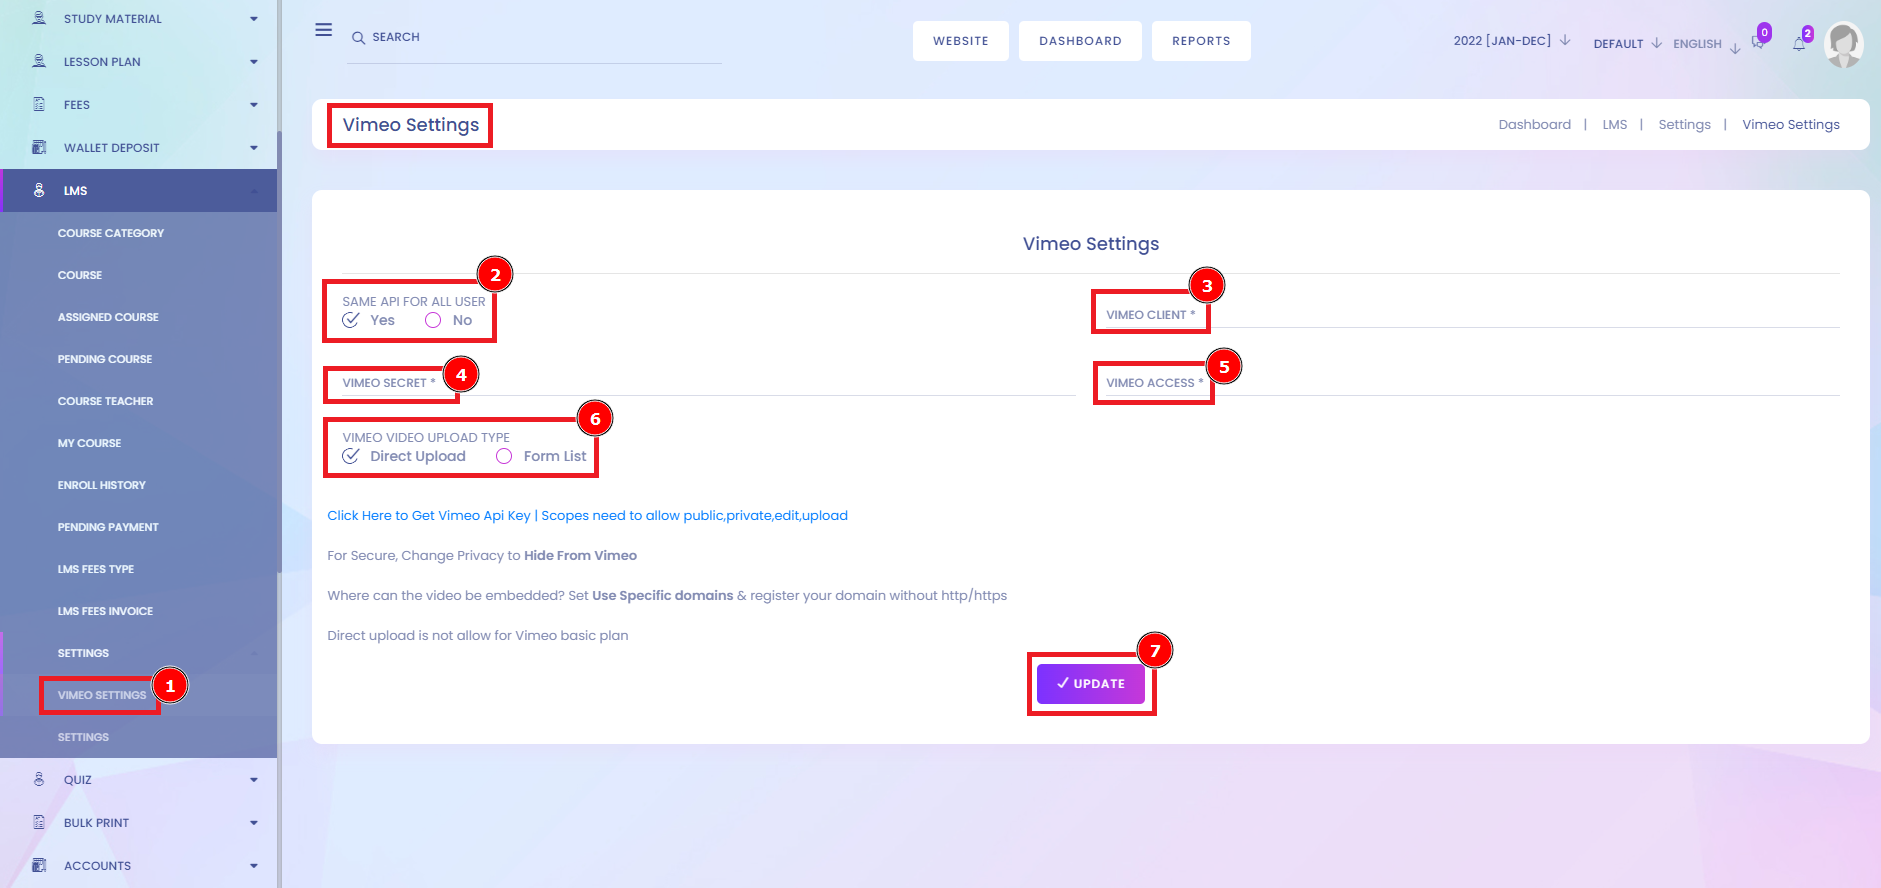
Vimeo Settings:
To the right of the player, you'll find the video's Privacy settings, Player settings, a link to the review page (Starter, Pro, and higher; Free, Basic, and Plus will see Comments), a link to the video's Analytics panel, Closed captions, Interactivity, and Settings that takes you to additional video settings. On the Video Settings page, click the Embed tab to see the Player Preferences. You can customize the look of your embedded video with Player Preferences settings. Click the checkbox next to the option you wish to enable or uncheck the ones you wish to disable, such as the Vimeo logo.
Short Direction: {Infix Edu> Dashboard> LMS> Vimeo Setting> Same API for all user> Vimeo Client> Vimeo Secret> Vimeo Access> Vimeo Video upload type> Update.}
You communicate to the Vimeo API through HTTP messages called requests. Especially if you're coming to us new, you might want to familiarize yourself with three essential components of an API request — endpoints, methods, and parameters — so that we're speaking the same language going forward. Your summary (or refresher course) awaits. This Vimeo segment helps you video upload or shearing all the course-related criteria as like go to the LMS setting to Vimeo setting[1], selecting the same API for all users [2] is yes or no; the secure platform lets you choose exactly who can access your video before its even finished uploading. Your Vimeo Client[3] & Vimeo Secret[4] can only share your video with specific individuals, lock it with a password, or hide it from everyone else. Vimeo Access[5] is a video-sharing that allows members to view, upload, and share videos. Members can choose between Vimeo's free service and several paid services aimed at helping organizations control how their videos appear on the Internet. Vimeo Video upload type[6] manually operates the direct uploaded or from list option. If all your setting is ok, click on the Update[7] option.
LMS Setting:
A learning management system (LMS) is a software application or web-based technology used to plan, implement and assess a specific learning process. This setting is important for organizing the total system management on the LMS. This online location helps you manage the administration, tracking, reporting, and delivery of courses, lessons, and tests. An LMS allows you to easily incorporate quizzes, situations, scenarios, and other interactive elements into your training. Gamification, messaging, and forums also contribute to a lively learning ecosystem. Coupled with a strong, this makes training more appealing and effective for your learners.
Short Direction: {Infix Edu> Dashboard> LMS> Settings> Commission Settings> Update> Review & QA Setting> Update> Pay Later Setting> Update> Host Setting> Update> Others Settings> Update.}
This LMS setting[1] is highly recommended for the course functionalized by the way to Commission settings[2] for including the Admin Commission percentage & Teacher. If you hit the commission, the update button. Review & QA Setting[4] modified the enable & disable option to update[5]. Pay later setting[6] build that any student can buy their course module at late payment & select the pay later days to update[7] it. Host setting[8] approached the plug-in tool: self, youtube, URL, Vimeo, Iframe, Image, etc. That can be unmarked & update[9]. Other settings[10] are included by the show instructor enrolled. Course & Video seek bar shows the current time of playing audio/video, and users can change the playing position by dragging or clicking. Finally, click on the update option to confirm the LMS setting is done manually.


