InfixLMS student setting enrolling is the process of registering for the courses students intend to study for a particular section. The enrollment system allows you to identify which applicants are the best fit for your institution by comparing in-system parameters. This module is designed for the return or refund option to the course area even though you can secretly login on to any of the student panels. Student panel registration field for customization by the setting section of Input Field Showing in registration, required field & editable field.
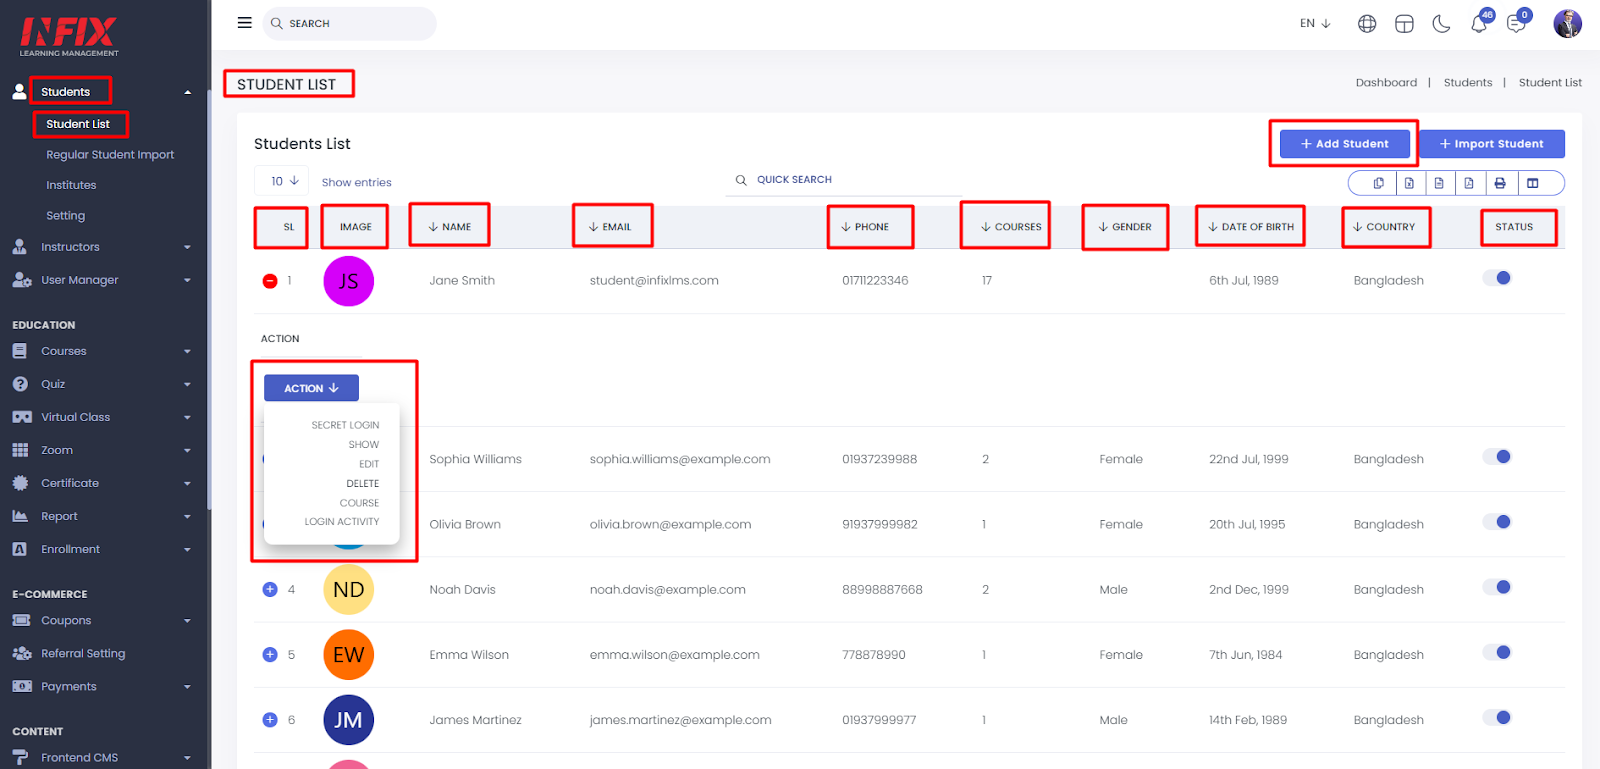
Student List:
In this option, you will be able to see the list of all students, and you can also add students. However, you will also be able to review students' previous enrolled course history. If you want to check on the student dashboard then go to the Action option to find the secret login option.
Short Direction: {InfixLMS> Dashboard> Student List> Add Student> SL> Image> Name> Email> Phone> Courses> Gender> Date Of Birth> Country> Status> Action.}
If you want to check on the student list who are already bought the course purchase, student enrollment refers to the act of signing up for specific classes or co-curricular activities at that particular LMS section. The enrollment process is completed after a student is granted admission to a separate course.
1- Student List
2- Add Student
3- SL means serial number.
4- Image
5- Name
6- Email
7- Phone
8- Courses
9- Gender
10- Date Of Birth
11- Country
12- Status
13- Action for secret login, edit, delete & course.
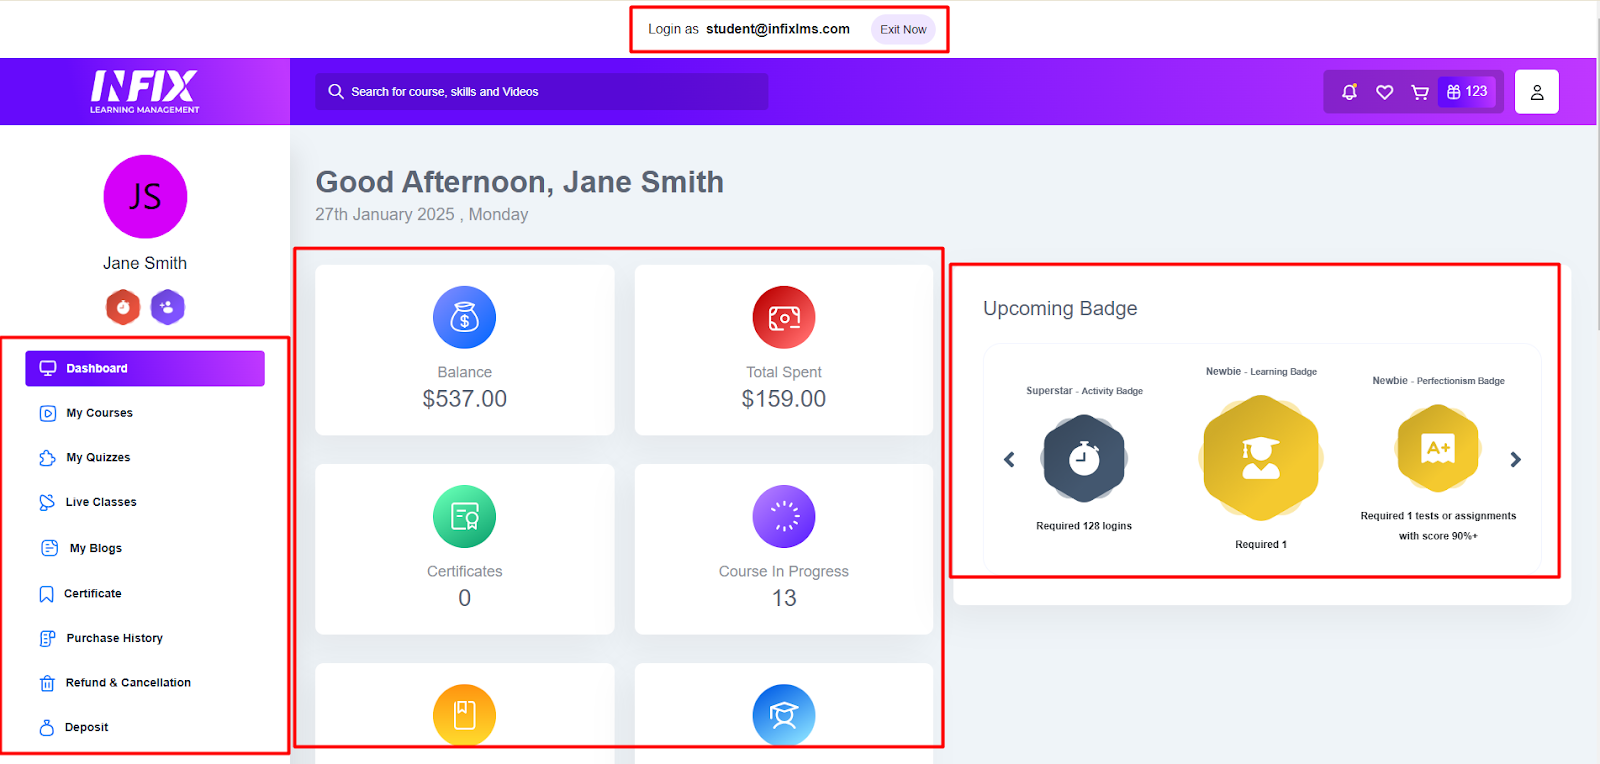
Secret Login:
The student dashboard secret login from the admin panel view is a separate site for students to access Defined Learning projects in LMS courses. Each student has a unique login. Depending on the student's preferences the login may be through a separate portal or at the main Defined Learning student site.
Short Direction: {InfixLMS> Dashboard> Login as Exit Now> Student Dashboard> Balance/ Total Spent/ Certificates/ Course In Progress/ Course Purchased/ Completed Courses> Upcoming Badge.}
This interface will show on the student dashboard when the admin wants to check on the secret log in. Also, this page assist a student to check on their all functionality as course, Quizzes, classes, notification setup etc.
1- Login or you can exit it now.
2- Student Dashboard
3- Balance/ Total Spent/ Certificates/ Course In Progress/ Course Purchased/ Completed Courses
4- Upcoming Badge including registration badge, learning badge or perfection badge etc.
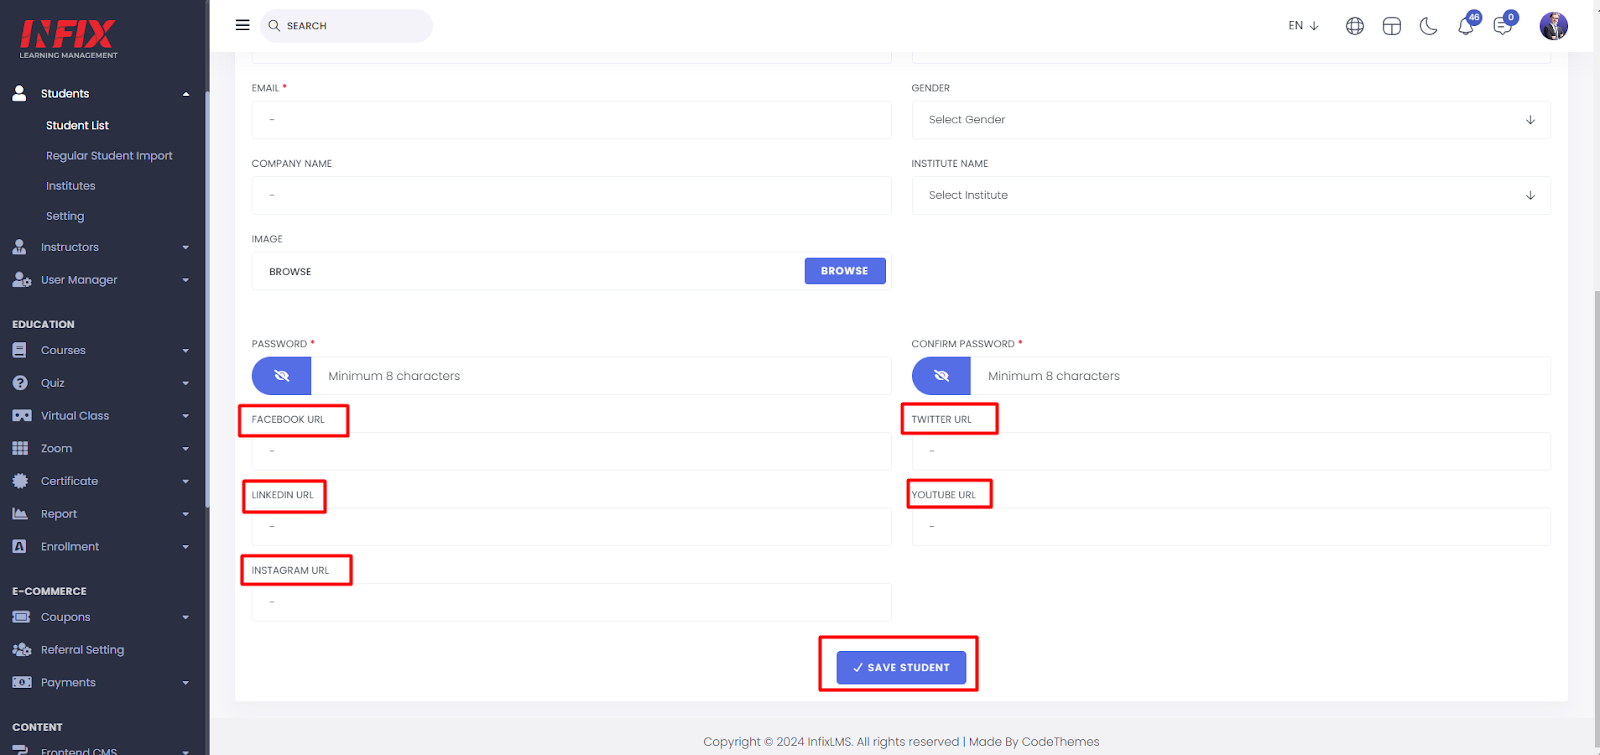
Add New Student:
After clicking on the add button, you should see a popup where you can add the Student's name, About, Date of Birth, Phone, Email, Gender, company, Student Image, and set up the student's login Password.
Short Direction: {InfixLMS> Dashboard> Student List> Add new Student> Name> About> Date Of Birth> Phone> Email> Gender> Company> Image> Password> Confirm Password> Facebook URL> Twitter URL> Linkedin URL> Youtube URL> Save Student.}
In the last section, you will be able to configure the student's Social Media accounts. you can set up Facebook, Twitter, Linkedin, and Instagram accounts. Finally, click on Save Student to save all information about that instructor.
1- Student List
2- Add new Student
3- Name
4- About
5- Date Of Birth
6- Phone
7- Email
8- Gender
9- Company
10- Image recommended size (330✖️400)
11- Password
12- Confirm the Password
13- Facebook URL
14- Twitter URL
15- Linkedin URL
16- Youtube URL
17- Save Student
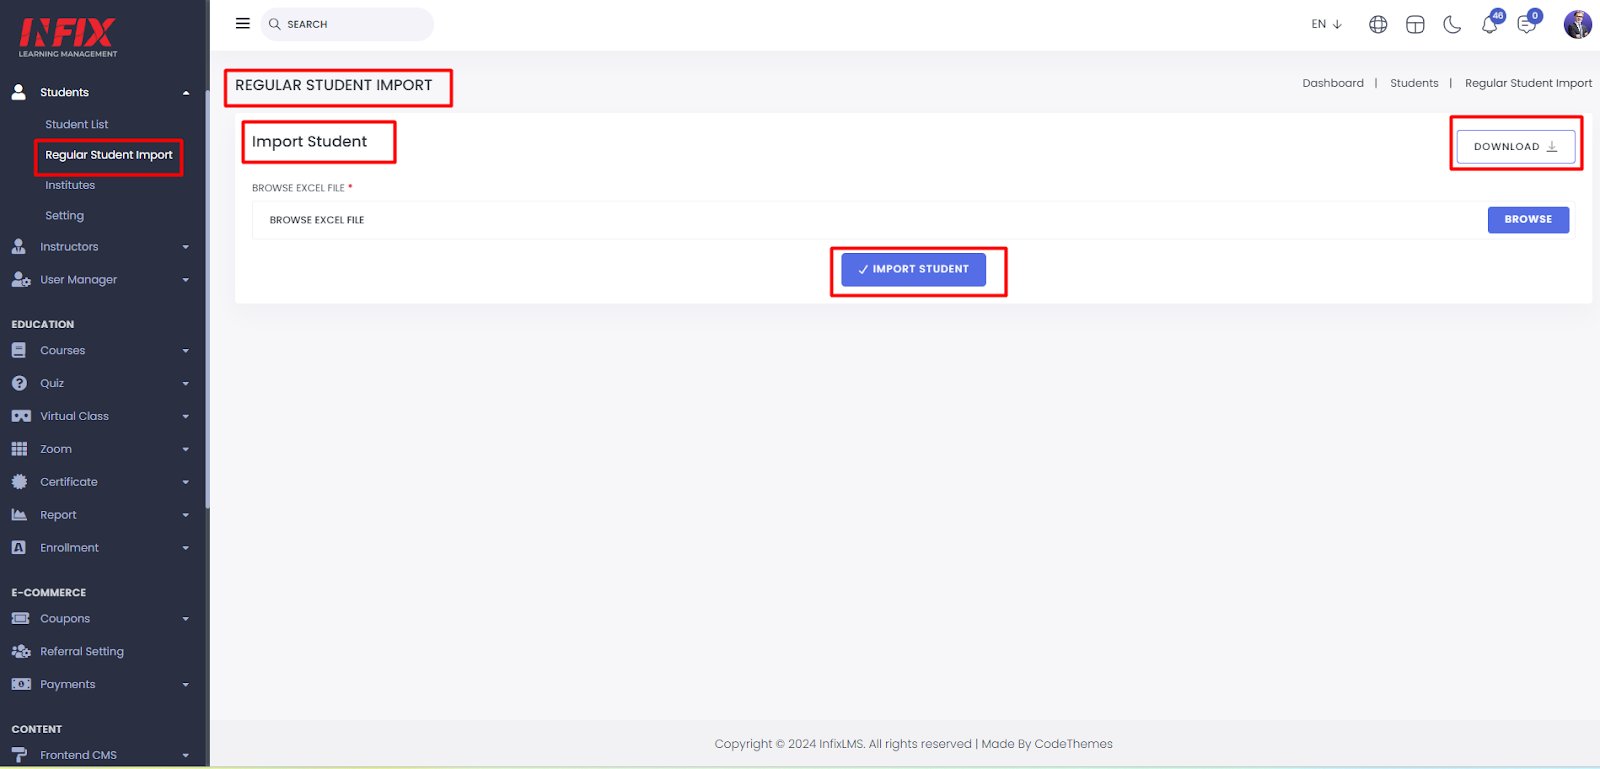
Regular Student Import:
The regular student Imports feature allows you to upload and integrate data from various Student Information Systems (SIS), complex databases, and even simple spreadsheets as comma-separated value (CSV) files. Admins can use this feature to create users, accounts, courses, enrollments, logins, and more.
Short Direction: {InfixLMS> Dashboard> Regular Student Import> Import Student> Download> Browse Excel File> Import Student.}
When uploading regular student import data with CSV files, you may import an individual CSV text file or you may compress multiple files into a single ZIP file to bulk import data. If you are using the Instructure format for importing files, the files should be in the following order: users, accounts, terms, courses, sections, enrollments, and logins.
1- Regular Student Import
2- Import Student
3- Download
4- Browse Excel File
5- Import Student.
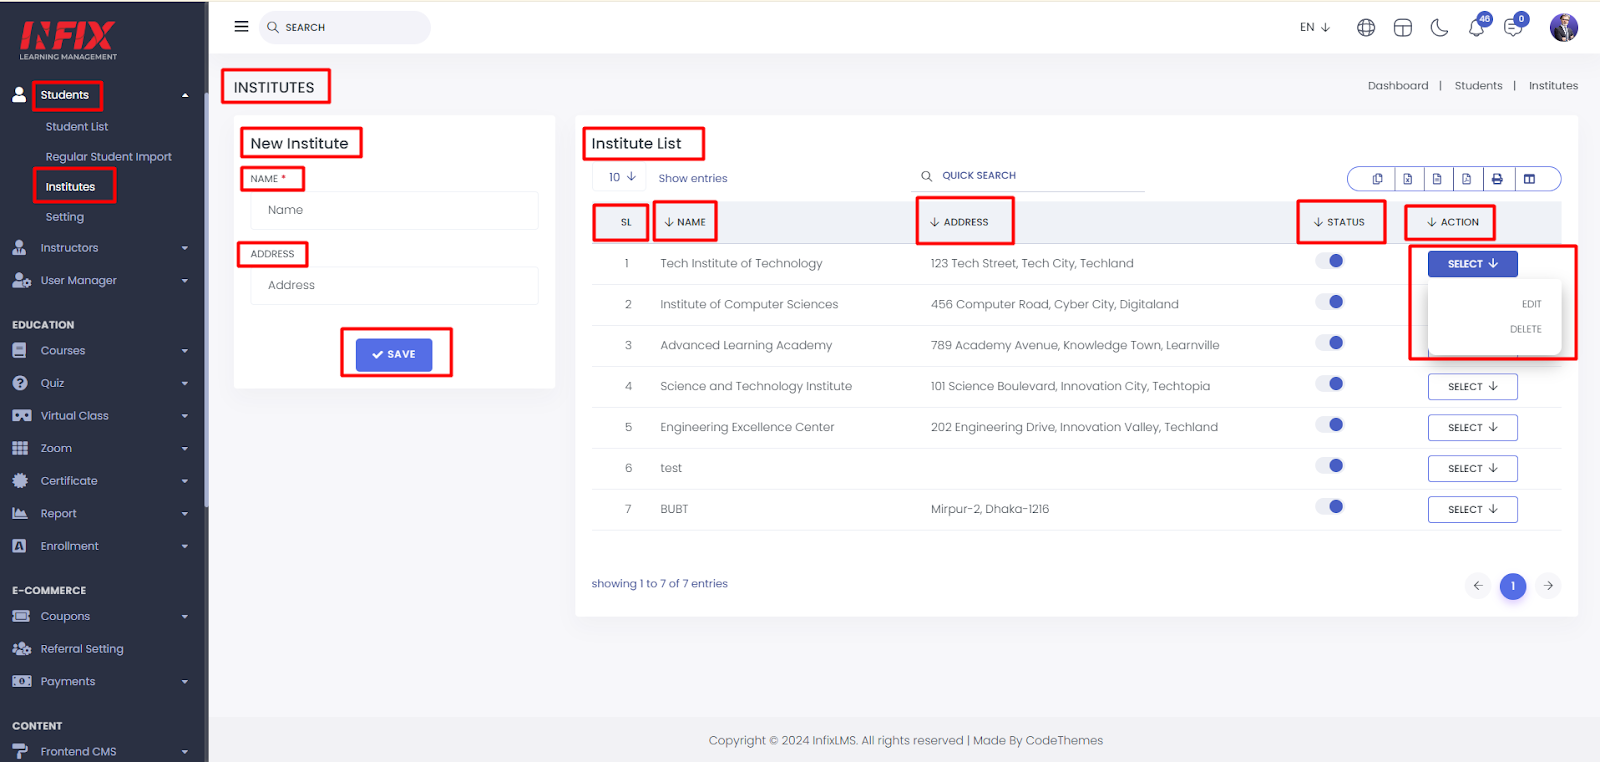
Institutes:
Here you can add new institutes. Just feel up the name and address. After that click on the save button you can create a new institute. Here you can see all the institutes list.
Short Direction: { InfixLMS> Dashboard > Institutes > SL > Name > Address > Status > Action > Edit > Delete .}
1.SL
2.Name
3.Address
4.Status
5.Action
6.Edit
7.Delete
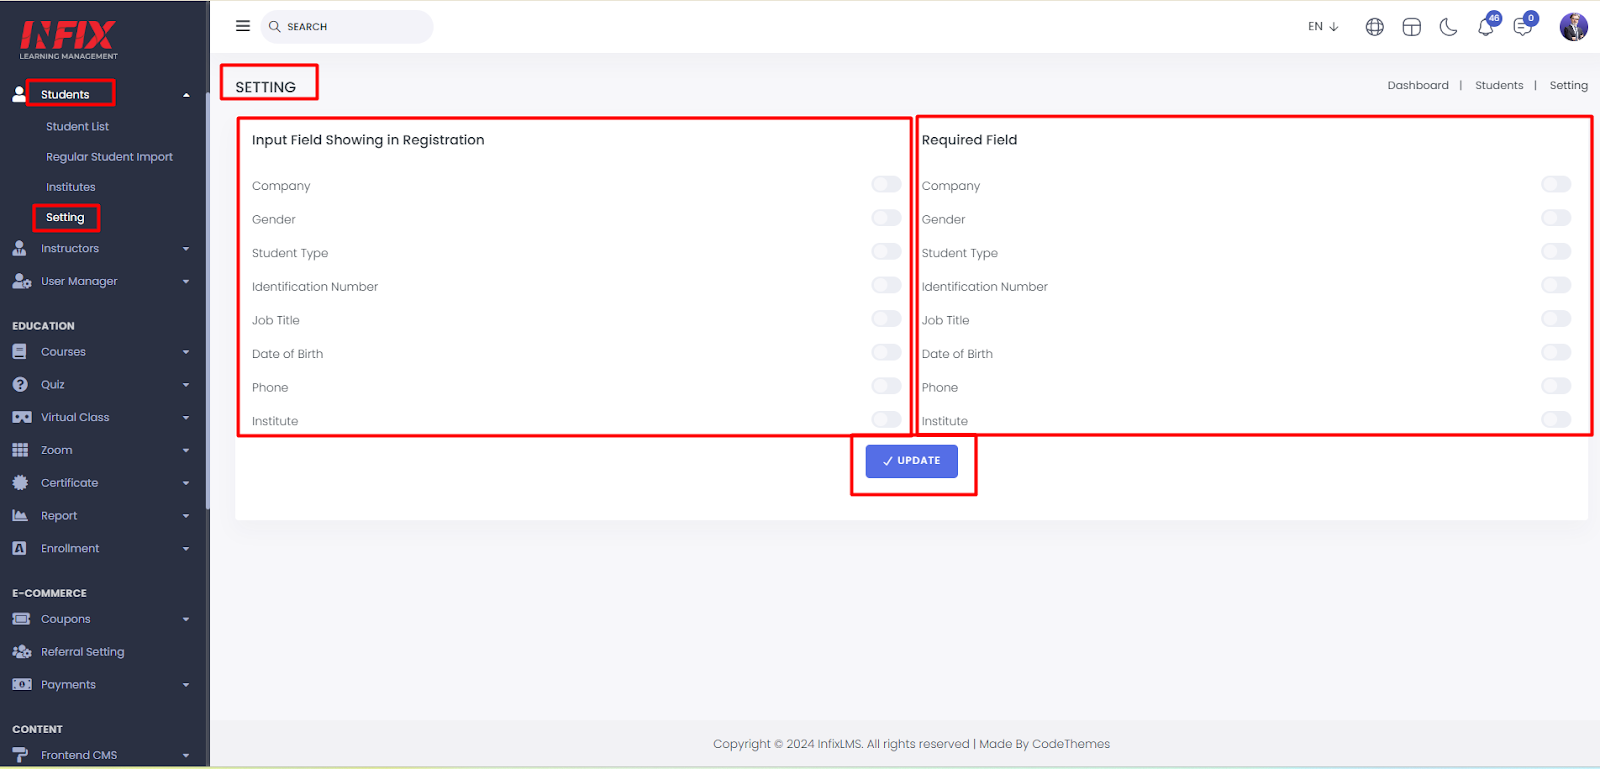
Setting:
This infixLMS setting design for the registration field customization is separately functionalized as operating it manually like the Input field showing in registration, required field & editable field. Those included the company, gender, student type, identification number, job title, date of birth, name & phone.
Short Direction: {InfixLMS> Dashboard> Setting> Registration Field Customization> Input Field Showing in Registration> Required Field> Editable Field> Company> Gender> Student Type> Identification Number> Job Title> Date Of Birth> Name> Phone> Update.}
If you want to manually set the settings of the infix LMS section go to the student dashboard to find the settings option.
1- Setting
2- Registration Field Customization
3- Input Field Showing in Registration
4- Required Field
5- Editable Field
6- Company
7- Gender
8- Student Type
9- Identification Number
10- Job Title
11- Date Of Birth
12- Name
13- Phone
14- Update it.