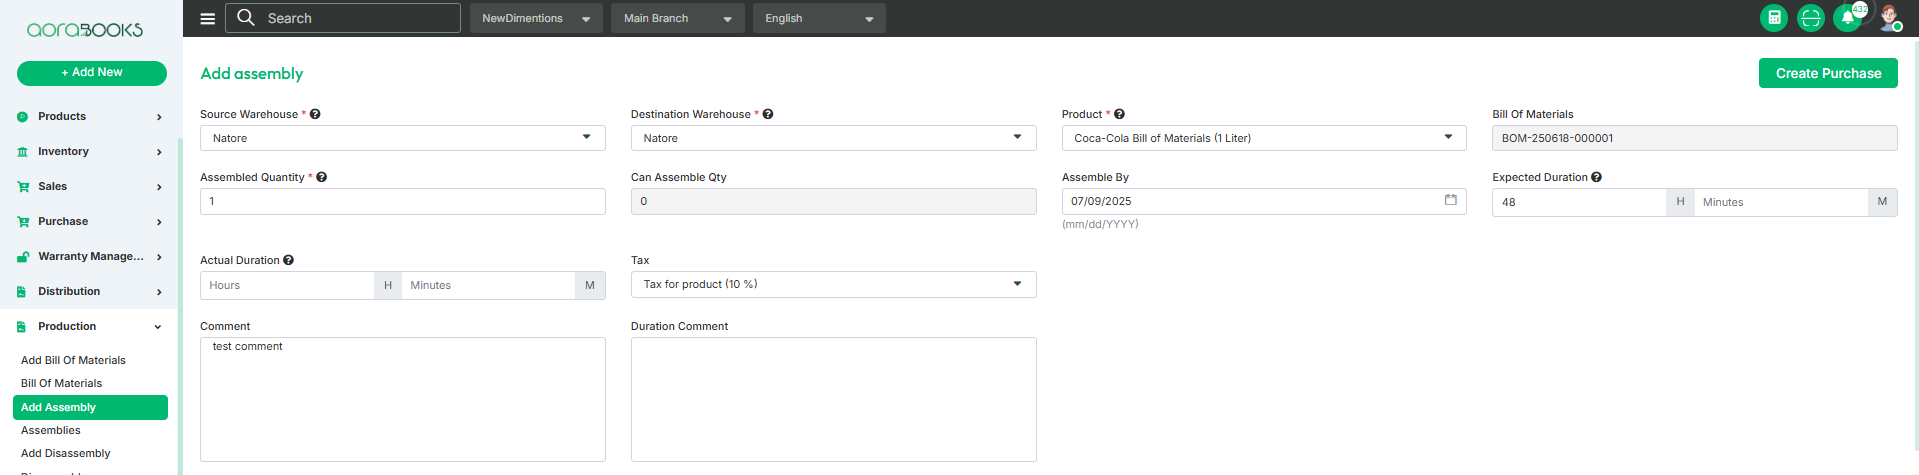
This option allows you to create a new assembly by selecting the product, components, source and destination warehouses, quantity, and other relevant details needed for production.
You can create an add assembly either manually or automatically. If “Can Auto Assemble” is enabled and the assembled product is allocated to a sell order and the stock in hand is insufficient to fully fill the order, then the product assembled automatically.
To create an add assembly , first ensure that the "Assemble" toggle is enabled when adding the product. Additionally, make sure that all required components have the "Component" toggle enabled. To Create the bill of materials just go to Production from sidebar and click on add assembly and then follow the below steps:
Source Warehouse: The warehouse from where all required components are taken to assemble the final product. The components quantity and also wastage quantity will be decreased from the warehouse stock when the assembly is completed. Search and select the source warehouse from here.
Destination Warehouse: This is the warehouse where all assembled products will be stored after the final assembly. Once products are added, the stock-on-hand quantity in this warehouse will increase. Search and select the destination warehouse from here.
Product: Search for the product which you want to assemble and then select it from the list.
Expected Duration: Enter the estimated time required to complete the assembly process, either for a single unit or for the entire batch, expressed in hours and minutes.
Actual Duration: Enter the real time taken to complete the assembly process, recorded in hours and minutes.
Tax: Select the applicable tax type or rate that applies to the assembly process or the final product.
Comment: If you want to add any kind of additional information related to the assembly you can note down it here.
Duration Comment: If you want to add kind of additional information related to time you can note down here.
Assembly Line: From here you can set the assembly line for assembling the final product . Just follow the below steps:
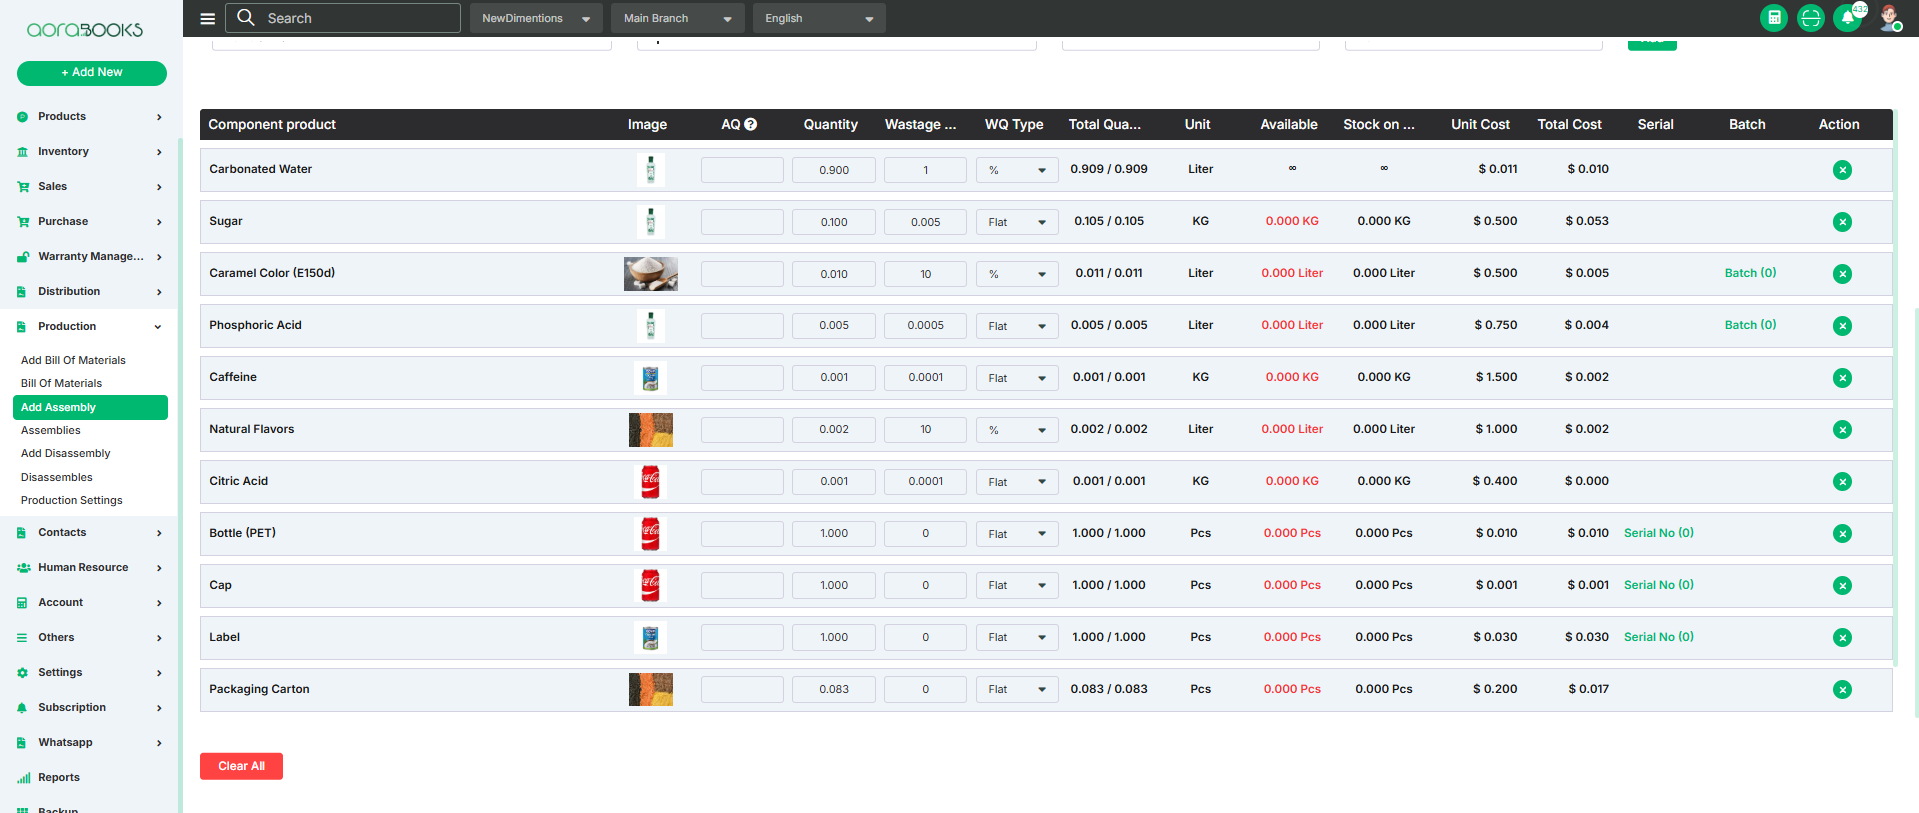
Component Product: To use a product as a component in add assembly you must enable the "Component Product" toggle when adding the product. Without this, the product won't appear in the component selection list. From here search the component product which you want to add to create the final product and select the product.
Quantity: Enter the amount of the selected component product required to assemble the final product.
Wastage Quantity: Enter the expected amount of the component that may be wasted during the assembly process.
Wastage Type: Choose how you want to calculate wastage either as a flat amount or as a percentage of the component quantity.
Add: Click the button to add the component. You can add as many components as you want.

After successfully adding the components, you can view the details of all added components in the table below. The table includes information such as:
Component Product: You can see the name of the component product you have selected to create the final product.
Image: You can see the image of the product.
Assembled Quantity: Displays the quantity of the component to be assembled. You can also adjust this quantity directly from the table if needed.
Quantity: You can see the total quantity of the component. And you can also adjust the quantity from here.
Wastage Quantity: Shows the amount of the component expected to be wasted during the assembly process. And you can adjust the quantity from here.
Wastage Type: Indicates whether the wastage is calculated as a percentage or a flat amount. You can also update or change the wastage type directly from this field if needed.
Total Quantity: You can see the total component quantity from here. Total Quantity=Quantity+Wastage Quantity.
Unit: Displays the unit type of the component product, such as pcs, kg, liters, etc., based on how it was defined when the product was created.
Available Quantity: The current amount of a product or component available in stock for use.
Stock On Hand: Displays the current available quantity of the component or product in the inventory.
Unit Cost: Shows the cost of one unit of the component product .
Total Cost: You can see the total cost of the product from here. Total Cost=Total Quantity * Unit Cost.
Serial: Use this field to add a serial number to the component product. You can only add serial numbers to products that have the Serial toggle enabled when the product is created.
Batch: Use this field to add a batch number to the component product. You can only add batch numbers to products that have the Batch toggle enabled when the product is created.
Delete: By clicking this you can remove any component from the list.
Clear All: Click the button to clear all the components from the list.
Supplier Cost: From here, you can add the cost details provided by the supplier. To add the supplier cost, follow the steps below:
Supplier: Select the supplier from whom the component or product is being purchased.
Cost: Enter the unit cost as provided by the selected supplier.
Tax: Specify the applicable tax rate which is applicable for the supplier cost.
Date: Set the date when the cost is recorded or becomes effective.
Comment: Add any additional notes or details related to the supplier cost.
Add: Click to add the supplier cost to the table.

After adding the cost you can see the supplier cost below with details. Such as:
Supplier Name: You can see the name who has supplied the component product.
Cost: You can see the total supplier cost.
Tax: You can see the tax applicable for the supplier cost from here.
Total Cost: You can see the total supplier cost. Total Cost = Cost + Tax.
Date: You can see the date when the supplier cost is generated.
Comment: You can see the comment related to supplier cost from here.
Action: From here, you can perform multiple actions related to the supplier cost:
Edit: Click this button to modify or update any details of the supplier cost.
Delete: Click to remove the supplier cost entry from the list.

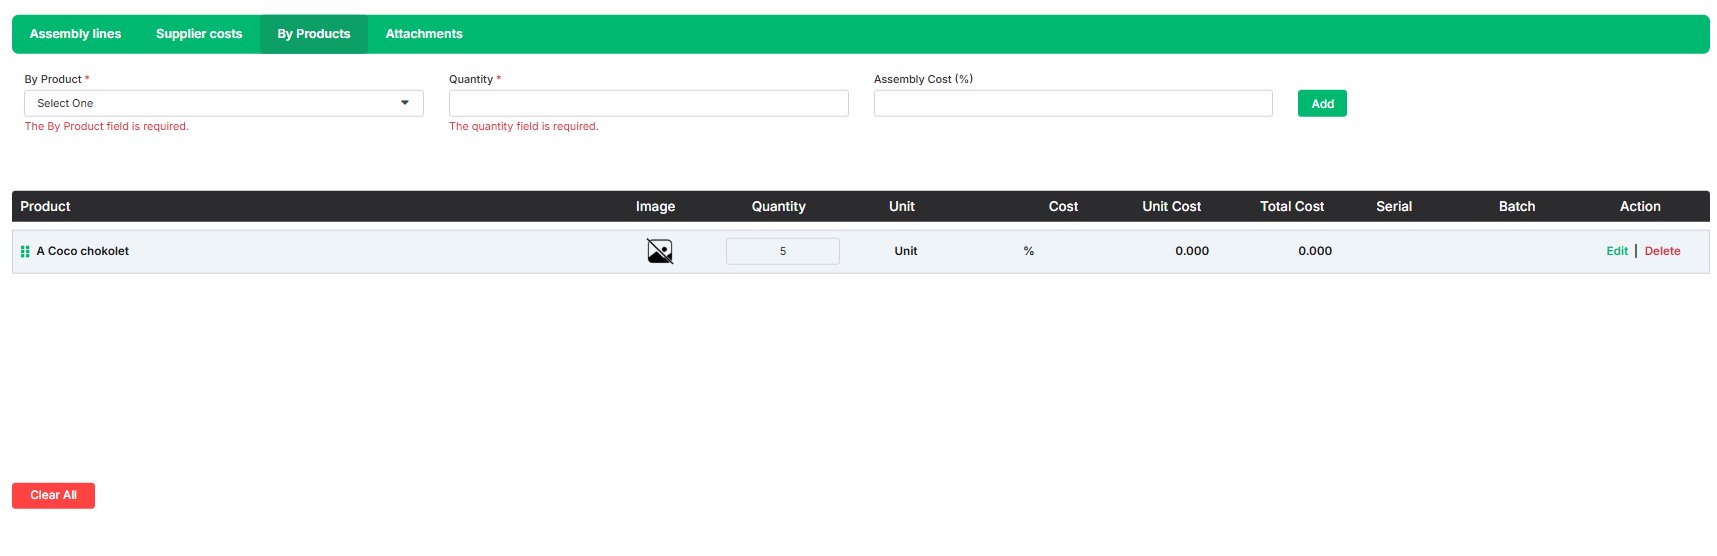
By Products: These are secondary products that are produced unintentionally or alongside the main product during the assembly or manufacturing process. You can record and manage by-products here. Follow the below steps to add the by products:
By-Product: Search and select the by-products that are generated during the assembly process. These are secondary products that result from manufacturing the main product and can be reused, stored, or sold. Search and select the by products from here.
Quantity: Enter the amount of the by-product produced during the assembly.
Assembly Cost: Specify the cost associated with the by-product as part of the overall assembly process.
Add: Click to add the by-product.
After adding the product you can see the by-product in the table below with details. Such as:
Product Name: You can see the name of the by product.
Image: You can see the image of the by product.
Quantity: You can see the quantity of the by product.
Unit: You can see the unit type of the by-product.
Cost: You can see the assembly cost percentage.
Unit Cost: Enter or view the cost of one unit of the by-product, based on its share of the total assembly cost.
Total Cost: You can see the total cost of the by-product from here.
Serial Number: You can see the serial number from here if there is any.
Batch Number: You can see the batch number from here if there is any.
Action: From here, you can perform multiple actions related to the by-product entry:
Edit: Click to modify the details of the by-product, such as quantity, cost, or unit.
Delete: Click to remove the by-product entry from the list.
Clear All: Click to clear all the by-products from the list.
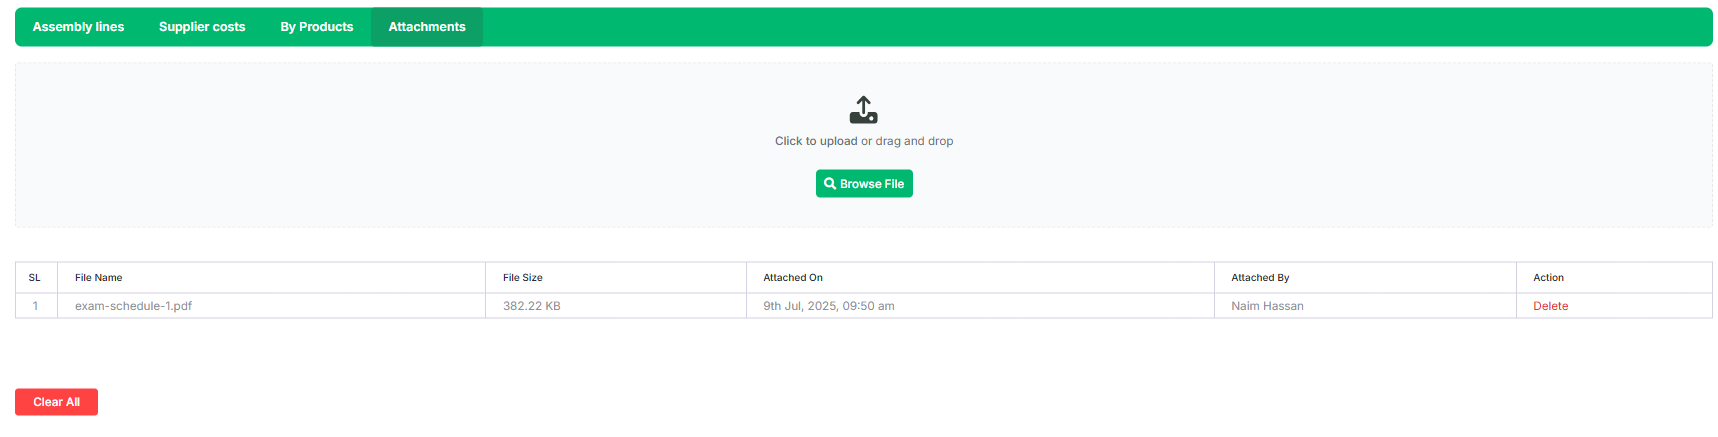
Attachments: From here you can add different types of attachments needed for assembly. Just browse the file and your file will be added.
After adding the file you can see the attachment details in the table below with details. Such as:
File Name: You can see the file Name.
File Size: You can see the file size.
Attached On: Displays the date and time when the file was attached to the record.
Action: By clicking the delete button you can remove the file.
Clear All: By clicking the button you can delete all the files.
Batch: If a batch is present you can add the batch number from here. Follow the below step to add the batch number:
Batch Number: Set the batch number for the product or component. This helps track and manage items produced or received in the same production run or shipment.
Quantity: Enter the number of units for the selected product or component.
Expiry Date: Set the date when the product or component will expire. This is especially important for perishable or time-sensitive items to ensure proper stock rotation and usage before expiration.
Add Batch: Click to add the batch
Save: Click to save the batch.
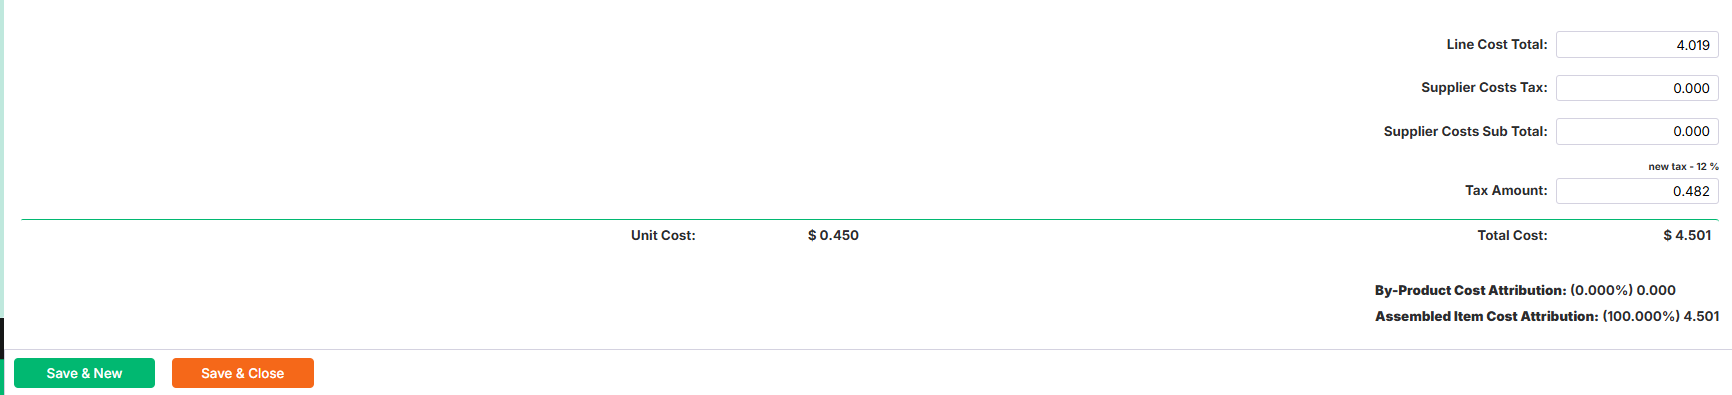
From here, you can view all cost-related calculations for the Bill of Materials. These include:
Line Cost Total: The total cost of all components before tax and other charges.
Supplier Costs Tax: The total tax amount applied to the supplier costs.
Supplier Costs Subtotal: The subtotal of supplier costs, excluding tax.
Tax Amount: The total tax applied to the entire bill.
Unit Cost: The cost to assemble one unit of the final product.
Total Cost: The overall cost to assemble the specified quantity of the final product.
By-Product Cost Attribution: The portion of the total cost attributed to the by-products.
Assembled Item Cost Attribution: The portion of the total cost attributed to the final assembled item.
Save & New: By clicking this your assembled product will be added successfully and a new form will be open.
Save & Close: By clicking this your assembled product will be added successfully and the form will be closed.


