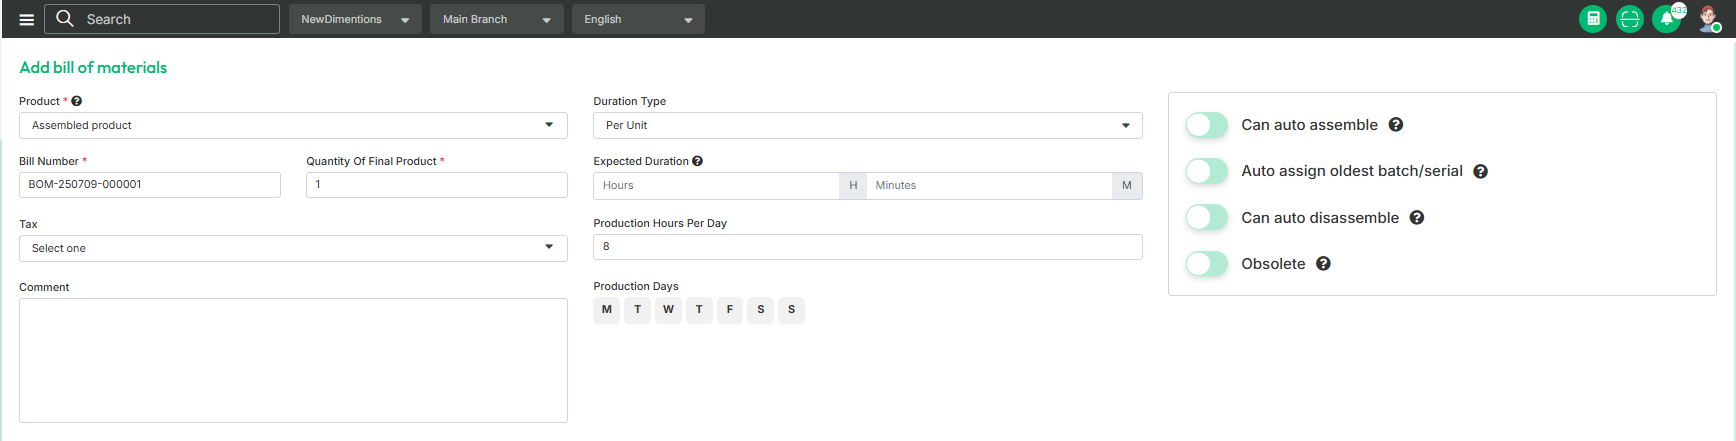
Add Bill Of Materials
A Bill of Materials is a comprehensive list of all the parts, components, raw materials, and sub-assemblies needed to manufacture a product. It includes details like part numbers, descriptions, quantities, and units of measure.
To create a Bill of Materials, first ensure that the "Assemble" toggle is enabled when adding the product. Additionally, make sure that all required components have the "Component" toggle enabled. To Create the bill of materials just go to Production from sidebar and click on add bill of materials and then follow the below steps:
Product: First, search for the product for which you want to create the Bill of Materials, and then select it from the list.
Duration Type: Choose how the assembly time will be measured, either Per Unit, where the duration is calculated for each individual product, or Per Assembly, where the duration is calculated for the entire batch or assembly process.
Bill Number: A unique, auto-generated identifier assigned to each Bill of Materials for tracking and reference purposes.Here your bill number will be added automatically after selecting the product.
Quantity of Final Product: Specify the number of finished products that will be produced using the defined Bill of Materials.
Expected Duration: Enter the estimated time required to complete the assembly process, either for a single unit or for the entire batch, expressed in hours and minutes.
Tax: Select the applicable tax type or rate that applies to the assembly process or the final product.
Production Hours Per Day: Set the number of hours allocated for production each day.
Production Days: Select the specific days of the week on which production or assembly will take place.
Comment: If you want to add any kind of additional information related to the bill of materials you can note down it here.
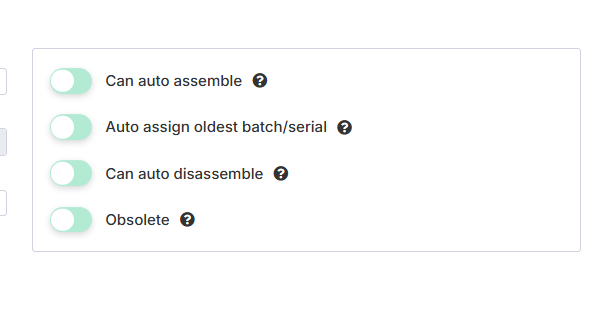
From here you can configure the bill of materials to determine how it should be used:
Can Auto Assemble: If you enable the setting it will automatically create an assembly when the assembled product is allocated to a sales order, but the stock on hand is insufficient to fully fill the order.
Auto Assign Oldest Batch/Serial: If you enable the setting it will automatically allocate the the oldest available batch or serial numbers for the components used in a new assembly.
Can Auto Disassemble: If you enable the setting it will automatically create disassembly when an assembly is received through a purchase order.
Obsolete: Turn on this option if the Bill of Materials is no longer needed. This will stop it from being used in any new assemblies or disassemblies, but it will still be saved for record-keeping.
From here, you can add all the component products required to assemble the final product. To add a component, follow the steps below:
Component Product: To use a product as a component in the Bill of Materials, you must enable the "Component Product" toggle when adding the product. Without this, the product won't appear in the component selection list. From here search the component product which you want to add to create the final product and select the product.
Quantity: Enter the amount of the selected component product required to assemble the final product.
Wastage Quantity: Enter the expected amount of the component that may be wasted during the assembly process.
Wastage Type: Choose how you want to calculate wastage either as a flat amount or as a percentage of the component quantity.
Add: Click the button to add the component. You can add as many components as you want.

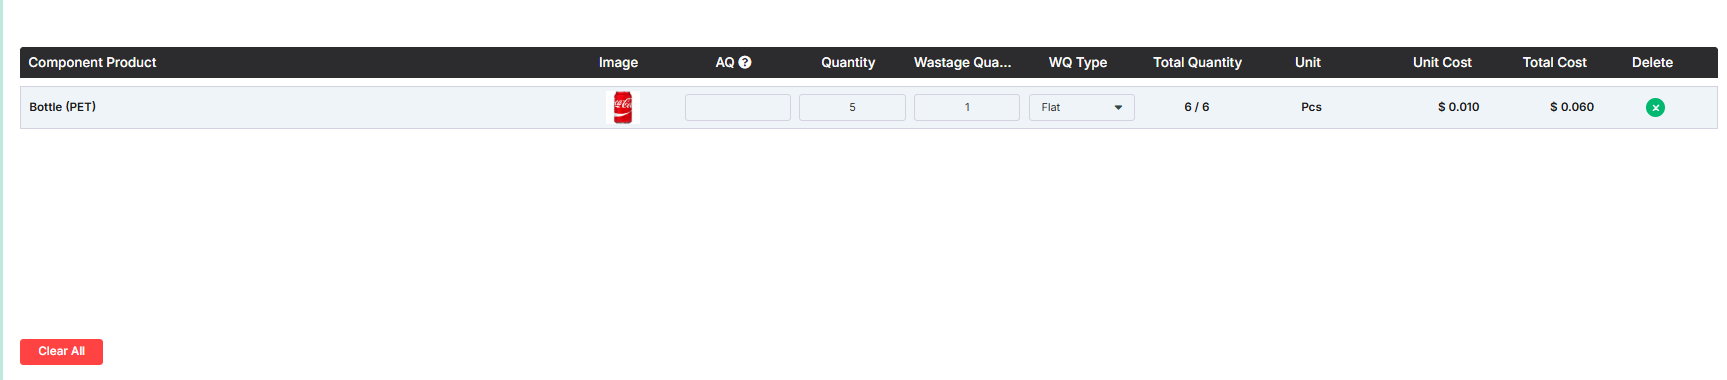
After successfully adding the components, you can view the details of all added components in the table below. The table includes information such as:
Component Product: You can see the name of the component product you have selected to create the final product.
Image: You can see the image of the product.
Assembled Quantity: Displays the quantity of the component to be assembled. You can also adjust this quantity directly from the table if needed.
Quantity: You can see the total quantity of the component. And you can also adjust the quantity from here.
Wastage Quantity: Shows the amount of the component expected to be wasted during the assembly process. And you can adjust the quantity from here.
Wastage Type: Indicates whether the wastage is calculated as a percentage or a flat amount. You can also update or change the wastage type directly from this field if needed.
Total Quantity: You can see the total component quantity from here. Total Quantity=Quantity+Wastage Quantity.
Unit: Displays the unit type of the component product, such as pcs, kg, liters, etc., based on how it was defined when the product was created.
Unit Cost: Shows the cost of one unit of the component product .
Total Cost: You can see the total cost of the product from here. Total Cost=Total Quantity * Unit Cost.
Delete: By clicking this you can remove any component from the list.
Clear All: Click the button to clear all the components from the list.
From here you can see all types of calculation of Bill of Materials. Such as:
Total Cost: Sum of all total cost will be shown here.
Save & New: Saves the current bill of materials and opens a new blank form to create another.
Save & Edit: Saves the current data and keeps the form open for further editing.
Save & Close: Saves the current data and closes the form.


