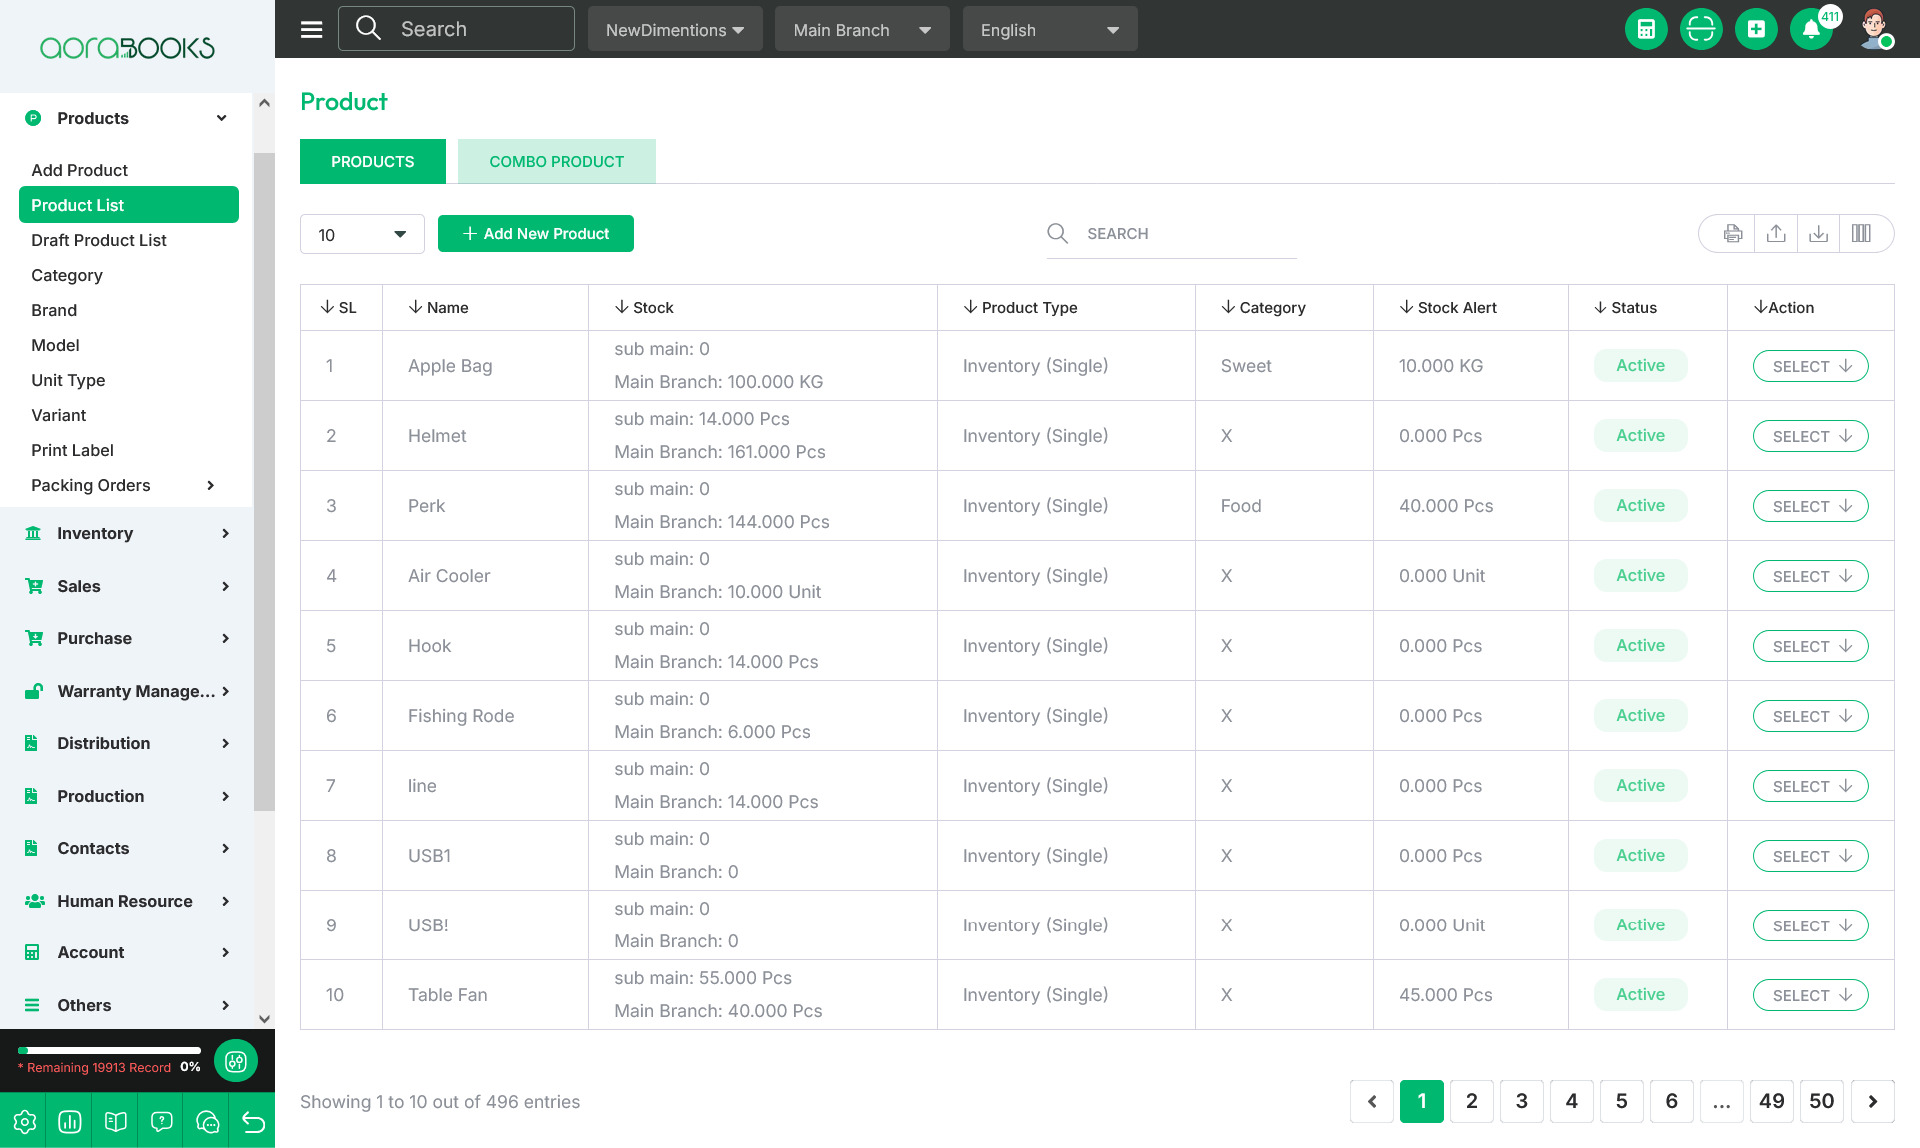
The Product List displays all products available in the system.
From here, you can see all the product list with details, such as,
1. Image : You can see the image of the product here.
2. Name : Here you can see the name of the product.
3. SKU : SKU is a unique identifier assigned to each distinct product or service that can be purchased. It helps businesses track inventory accurately and manage product details efficiently.
4. Brand : You can see the brand name of the product.
5. Model : You can see the model name of the product.
6. Purchase Price : You can see the purchase price of the product.
7. Selling Price : You can see the selling price of the product.
8. Min Selling Price : Here you can see the min selling price of the product.
9. Stock : You can see the stock quantity of the product for each branch.
10. Supplier : You can also see the product supplier name here.
11. Product Type : Here you can see the type of the product.
12. Category : On that section you can see the product category.
13. Stock Alert : You can see the stock alert quantity of the product.
14. Status : You can see the status of the product that it is active or not.
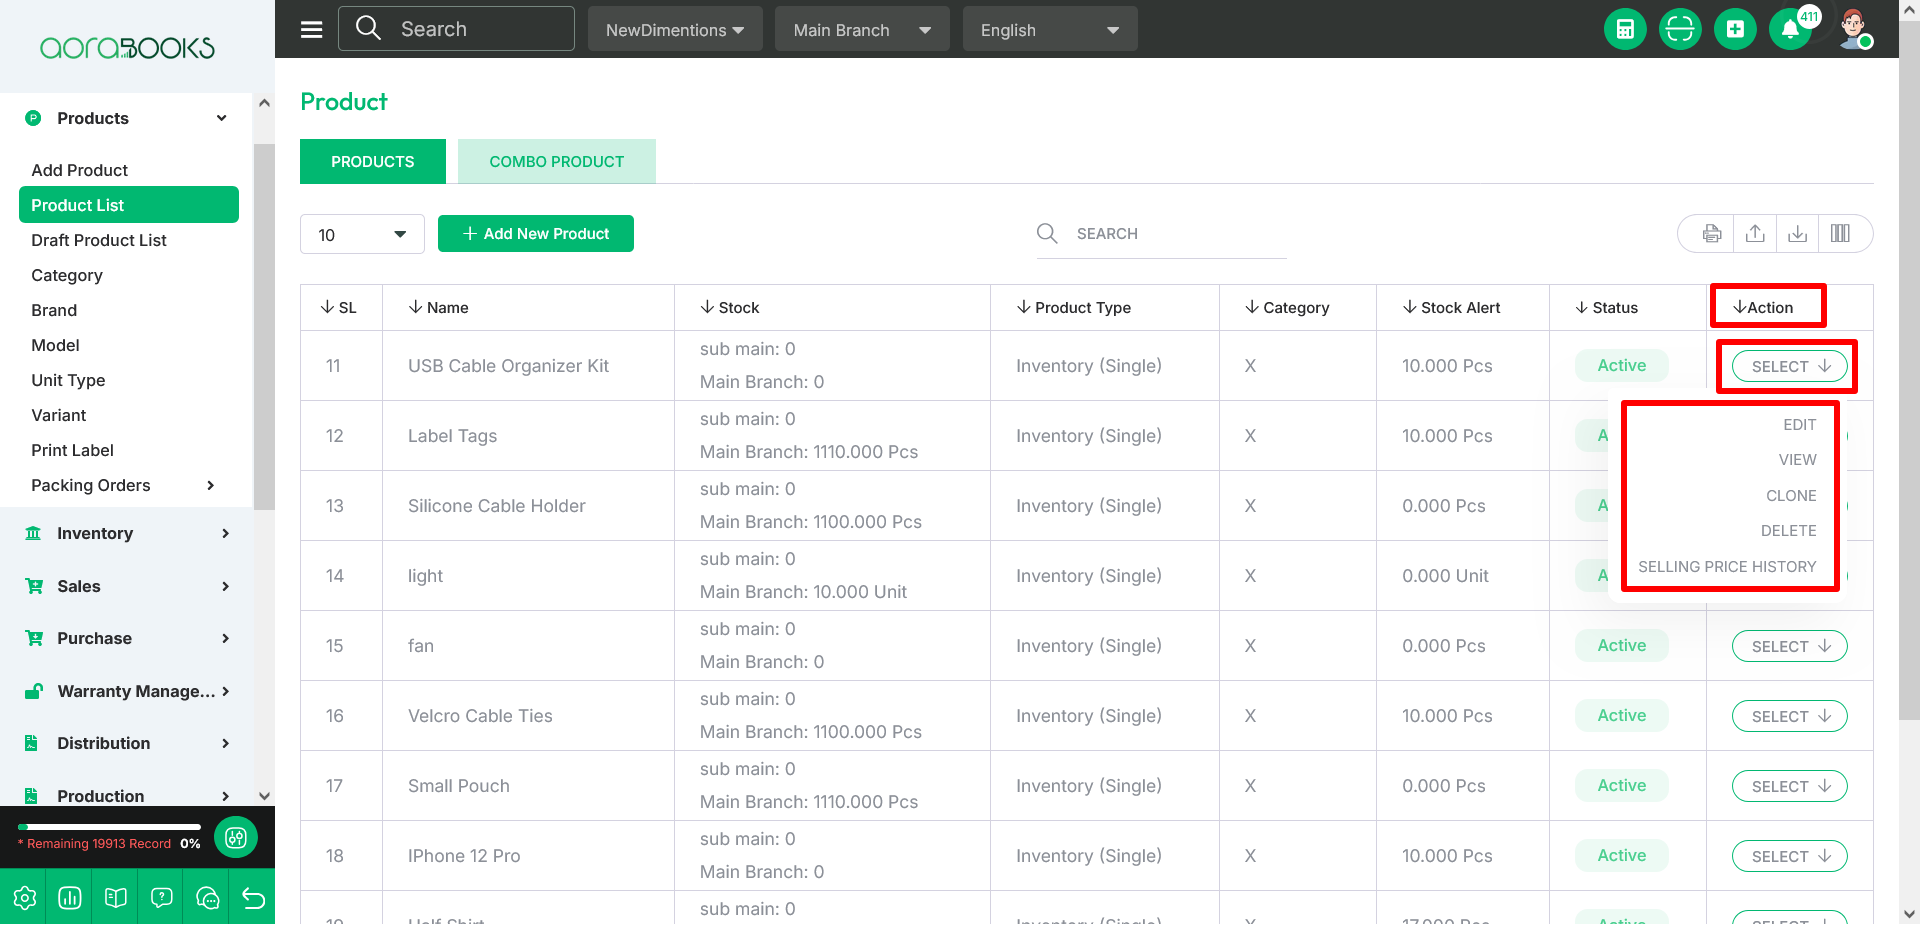
15. Action : By clicking the action button, you can perform various tasks.
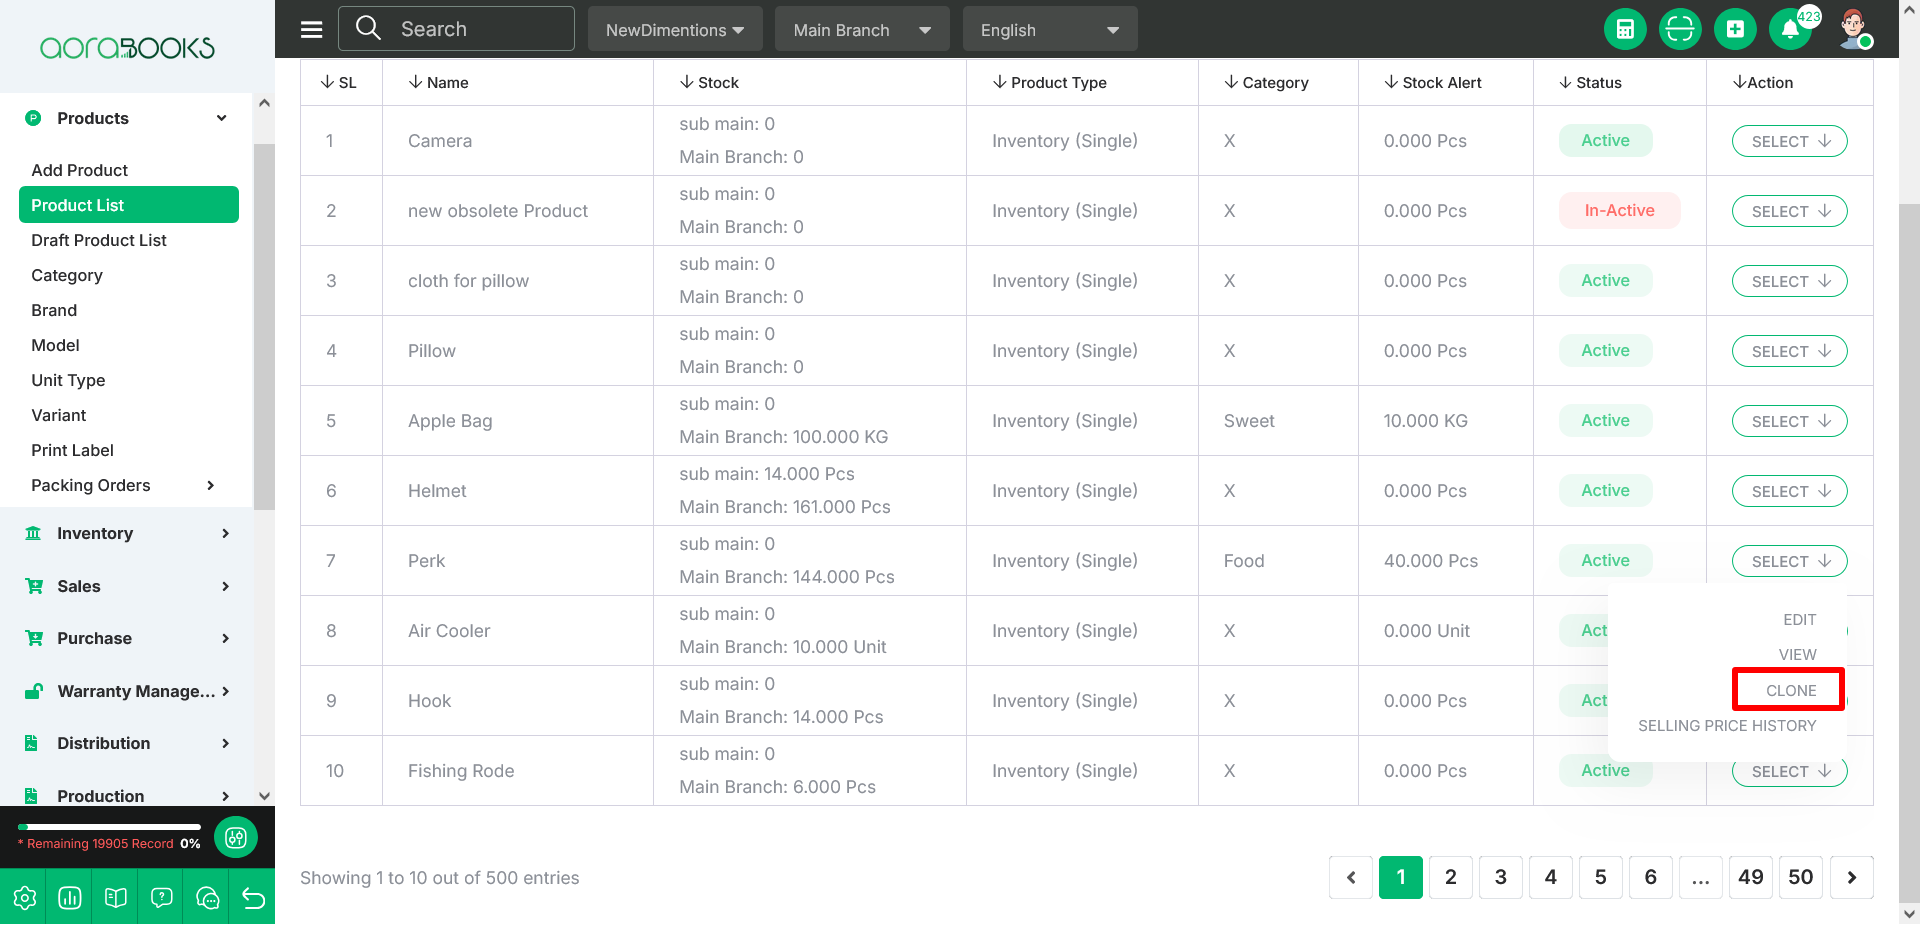
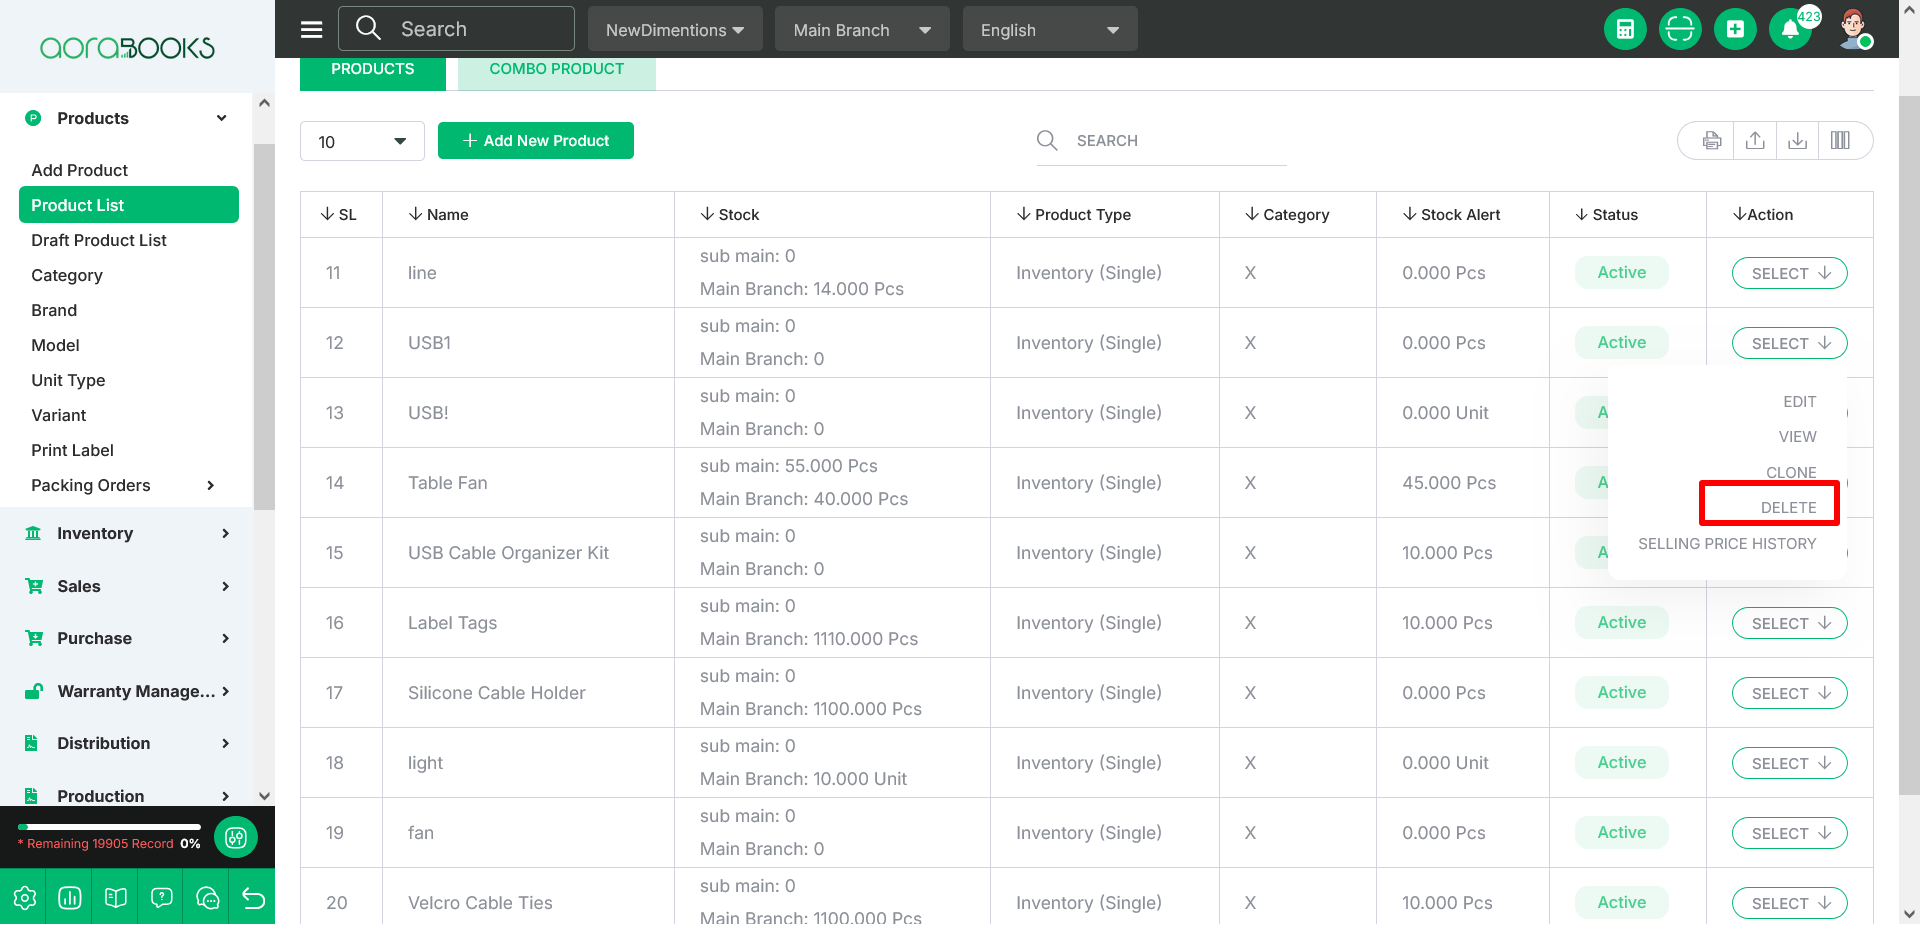
By clicking the Select button, you can perform various actions, including edit, view, clone, delete and view the selling price history.
Edit : You can update your product details by clicking edit button.
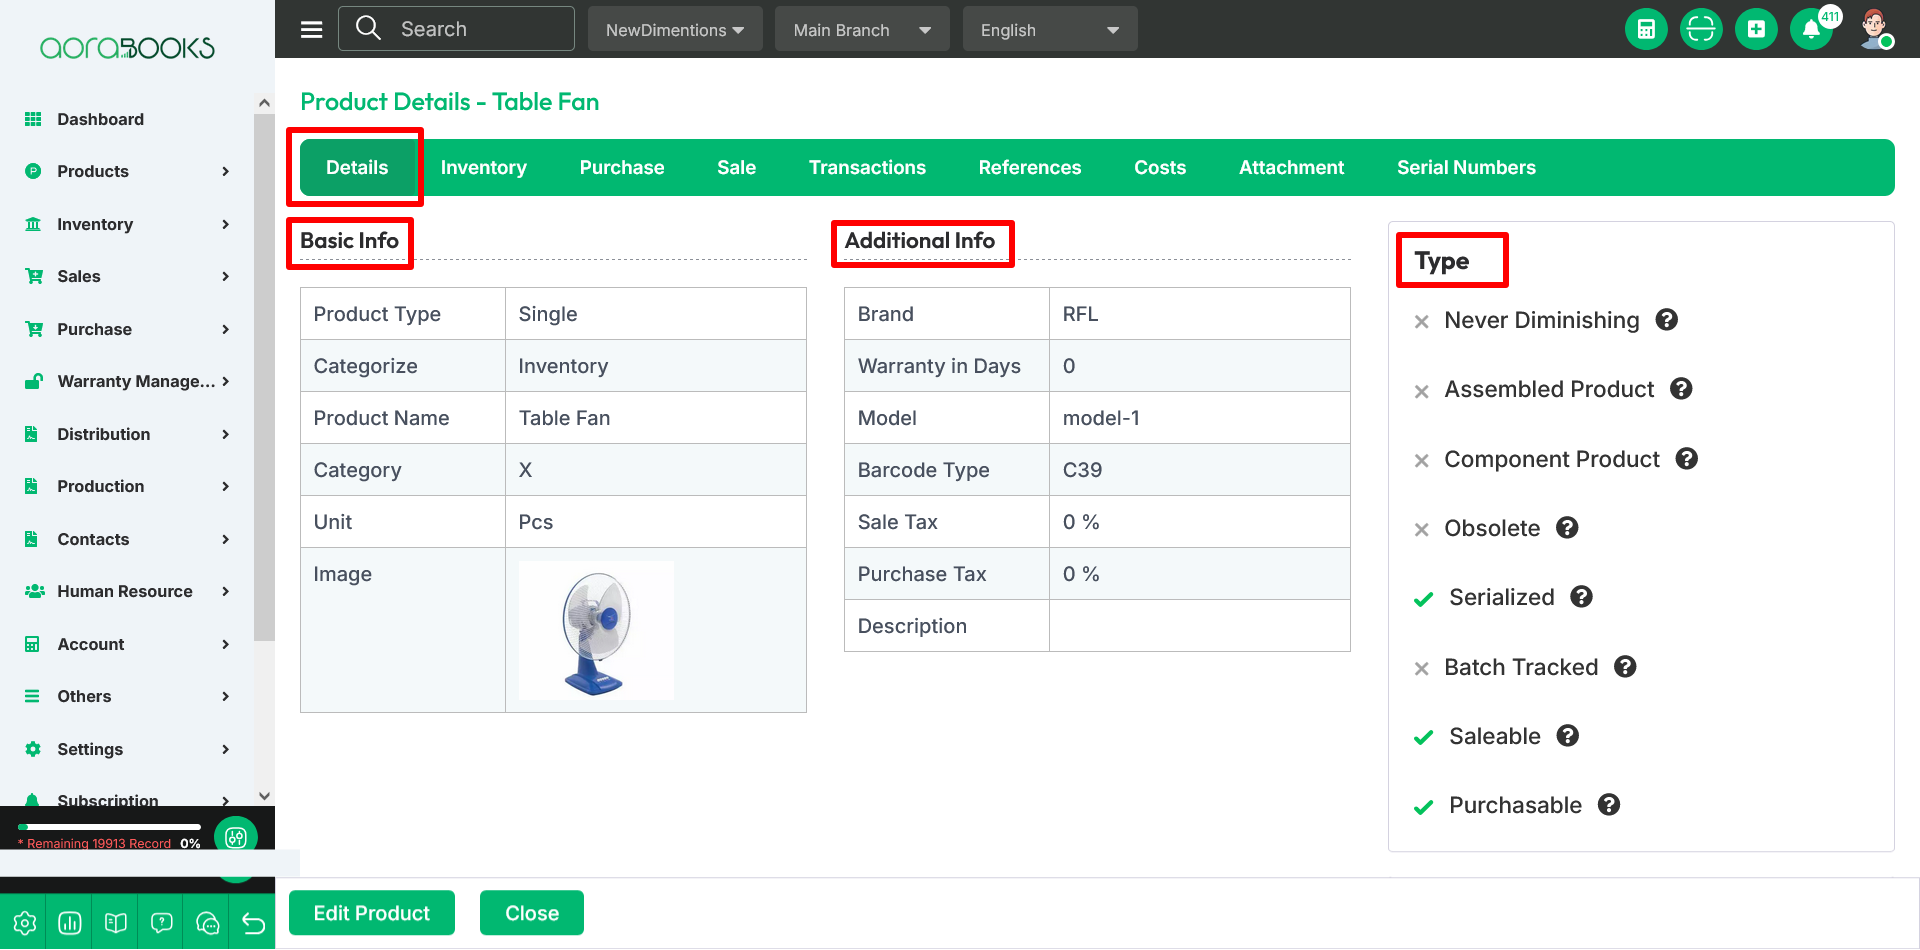
View : Here you can see the details of the product.
In product details, you can see the details of the product like as, basic info, additional info and type of the product.
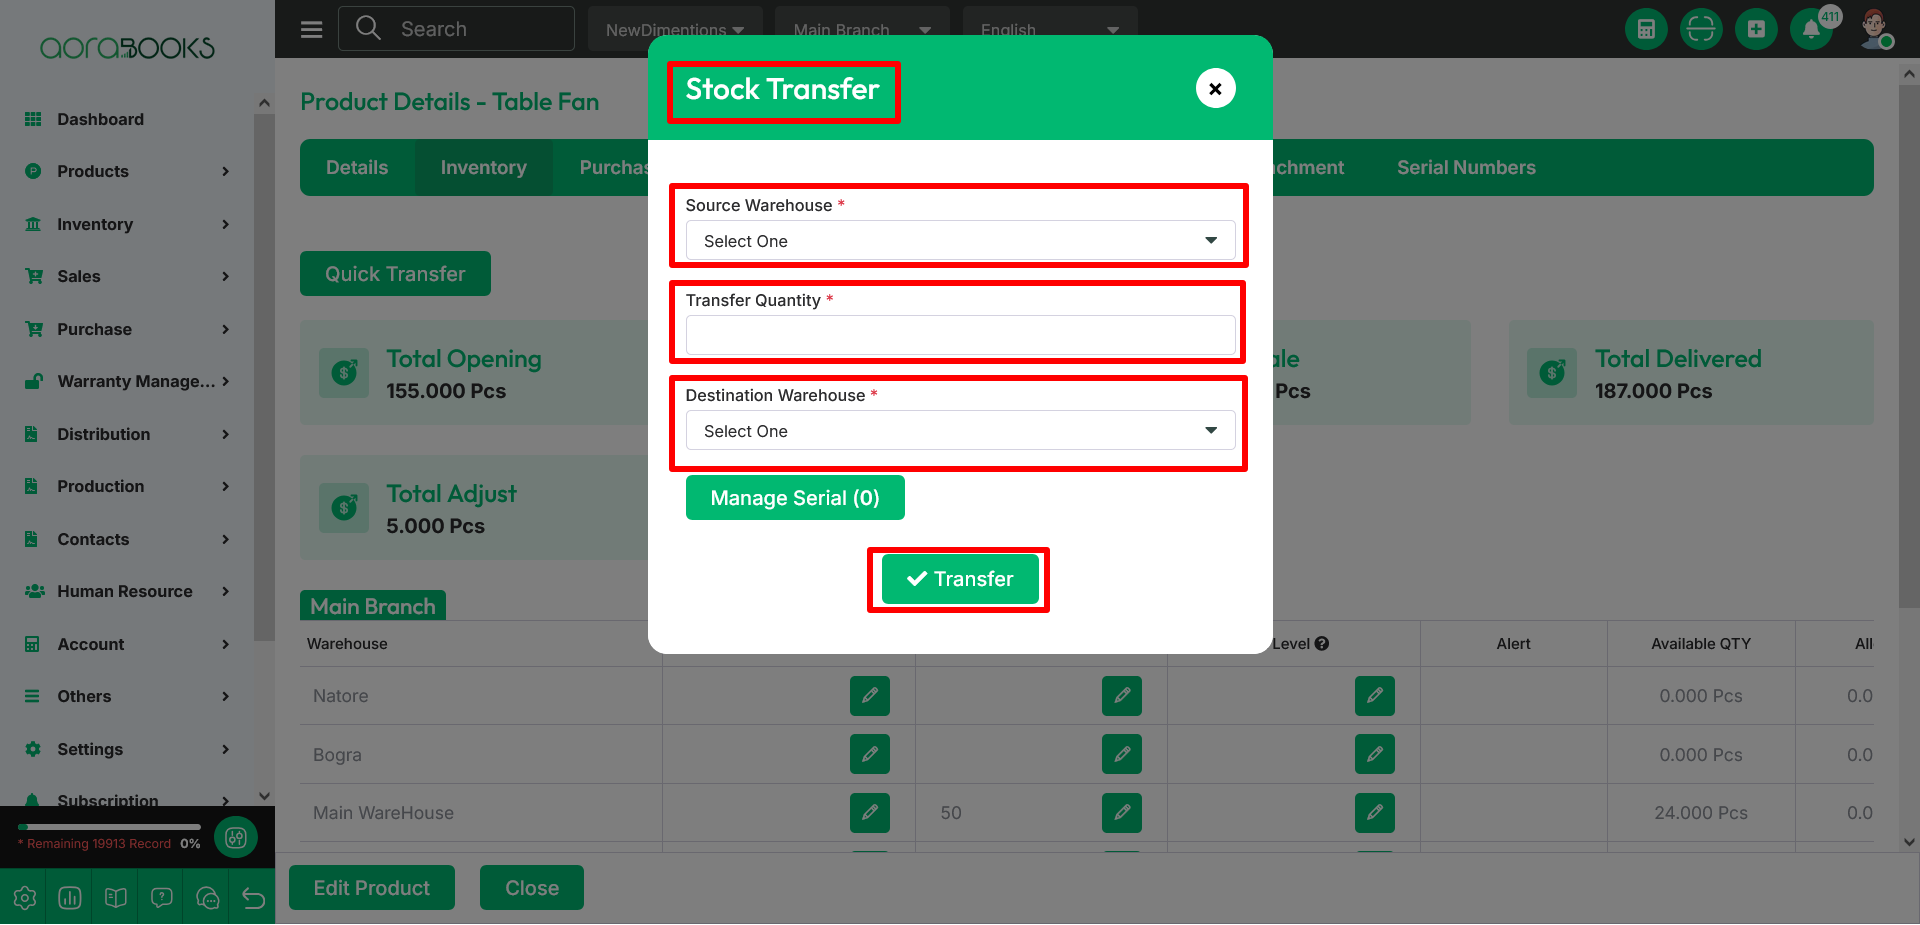
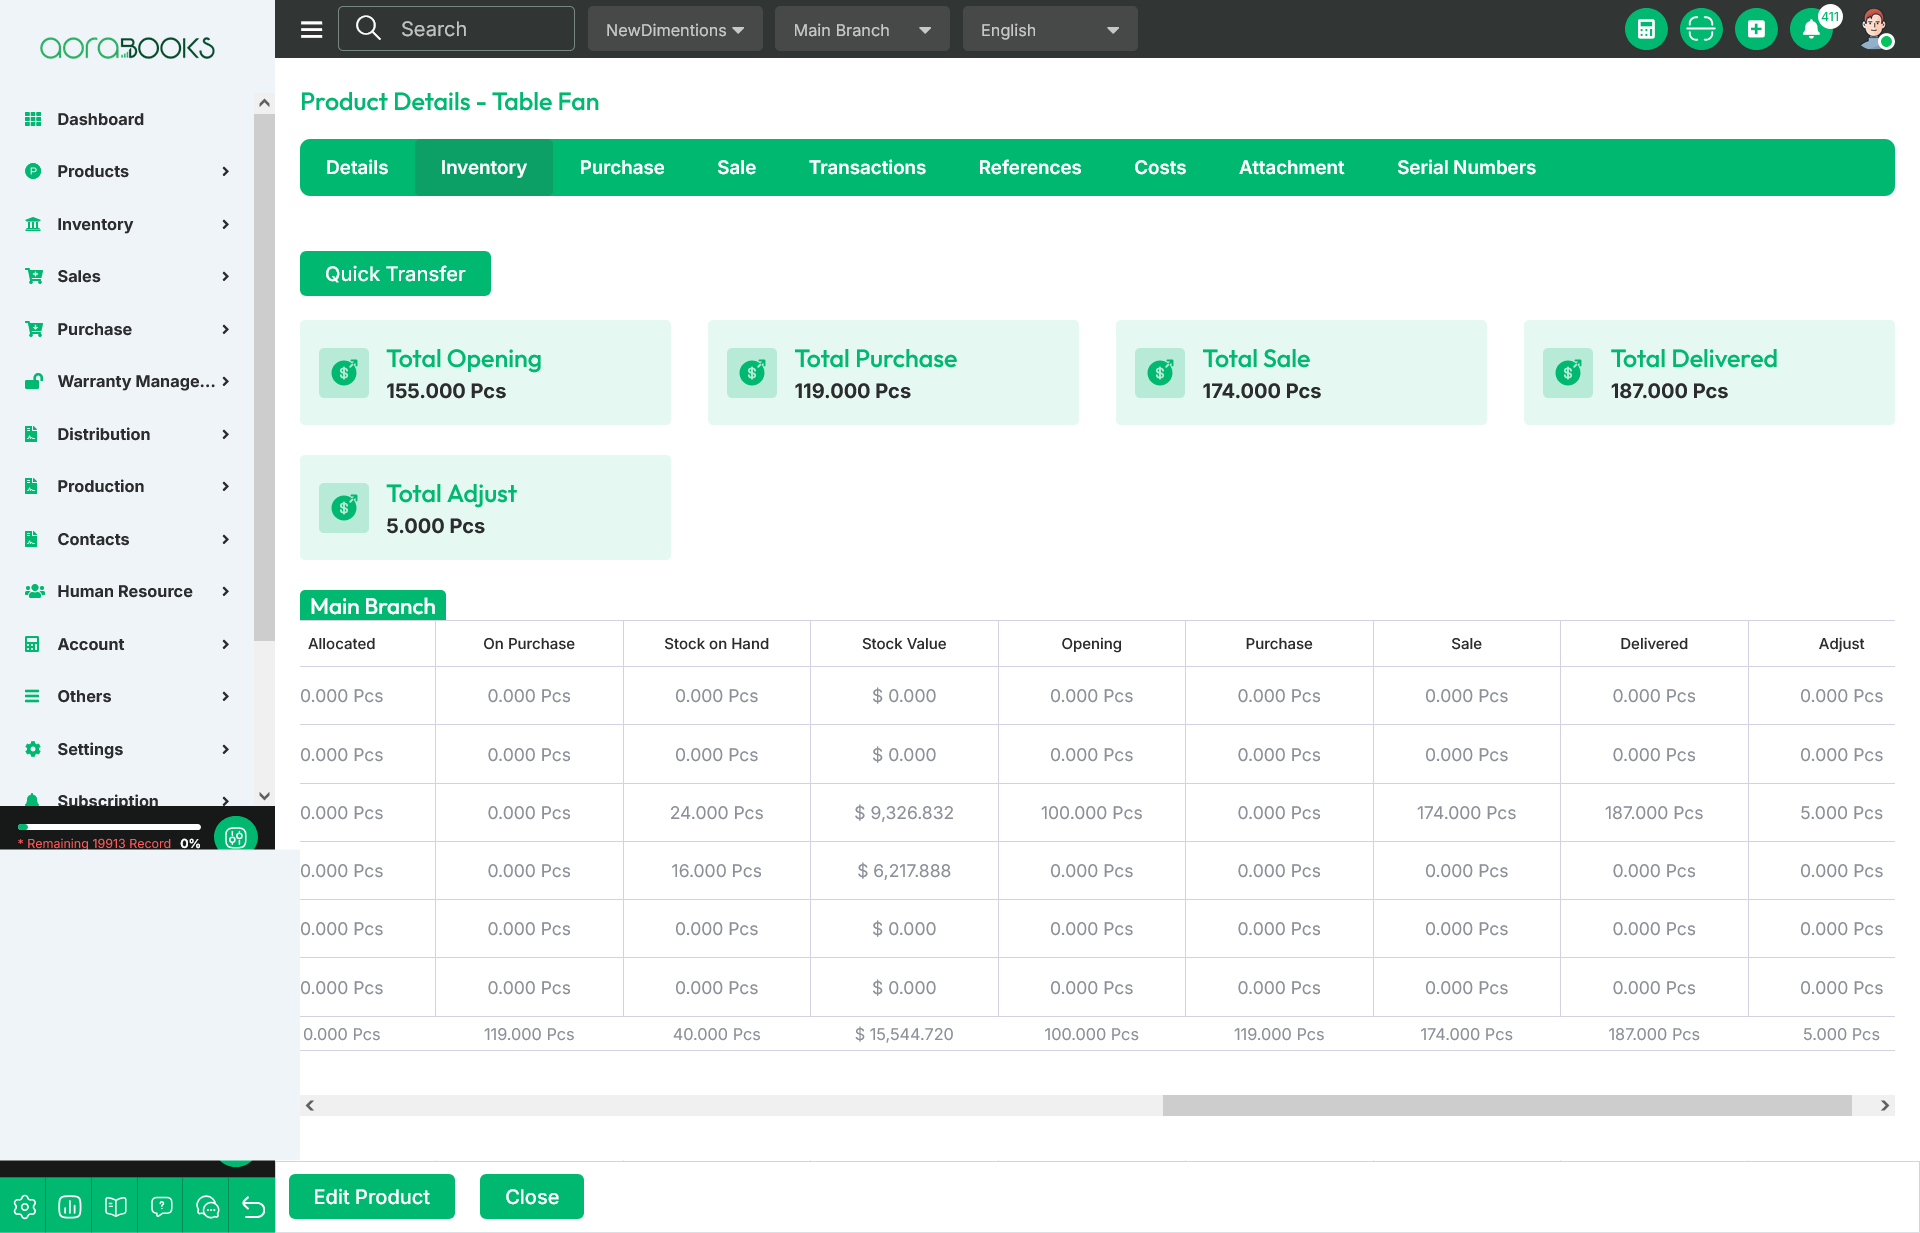
Inventory : You can see the product inventory details from here.
1. Quick Transfer : From Quick Transfer, we can transfer products from one warehouse to another.
To transfer a product, select the source warehouse, enter the transfer quantity, and choose the destination warehouse. If the product type is tracked by serial number or batch, manage the serial or batch tracking accordingly. Finally, click the Transfer button to complete the process.
2. Total Opening : You can see the total opening stock quantity of the product.
3. Total Purchase : You can see the total purchase quantity of the product.
4. Total Sale : Here you can see the total sale quantity of the product.
5. Total Delivered : You can see the total delivered quantity of the product .
6. Total Adjust : You can see the total adjust quantity of the product.
7. Warehouse : It will display the names of all the warehouses under the selected branch.
8. Bin Location : Using the bin location, you can set and track the exact location or position of the product.
9. Min Stock Level : In the Minimum Stock Level, you can set the minimum stock quantity for the product in each branch. When the product stock reaches this minimum level, the system will display an alert message to notify you.
10. Max Stock Level : In the Maximum Stock Level, you can set the maximum stock quantity for the product in each branch. When the product stock reaches this maximum level, the system will display an alert message to notify you.
11. Alert : An alert message will be displayed here when a product reaches its minimum or maximum stock level.
12. Available QTY : In the "Available QTY" section, the currently available quantity of the product will be displayed.
13. Allocated : When a product has been sold but not yet delivered, its quantity will be shown under “Allocated.”
14. On Purchase : When a product is purchased, the purchased quantity will be shown under the "On Purchase" section.
15. Stock On Hand : The sum of the available quantity and the allocated quantity will be displayed as the stock on hand.
16. Stock Value : The product's average landed cost multiplied by the stock on hand will be displayed as the stock value amount. The product’s average landed cost can be found in the purchase section.
17. Opening : When the opening stock of a product is added that quantity will be displayed here.
18. Purchase : When a product is purchased, the purchased quantity will be shown here.
19. Sale : When a product is sold, the sold quantity will be displayed here.
20. Delivered : The quantity of the product that has been delivered will be shown here.
21. Adjust : When the product is adjusted, the adjusted quantity will be shown here.
22. Edit Product : You can update your product information by clicking the Edit button.
23. Close : You can close the current screen.
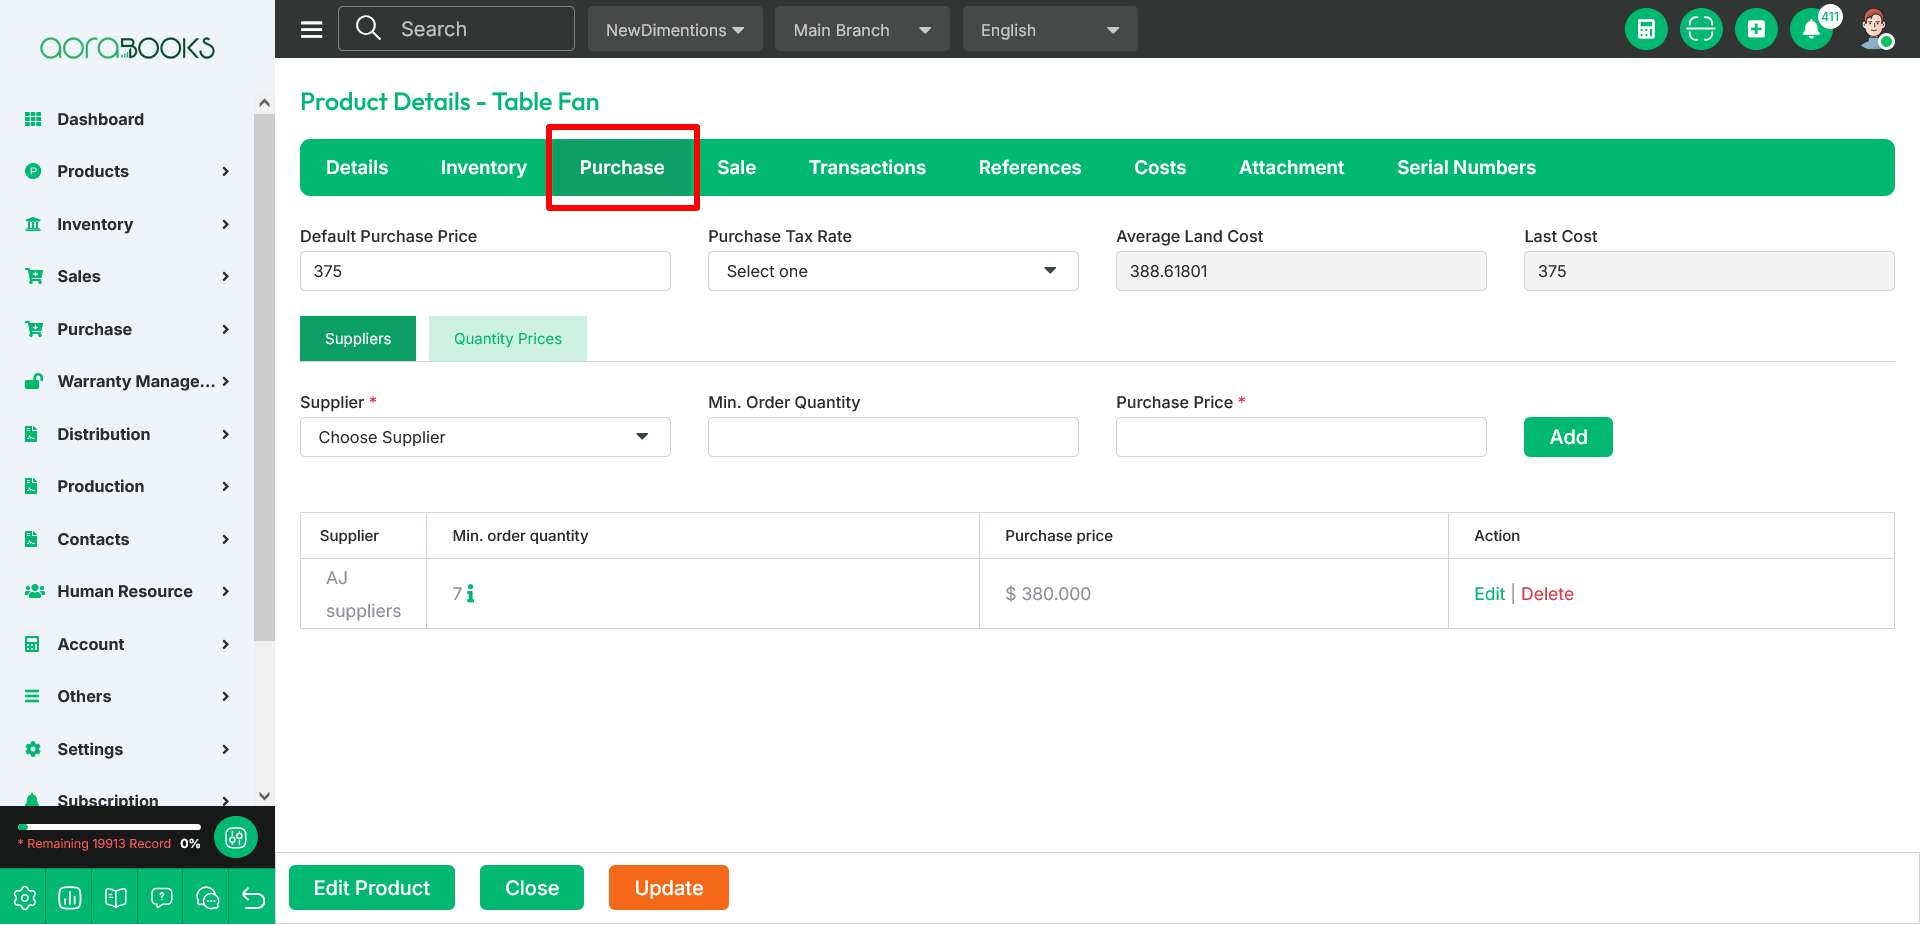
Purchase : In the purchase section, you can see the product’s default purchase price, average landed cost, last cost, and also set the purchase tax rate.
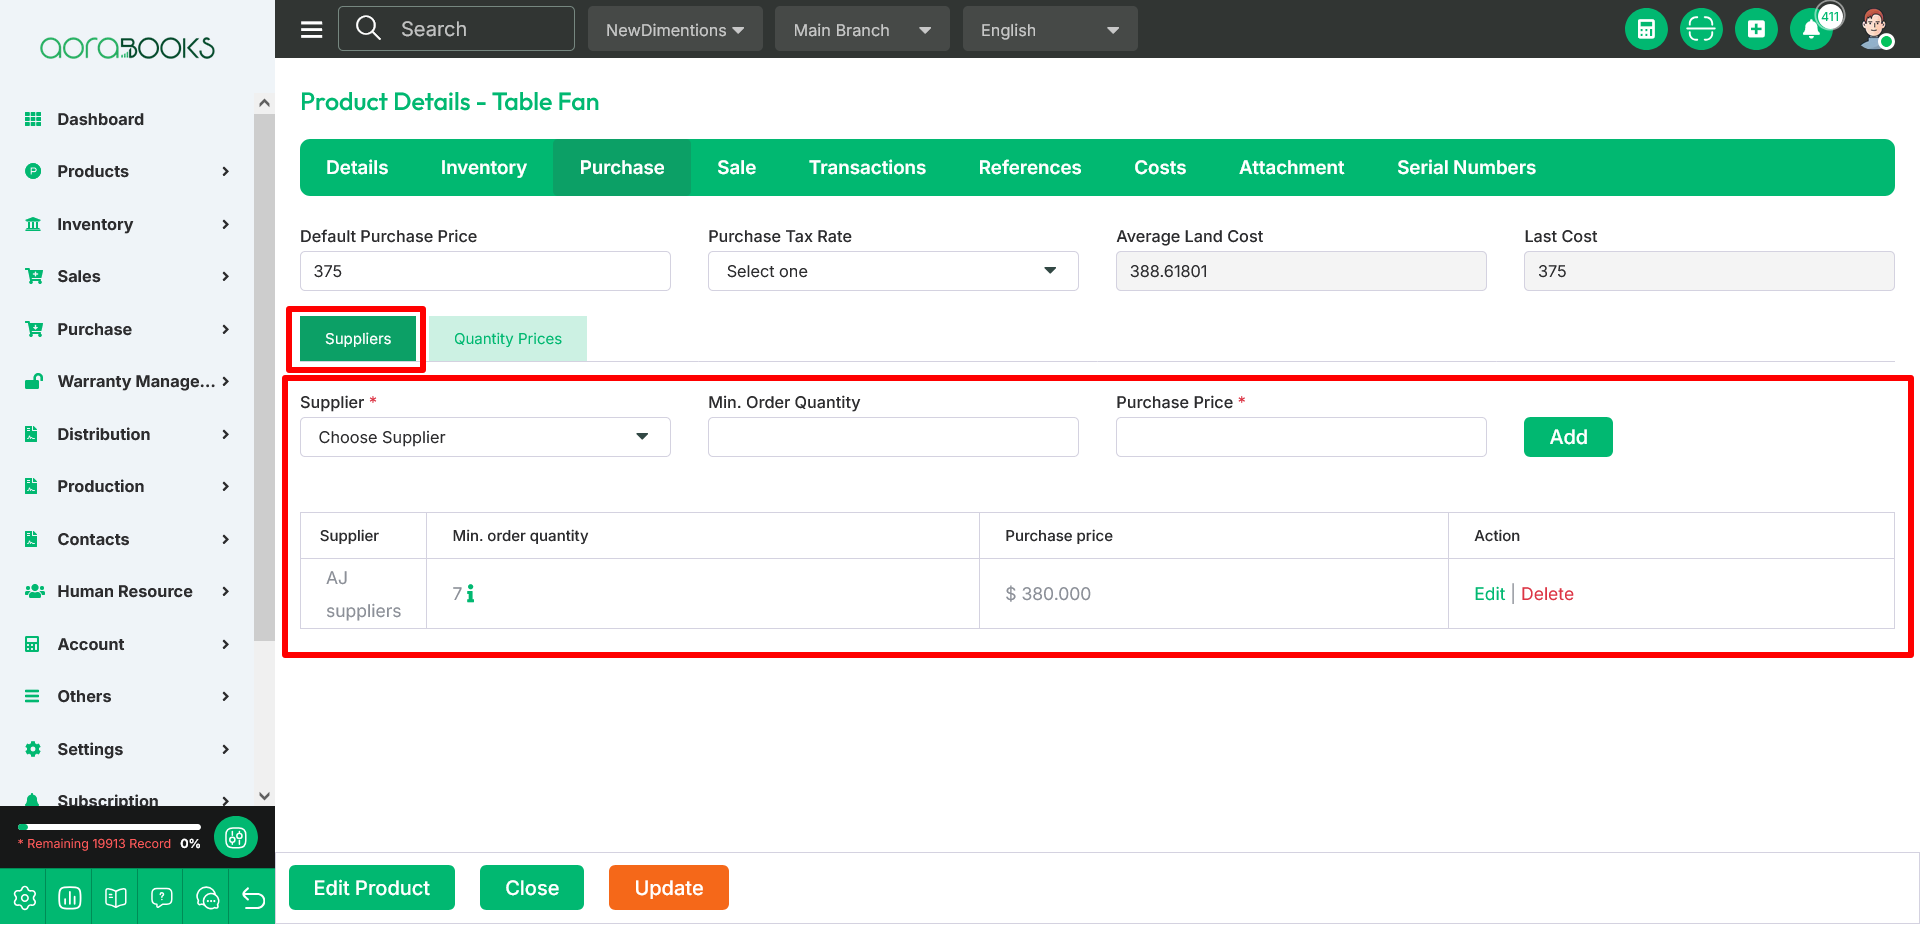
In the supplier section, you can set the product’s purchase price for the selected supplier and specify the quantity ranges that determine the price. Supplier : You can select supplier from here.
Min Order Quantity : You can set the min order quantity of the product.
Purchase Price : You can set the purchase price for the selected supplier.
Add : After filling all the fields then click the add button to complete the process. You can then edit or delete the item from the action.
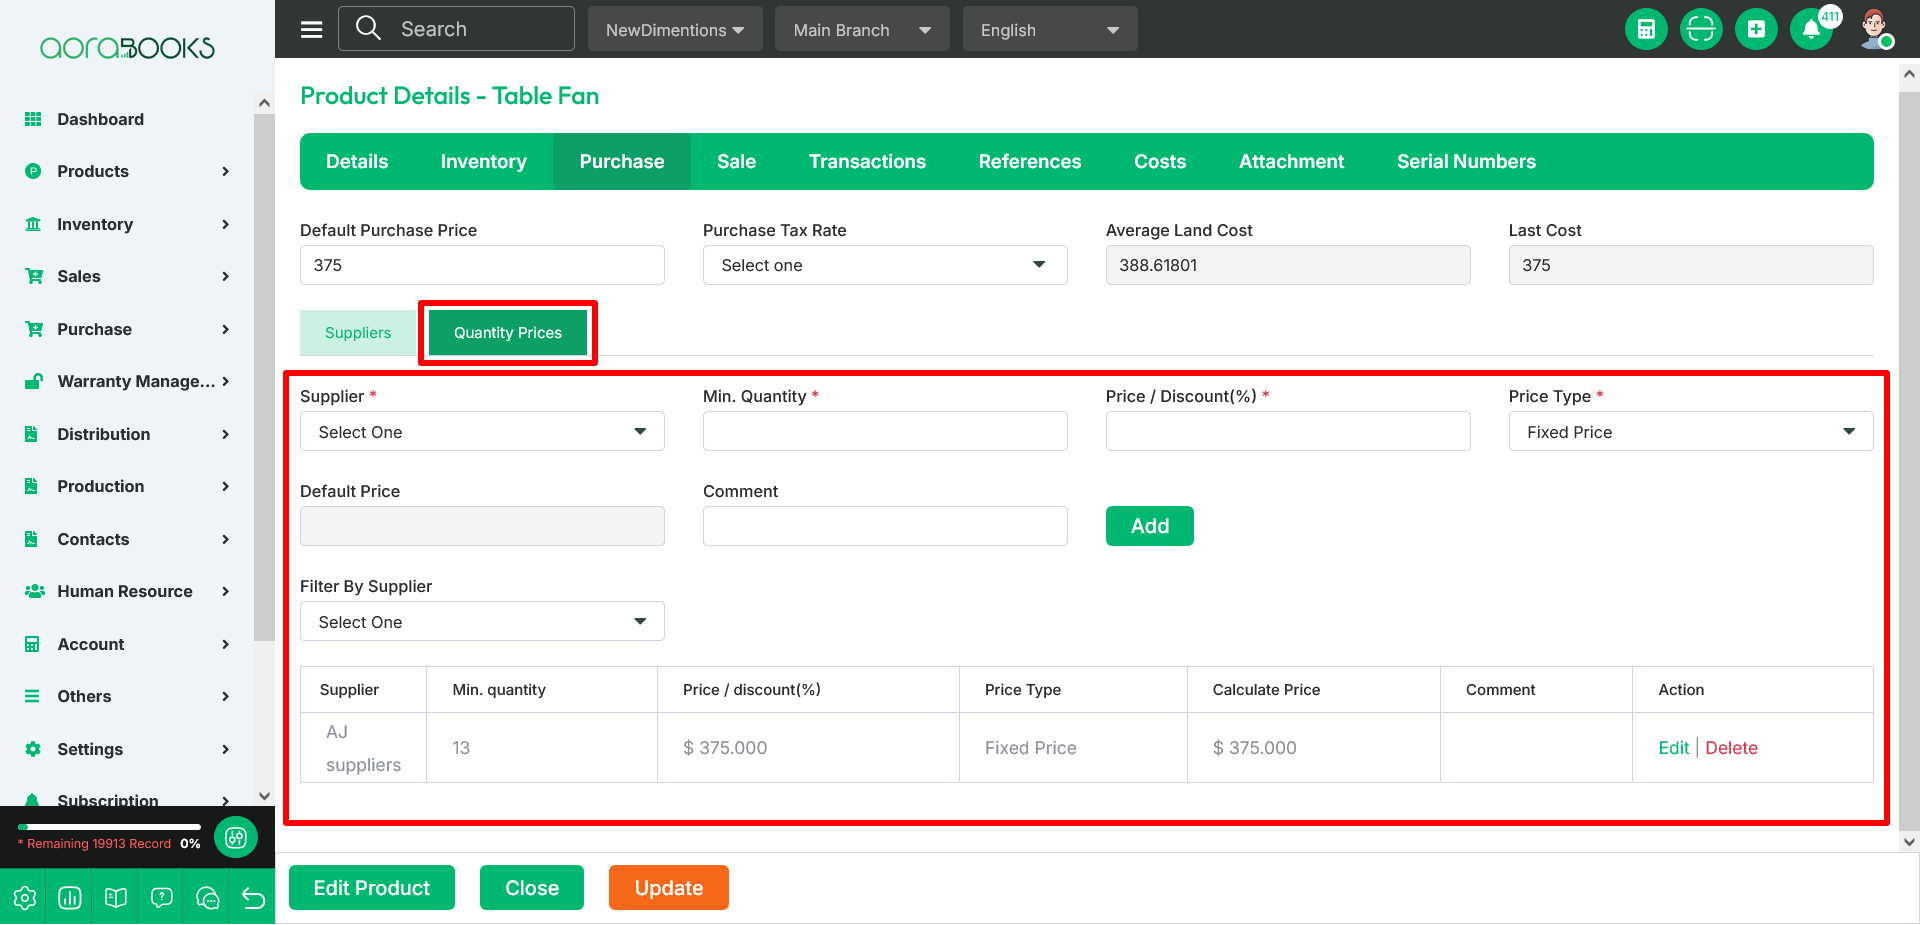
Quantity Price: In the Quantity Price section, you can set different prices for the product based on the quantity. Supplier : you can select supplier from here.
Min Quantity : You can set the minimum quantity.
Price/Discount : you can set the price/discount amount from here.
Price Type : You can set the price type as Fixed Price or Discount.
Comment : You can add comment here.
Add : After filling all the fields then click the add button to complete the process. You can then edit or delete the record from the action.
Filter By Supplier : You can filter the supplier from the list.
Sale : In the sale section, you can see the product’s default sale price, minimum sale price, average landed cost, last cost, average purchase price and also set the sale tax rate.
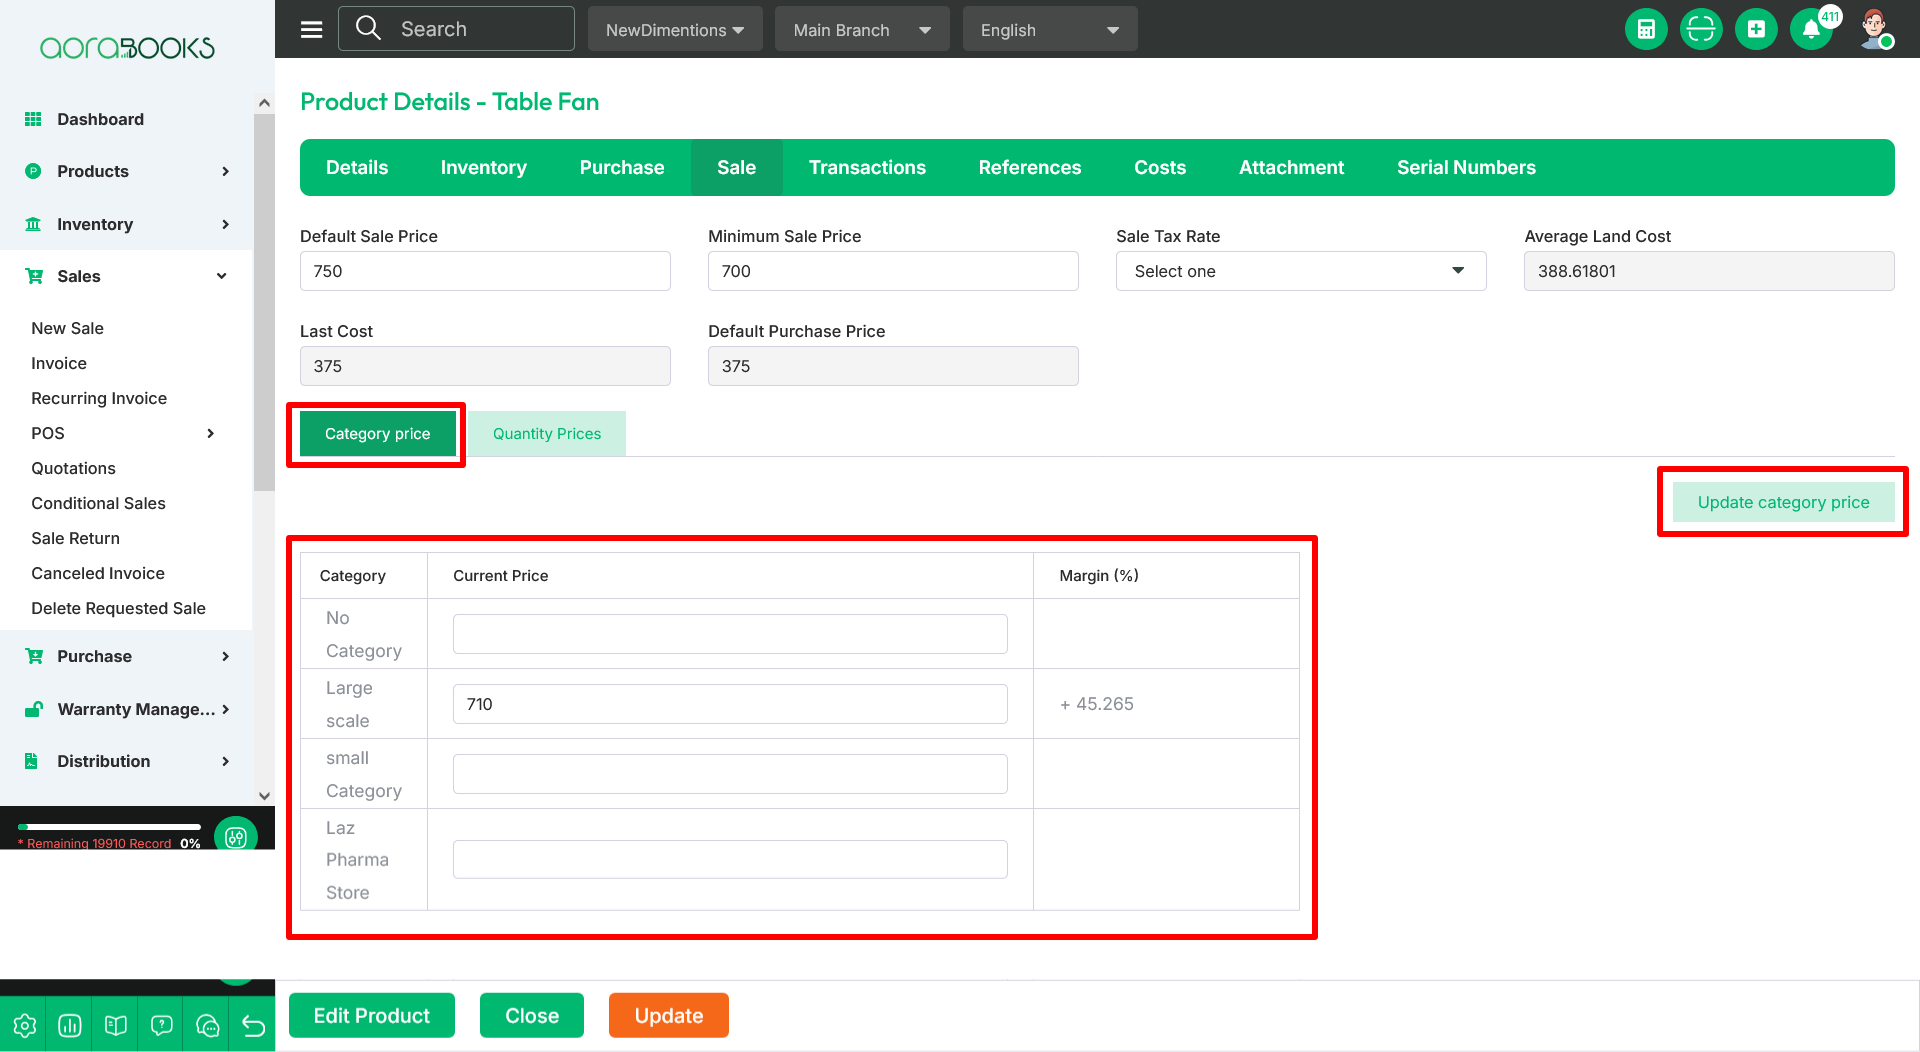
Category Price : In the Category Price section, you can set the sale price based on the customer’s category.
You can set the current sale price of a product based on the customer’s category. However, if the current sale price is lower than the minimum sale price, that price will not be applied during the sale for that customer category.
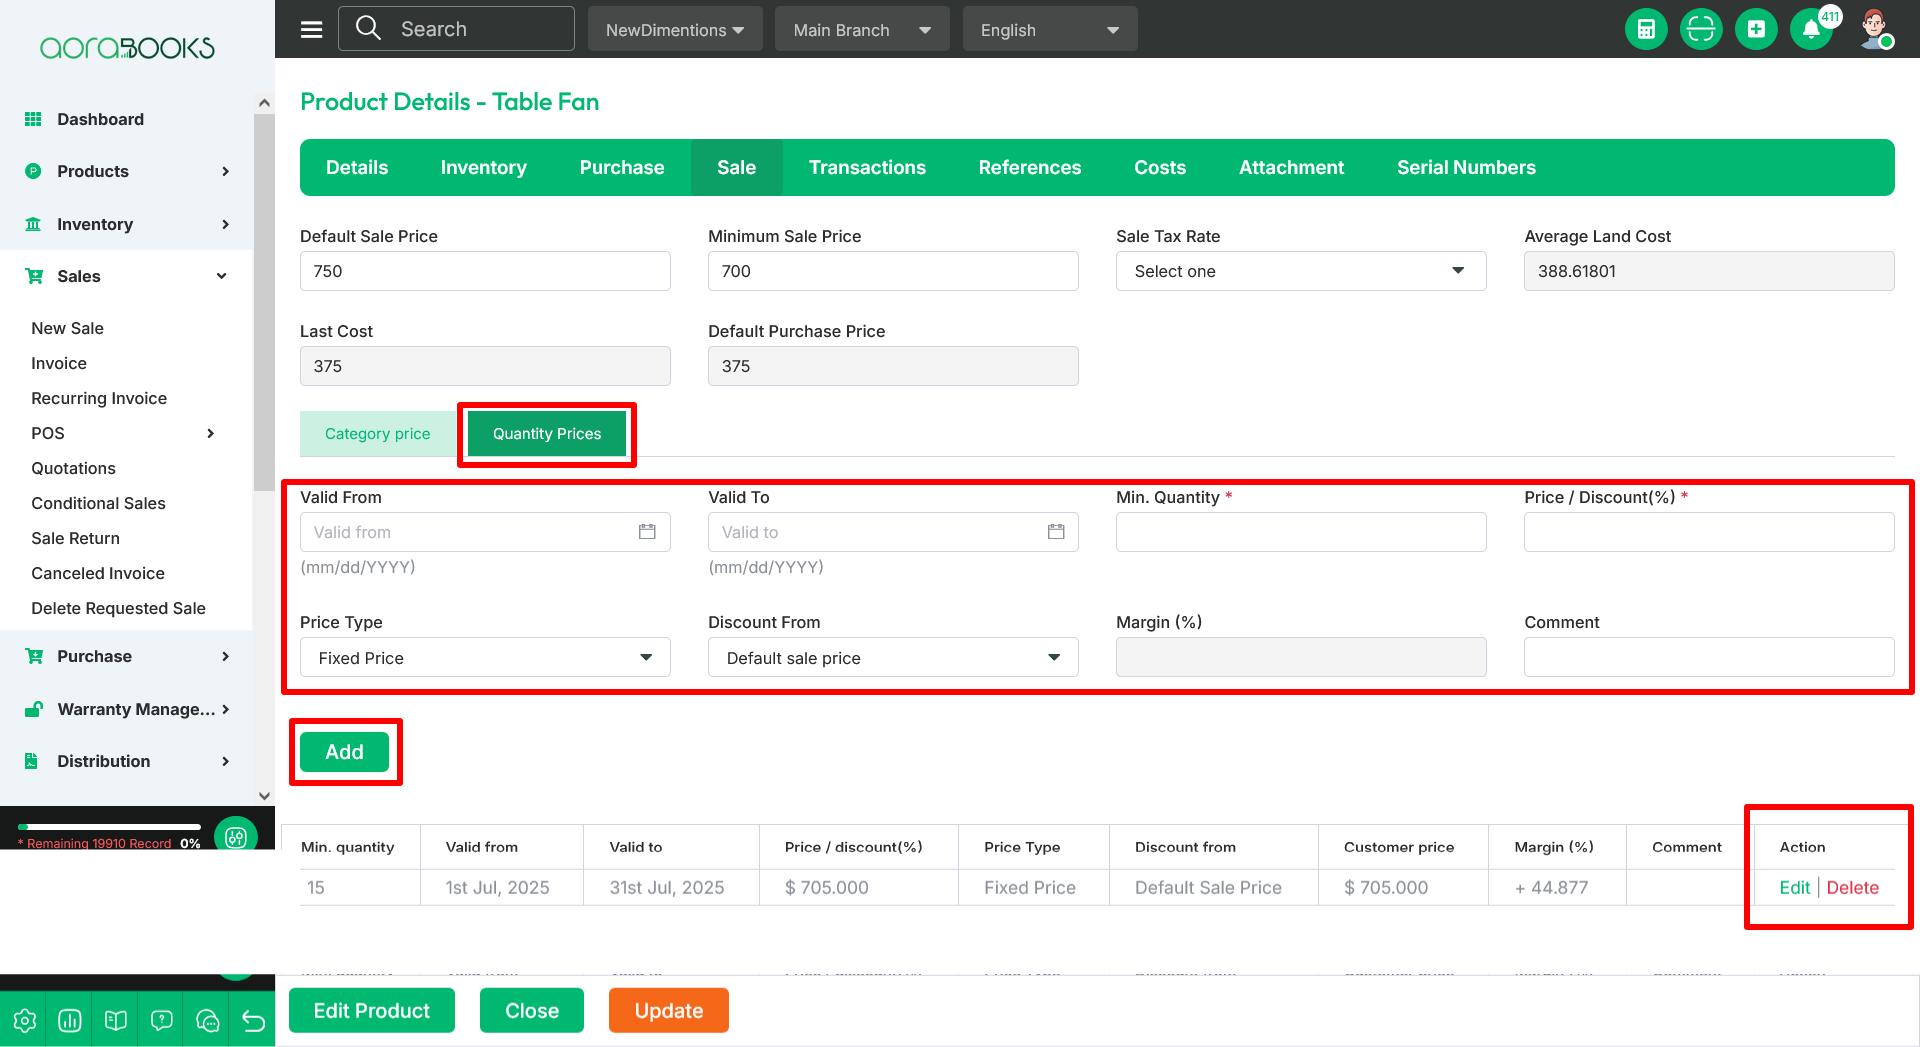
Quantity Price : In the Quantity Price section, you can set the current sale price of the product based on the quantity.
Valid From : Here, you can set the start date for when you want the sale price based on product quantity.
Valid To : Here, you can set the end date for when you want the sale price based on product quantity.
Min Quantity : You can set the min quantity of the product.
Price/Discount : you can set the price/discount amount from here.
Price Type : You can select the price type as Fixed Price or Discount.
Discount From : When you select discount, you can choose here whether the discount amount will be calculated from the default sale price or the category price.
Margin : Here you can see the margin.
Comment : You can add comment here.
Add : After filling all the fields then click the add button to complete the process. You can then edit or delete the record from the action.
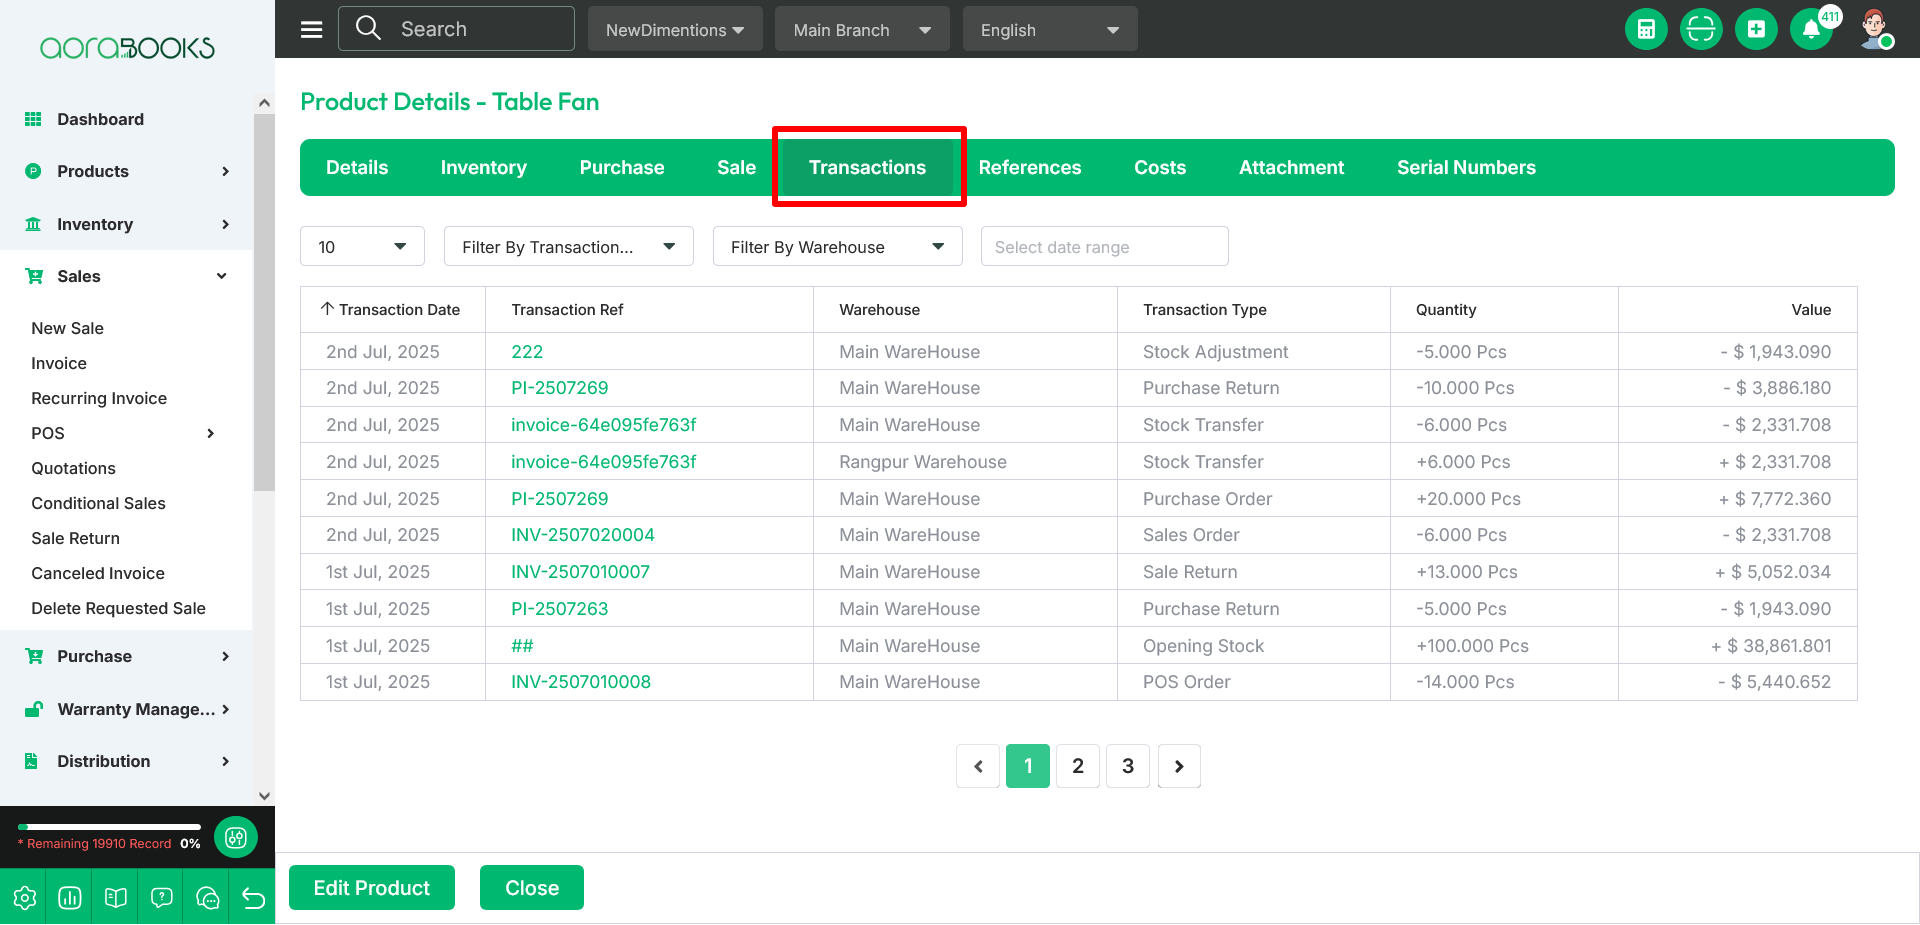
Transaction : When the product’s opening stock, purchases, transfers, sales, and other actions are completed, these transactions will be shown in the Transactions section.
Page Entries : You can set the page entries from here.
Filter By Transaction Type : You can filter the selected transaction type from here.
Filter By Warehouse : You can filter your transaction by selected warehouse from here.
Select Date Range : You can also filter your transaction by selected any date range.
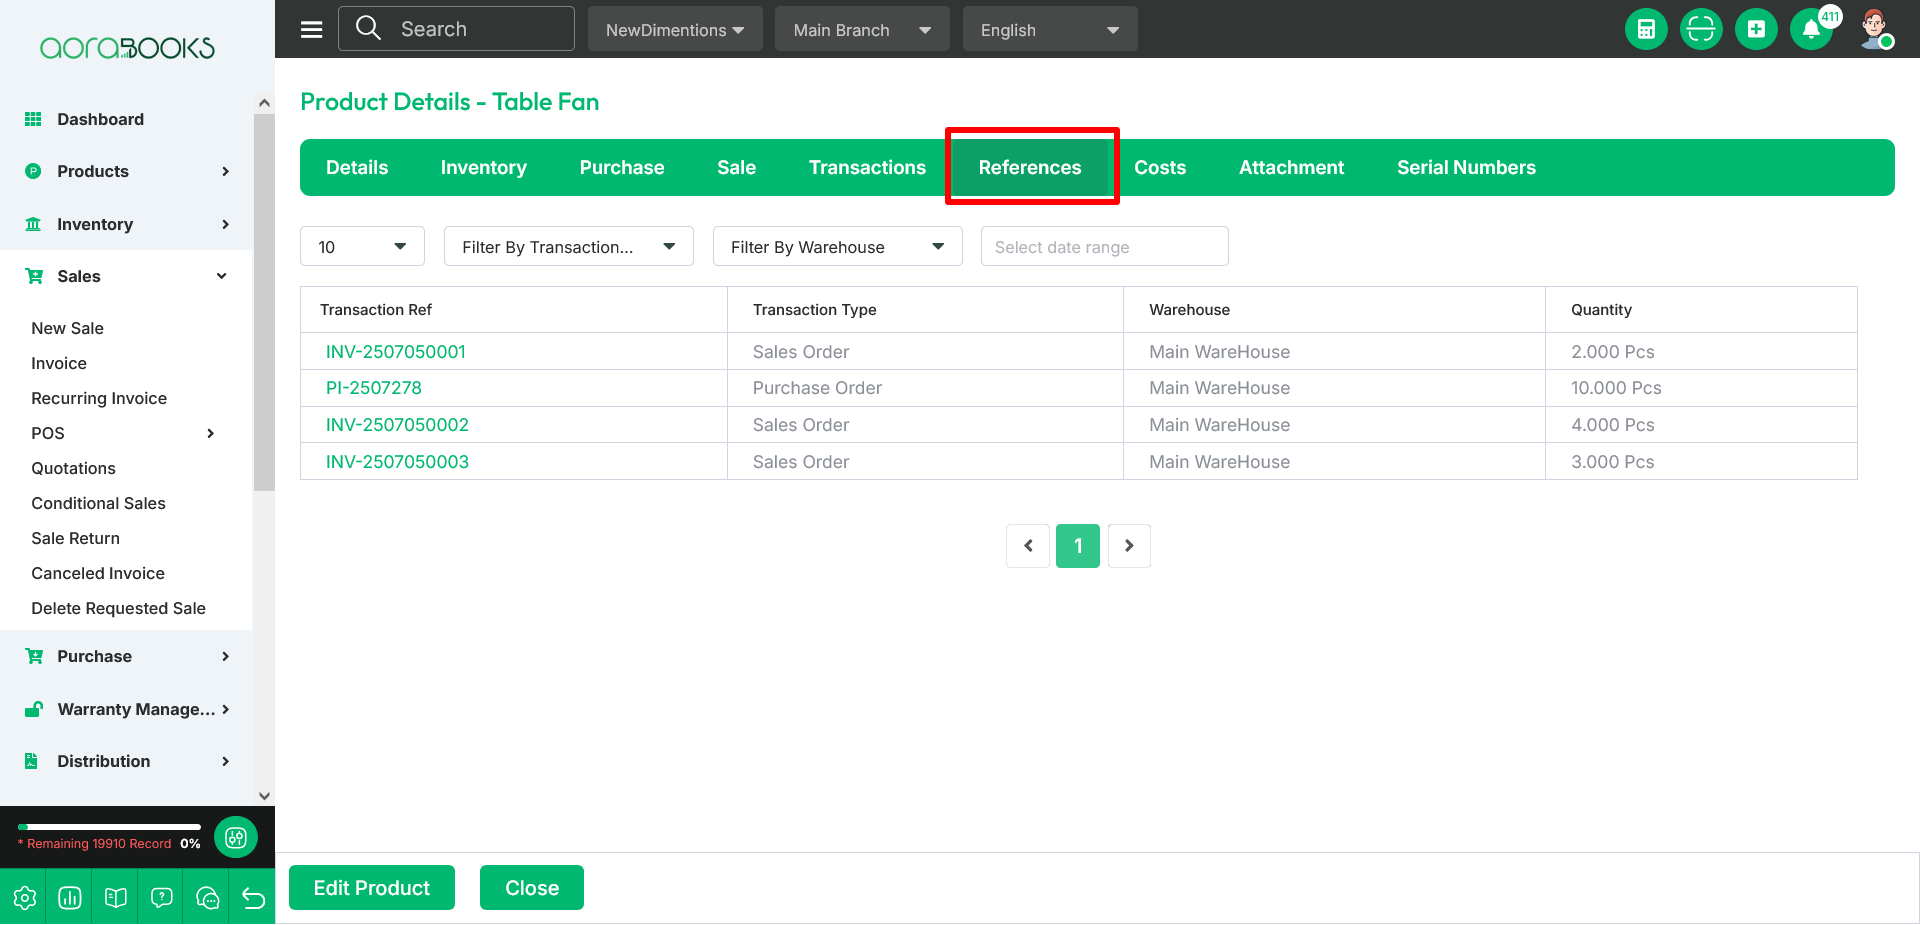
References : When the product’s opening stock, purchases, transfers, sales, and other actions occurred, these transactions will be shown in the References section.
Page Entries : You can set the page entries from here.
Filter By Transaction Type : You can filter the selected transaction type from here.
Filter By Warehouse : You can filter your transaction by selected warehouse from here.
Select Date Range : You can also filter your transaction by selected any date range.
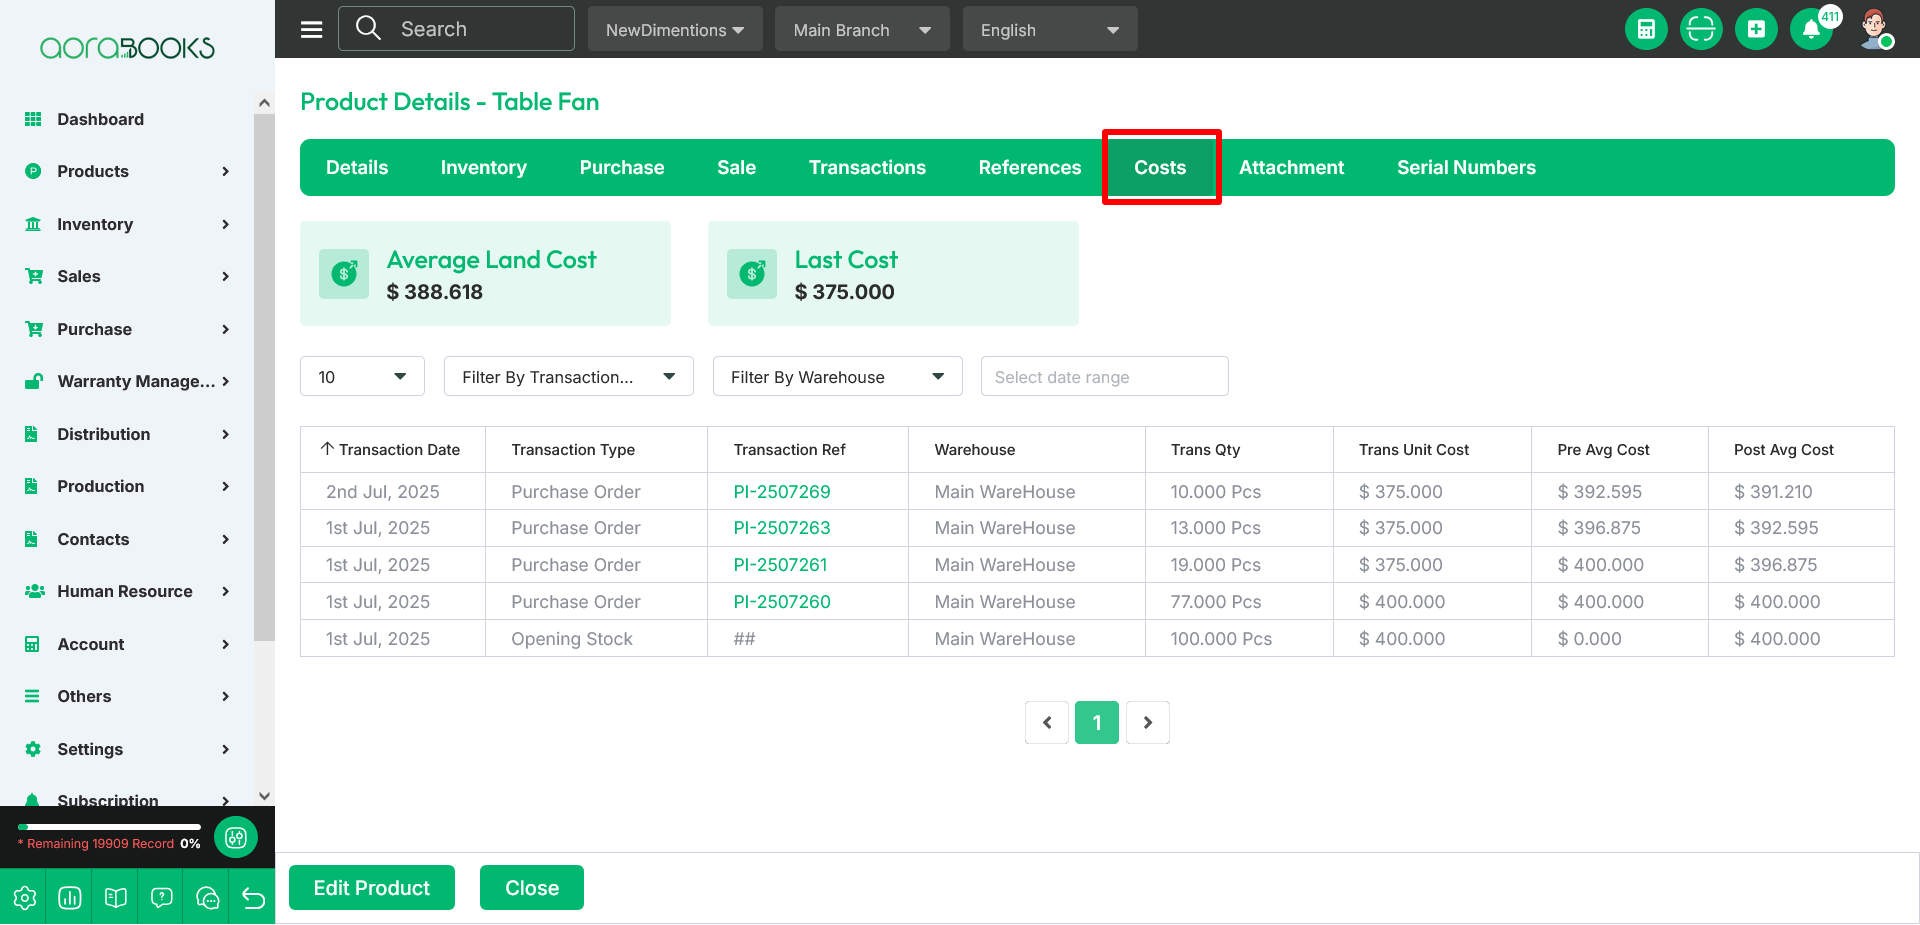
Cost : In the cost section, you can see the average land cost & last cost of the product.
Page Entries : You can set the page entries from here.
Filter By Transaction Type : You can filter the selected transaction type from here.
Filter By Warehouse : You can filter your transaction by selected warehouse from here.
Select Date Range : You can also filter your transaction by selected any date range.
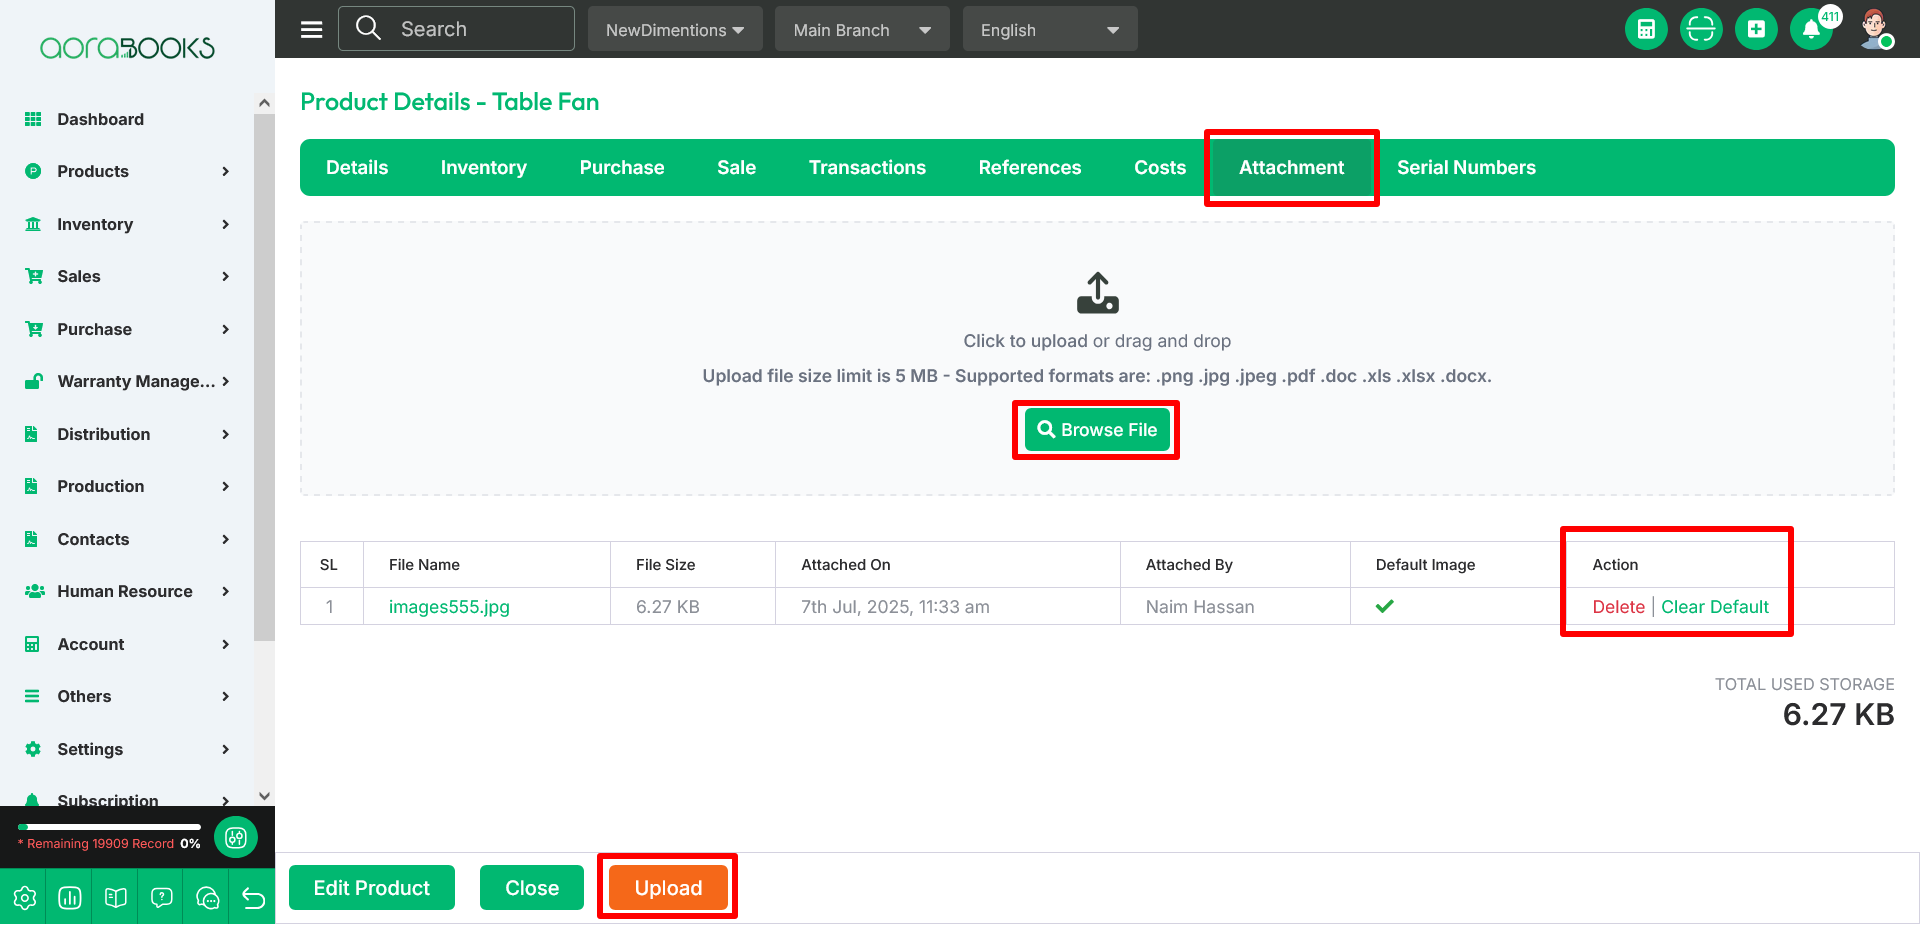
Attachment : In attachment you can upload the default image of the product. you can also delete or clear the default image from the action.
Browse File: You can Browse the image file that you want to upload.
Upload : You can upload your image by clicking Upload button after browse the file.
Action : In action, you can delete or clear the default image.
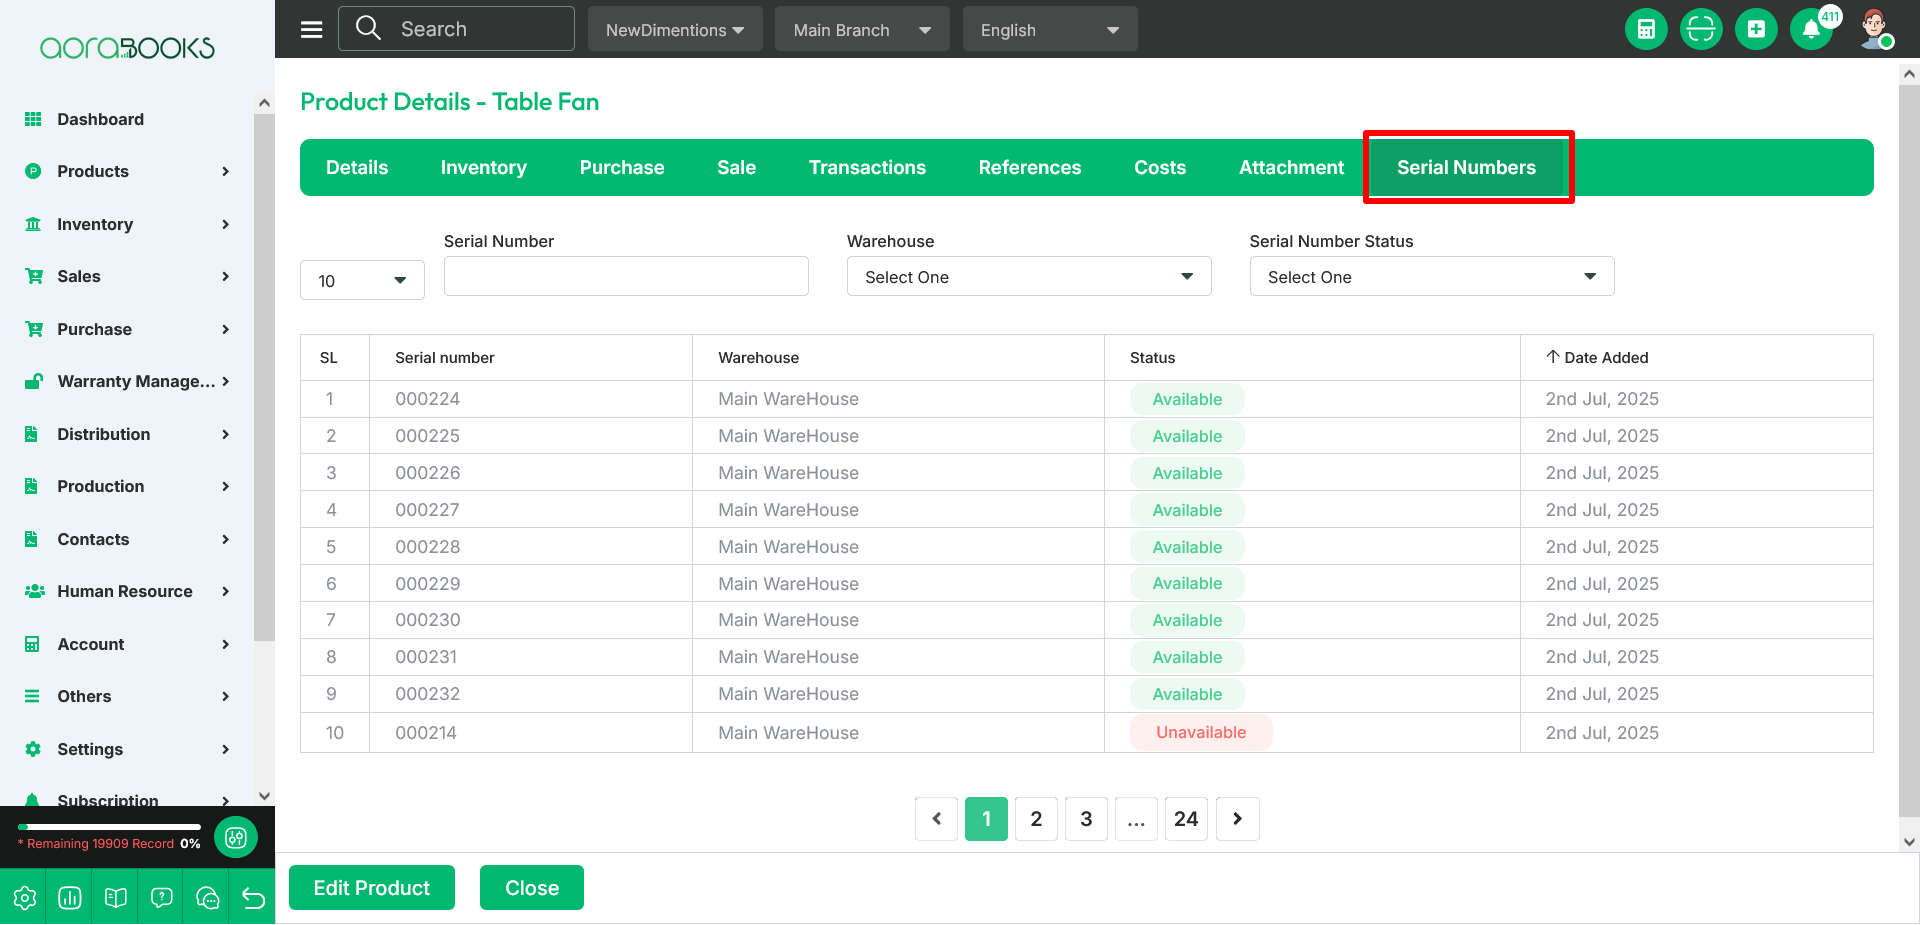
Serial Number : You can check your serialized product serial number from this section.
Page Entries : You can set the page entries from here.
Serial Number : You can also filter the serial number from this section.
Warehouse : You can filter the warehouse here.
Serial Number Status : You can also filter product serial number status from this section.
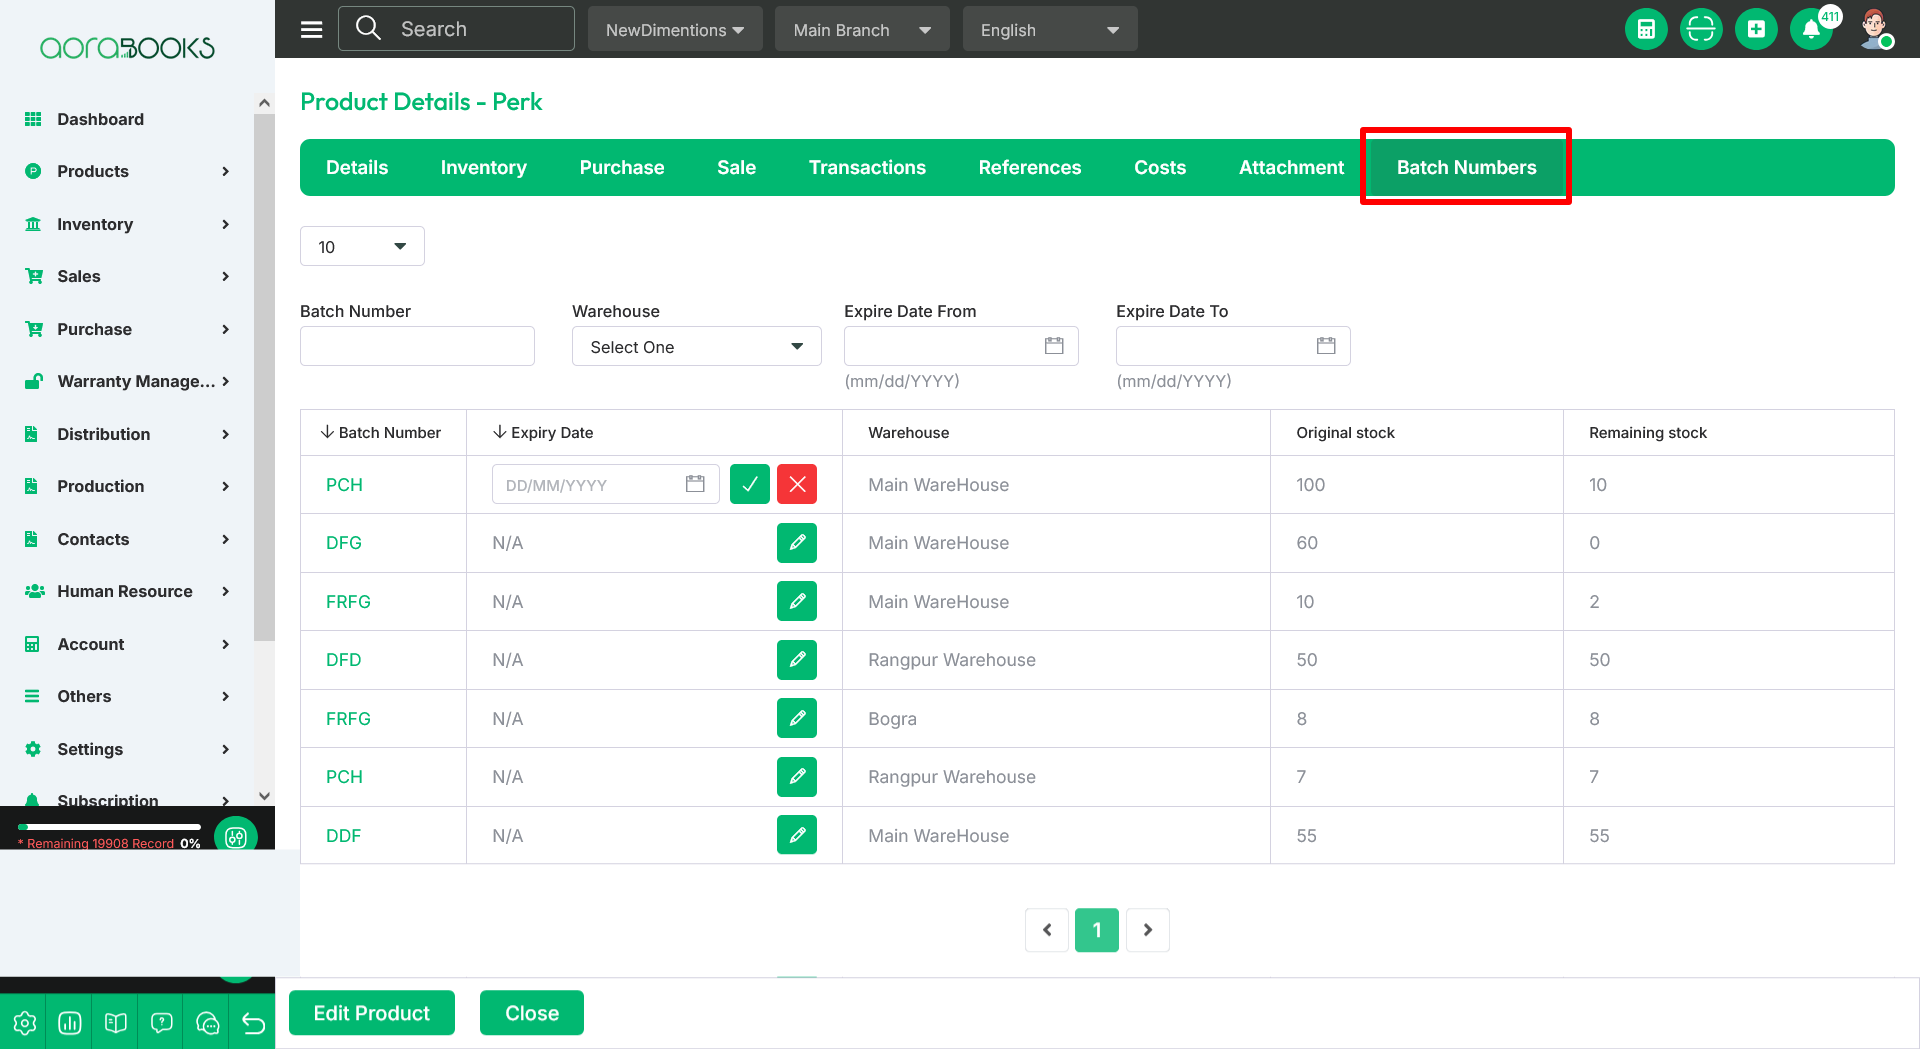
Batch Number : You can check your batch tracked type product batch number & details from here.
Page Entries : You can set the page entries from here. Batch Number : Here you can filter the batch number. Warehouse : In this section you can filter the warehouse. Expire Date From : You can filter the expire date from here. Expire Date To : You can filter the expire date to from here. Expire Date : You can update the batch track product expire date from here.
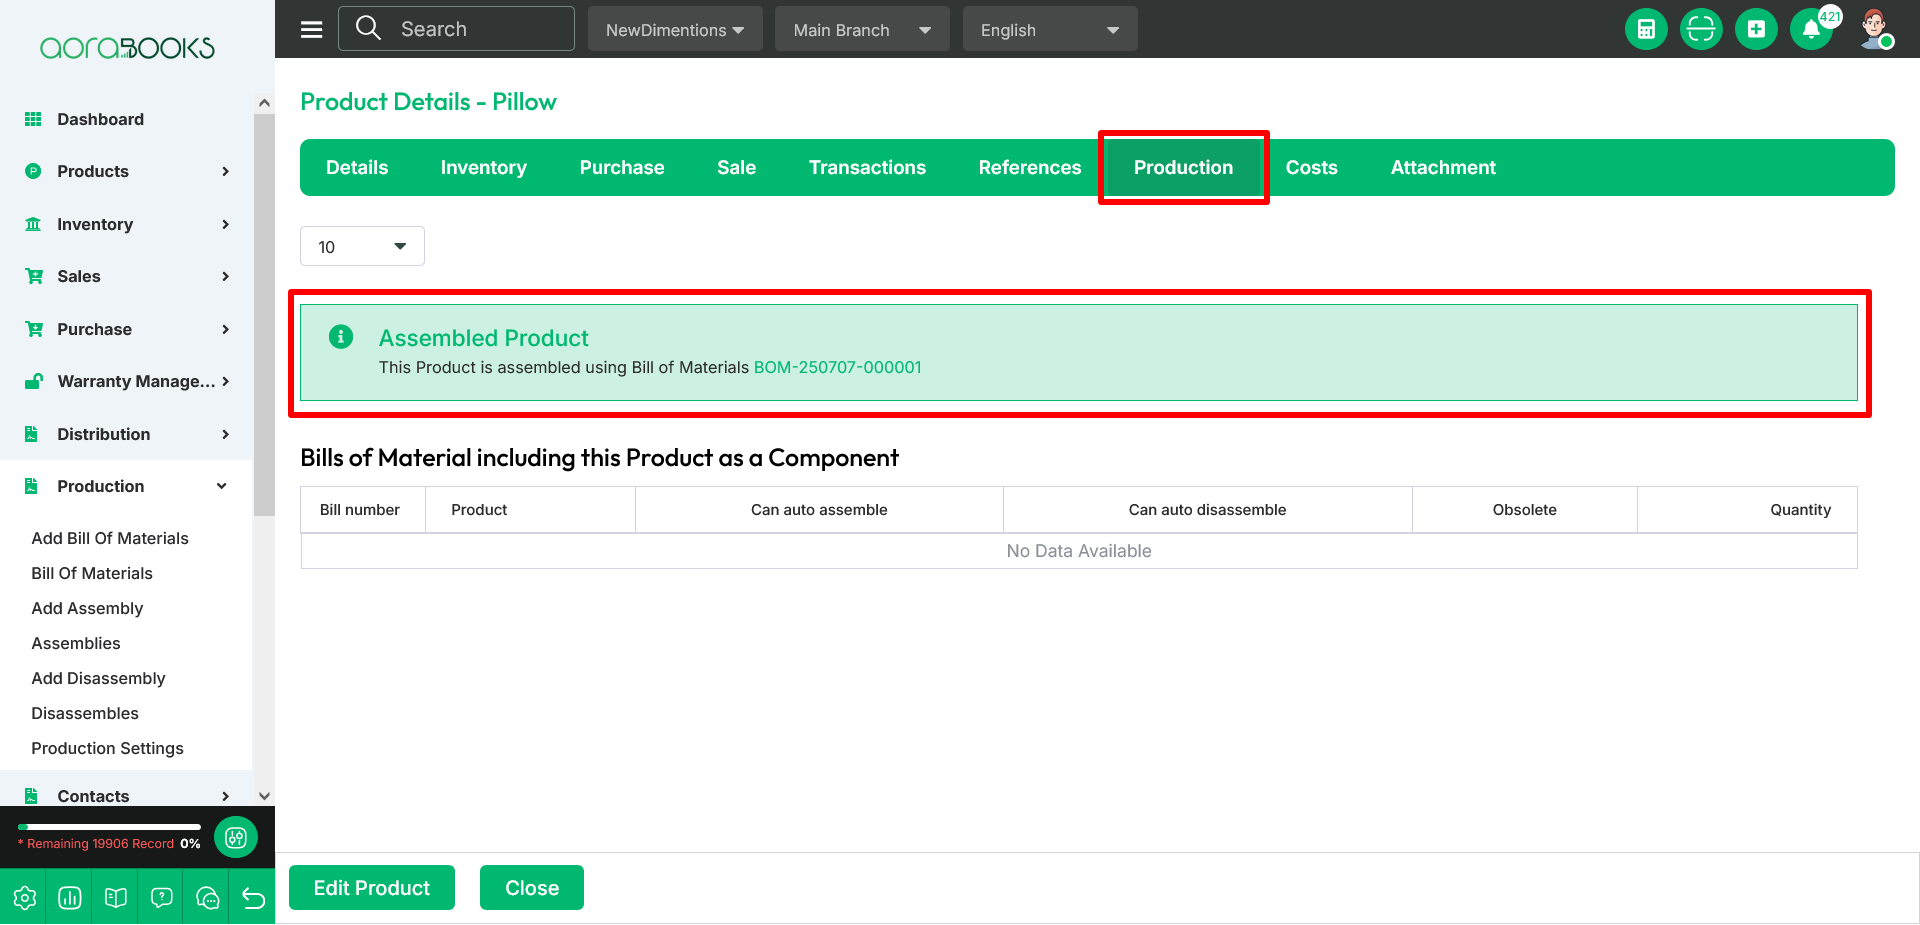
Production: For assembled & component-type products, a Production section will appear in the product details. In this section, you can see which Bill of Materials was used to assemble the product.
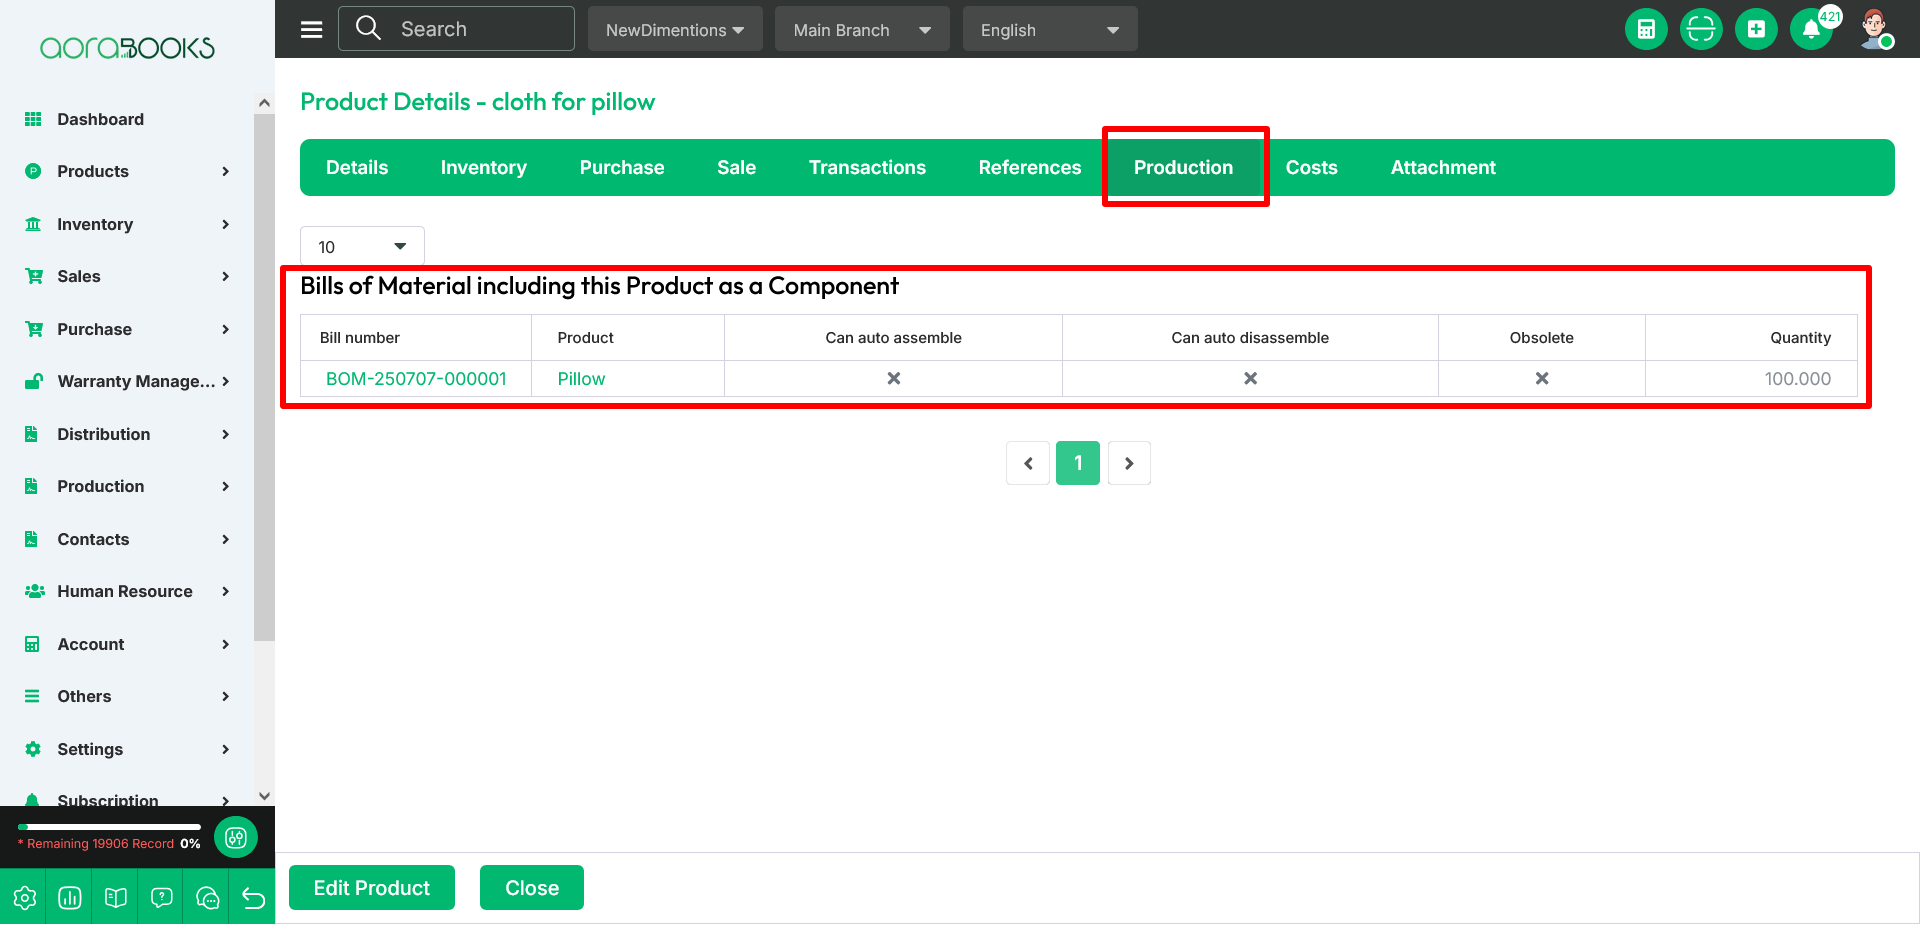
In the Production section, you can view which Bill of Materials includes this product as a component.
Clone : You can clone the product by clicking Clone button from action section.
Delete : You can delete product by clicking Delete button from action.
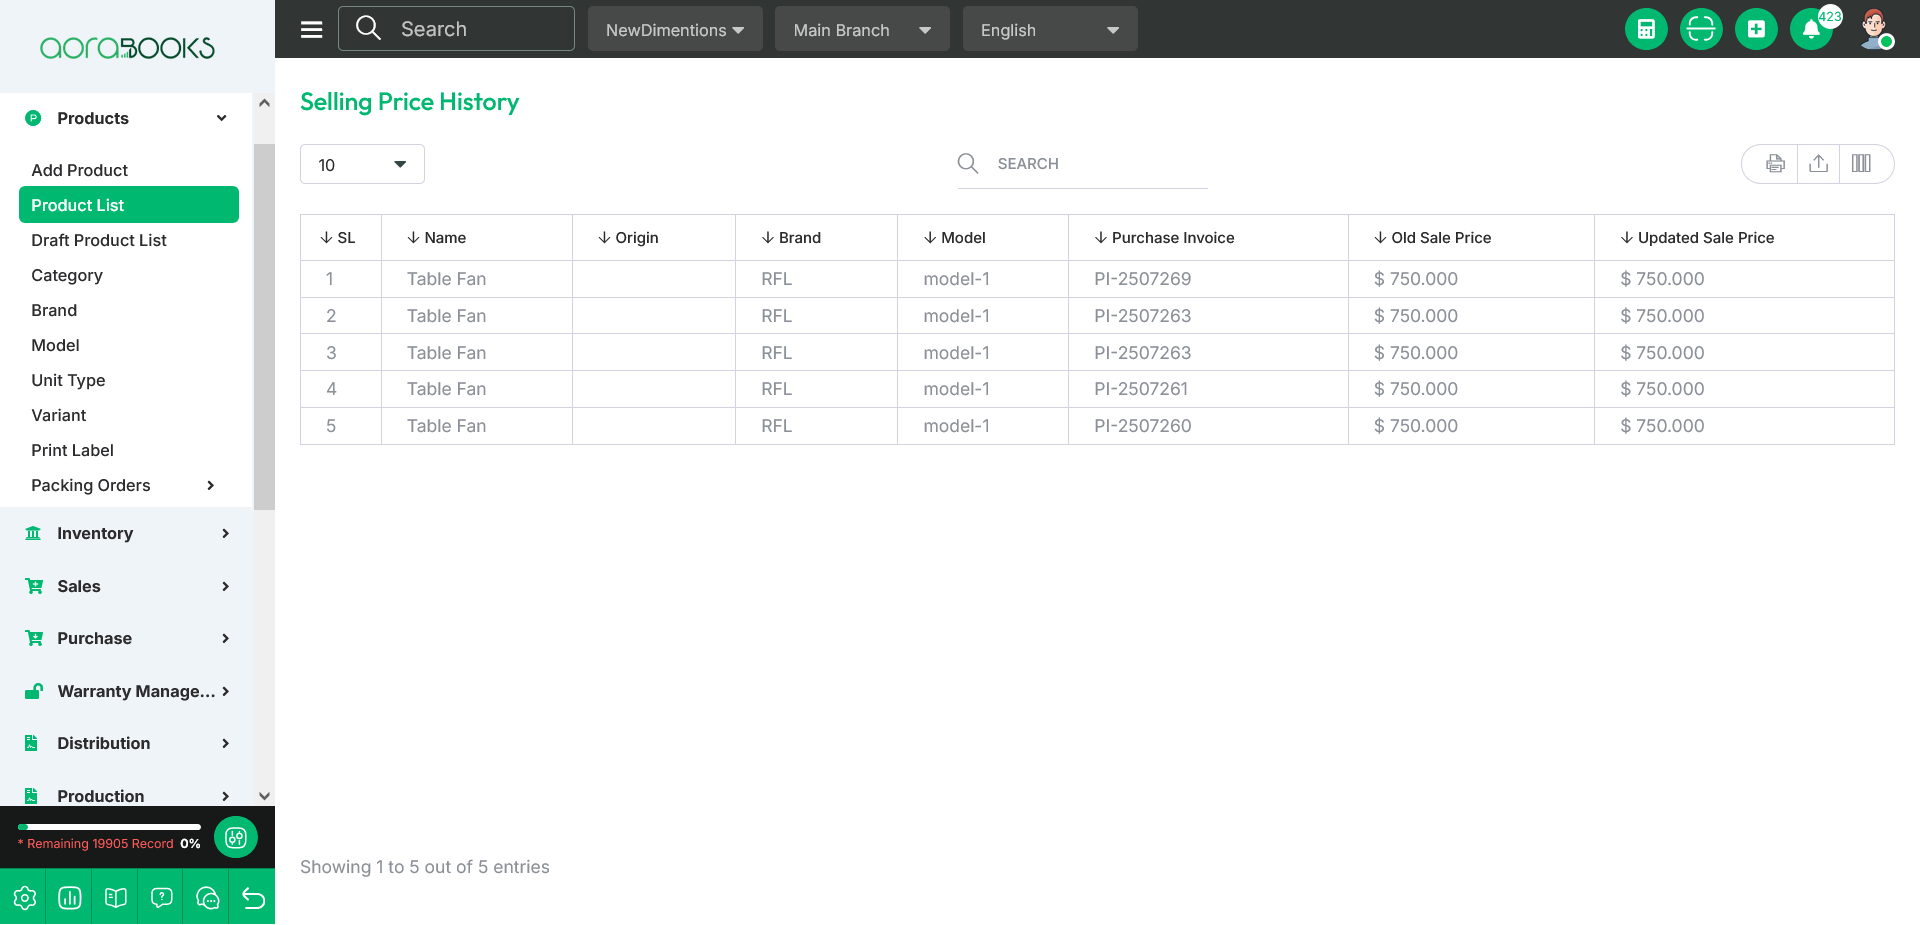
Selling Price History : You can see the selling price history of the product by clicking Selling Price History button from action section.