Amazcart (Cross Platform)
Updated: 12 July 2023
Company: SpondonIT
Thank you for purchasing the app. If you have any questions that are beyond the scope of this help file, please feel free to message us. We really appreciate your curiosity!
App Features
Featured Sliders
Top Categories
New User Zone
Top Brands
Flash Deals
Top Picks Products
Discounted Products
Product Recommendations
Notifications
Variant Products
Cart
Checkout
Order List
Cancellations list
Refunds and Disputed Products
Review Products
Support system
Wallet system
Address Book
Language support
Currency support
Social Authentication
OTP module (paid)
Pickup Location
Multiple shipping methods
Multivendor
Payment Gateways
Cash on Delivery
Wallet Payment
Paypal
Stripe
PayStack
Razorpay (India)
Bank Payment
Instamojo
PayTM (India)
Midtrans
JazzCash
Flutterwave
Security
Token based Authentication
How to Install Flutter on Windows?
Minimum System RequirementsOperating Systems: Windows 7 or later [64-bit]
Disk Space: 400 MB
Git for Windows
Flutter SDK 2.10.5-stable
Get the Flutter SDK
Download Flutter SDK HERE
Unzip the downloaded zip in C:\flutter .
Locate flutter_console.bat inside the flutter directory and start it by double-clicking.
Update your path
If you wish to run Flutter commands in the regular Windows console, take these steps to add Flutter to the PATHenvironment variable:
From the Start search bar, type ‘env’ and select Edit environment variables for your account.
Under User variables check if there is an entry called Path:
If the entry does exist, append the full path to flutter\bin using; as a separator from existing values.
If the entry does not exist, create a new user variable named Path with the full path to flutter\bin as its value.
Note that you will have to close and reopen any existing console windows for these changes to take effect.
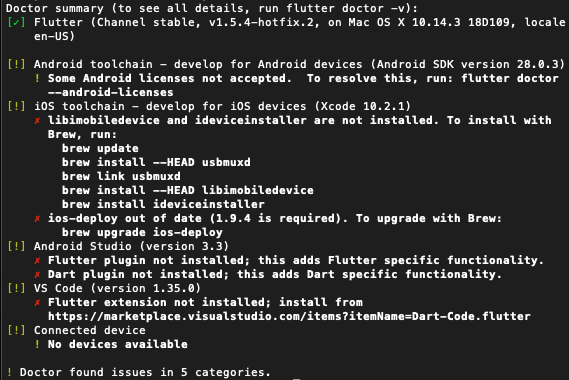
Run flutter doctor
From a console window which has the Flutter directory in the path (see above), run the following command to see if there are any platform dependencies you need to complete the setup:
C:\flutter>flutter doctor
This command checks your environment and displays a report of the status of your Flutter installation. Check the output carefully for other software you may need to install or further tasks to perform (shown in bold text).
For example:
[-] Android toolchain - develop for Android devices
• Android SDK at C:\Android\sdk
✗ Android SDK is missing command line tools; download from https://goo.gl/XxQghQ
• Try re-installing or updating your Android SDK,
visit https://flutter.dev/setup/#android-setup for detailed instructions.
Android Setup
Flutter relies on a full installation of Android Studio to supply its Android platform dependencies. However, you can write your Flutter apps in a number of editors.
Install Android Studio
Download and install Android Studio.
Start Android Studio, and go through the ‘Android Studio Setup Wizard’. This installs the latest Android SDK, Android SDK Platform Tools, and Android SDK Build Tools, which are required by Flutter when developing for Android.
Set up your Android device
To prepare to run and test your Flutter app on an Android device, you’ll need an Android device running Android 5.0 (API level 21) or higher.
Enable Developer options and USB debugging on your device. Detailed instructions are available in the Android documentation.
Windows-only: Install the Google USB Driver
Using a USB cable, plug your phone into your computer. If prompted on your device, authorize your computer to access your device.
In the terminal, run the Flutter devices command to verify that Flutter recognizes your connected Android device.
By default, Flutter uses the version of the Android SDK where your adb tool is based. If you want Flutter to use a different installation of the Android SDK, you must set the ANDROID_HOME environment variable to that installation directory.
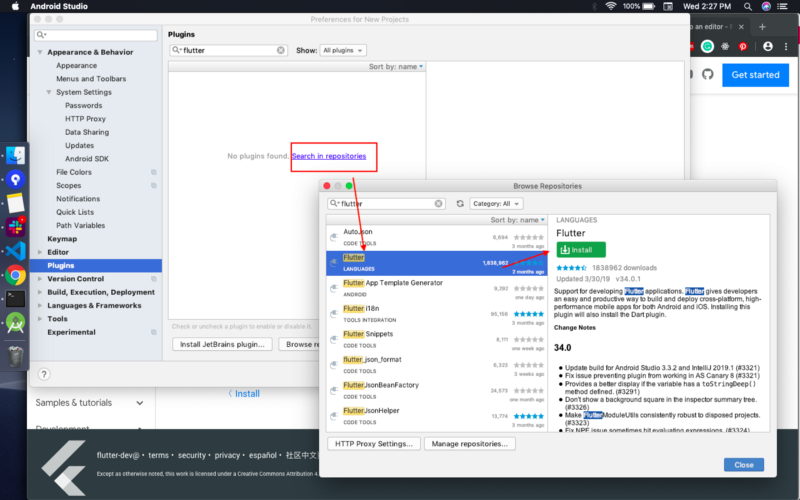
Install the Flutter and Dart plugins
Start Android Studio.
Open plugin preferences (File > Settings > Plugins).
Select Browse Repositories, select the Flutter plugin and click Install.
Click Yes when prompted to install the Dart plugin.
Click Restart when prompted.
How to Install Flutter on MacOS
Minimum System Requirements
Operating Systems: macOS [64-bit]
Disk Space: 700 MB
Git for macOS
Flutter SDK 2.10.5-stable
Download the Latest Flutter SDK HERE
Extract the file in the desired location e.g.
cd ~/development
unzip ~/Downloads/flutter_macos_v1.5.4-hotfix.2-stable.zip
Add the flutter tool to your path. To do this, open your bash profile from your terminal (might need sudo)
sudo vim ~/.bash_profile
Add your flutter path to the $PATH variable in bash_profile.
E.g. If you extracted flutter in your Applications folder, your path will be /Applications/flutter/bin. Add this to the existing $PATH variable by using: in between two paths. Once added, save and close the bash_profile. Run the terminal again and check the $PATH by running.
echo $PATH
You should see your Flutter path added to the $PATH
Run Flutter precache in the terminal.
Run flutter doctor
Run the following command to see if there are any dependencies you need to install to complete the setup (for verbose output, add the -v flag):
flutter doctor
This command checks your environment and displays a report in the terminal window. The Dart SDK is bundled with Flutter; it is not necessary to install Dart separately. Check the output carefully for other software you may need to install or further tasks to perform (shown in bold text). For example: If you haven’t used Flutter before, you might see an output like this by running flutter doctor.
You can see there are several things to be done to begin using Flutter on this Mac. To correct these issues, let’s run the following commands.
Fix license issue in Android studio
$ brew update
$ brew install --HEAD usbmuxd
$ brew link usbmuxd
$ brew install --HEAD libimobiledevice
$ brew install device installer
Update iOS-deploy
npm install -g ios-deploy
iOS Setup
Install Xcode
To develop Flutter apps for iOS, you need a Mac with Xcode 9.0 or newer:
Install Xcode 9.0 or newer (via web download or the Mac App Store).
Configure the Xcode command-line tools to use the newly-installed version of Xcode by running the following from the command line:
sudo Xcode-select --switch /Applications/Xcode.app/Contents/Developer
This is the correct path for most cases when you want to use the latest version of Xcode. If you need to use a different version, specify that path instead.
Make sure the Xcode license agreement is signed by either opening Xcode once and confirming or running sudo xcodebuild -license from the command line.

With Xcode, you’ll be able to run Flutter apps on an iOS device or on the simulator.
Set up the iOS simulator
To prepare to run and test your Flutter app on the iOS simulator, follow these steps:
On your Mac, find the Simulator via Spotlight or by using the following command:
open -a Simulator
Make sure your simulator is using a 64-bit device (iPhone 5s or later) by checking the settings in the simulator’s Hardware > Device menu.
Depending on your development machine’s screen size, simulated high-screen-density iOS devices may overflow your screen. Set the device scale under the Window > Scale menu in the simulator.
Android Studio — Install Flutter and Dart plugins
Start Android Studio.
Open plugin preferences (Preferences > Plugins on macOS, File > Settings > Plugins on Windows).
Select Browse Repositories, select the Flutter plugin and click Install.
Click Yes when prompted to install the Dart plugin.
Click Restart when prompted.
After opening the project in Android Studio. Select the terminal from the bottom, type this command and hit enter.
flutter pub get
How to change the Package name and App Name and run on devices
Android Package name:
Go to lms_flutter_app > android > app folder.
Open build.gradle file.
Type in your app package name in the application

Android App name:
Go to lms_flutter_app > android > app > src > main folder.
Open the AndroidManifest.xml file.
Type in your app name in android:label

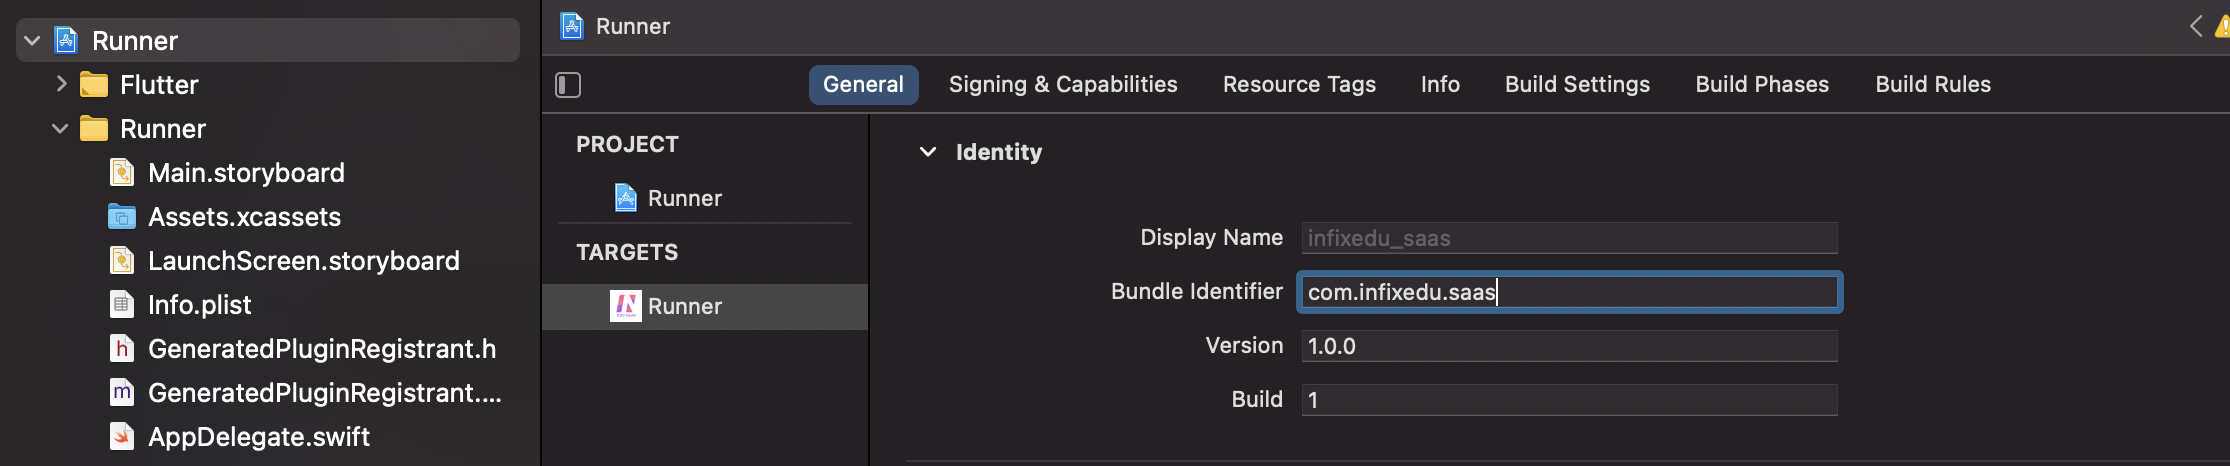
iOS Package Name and App Name:
Go to lms_flutter_app > ios > folder
Open Runner.xcworkspace file with XCODE
Select Runner from the left panel and Select General.
Change the display name for your app name and Bundle Identifier for a package name.
How to run on real Android devices?
Connect your device
Open Android Studio. From the device dropdown, select your device and hit the play button
How to run on real iPhone devices?
Connect your device
In the terminal type cd ios
Then type pod install. If you're using M1 Mac devices, follow this link for pod install > Click here
Then go to amazcart_app > ios folder and open Runner.xcworkspace with Xcode
Select iPhone from the phone dropdown and hit the play button
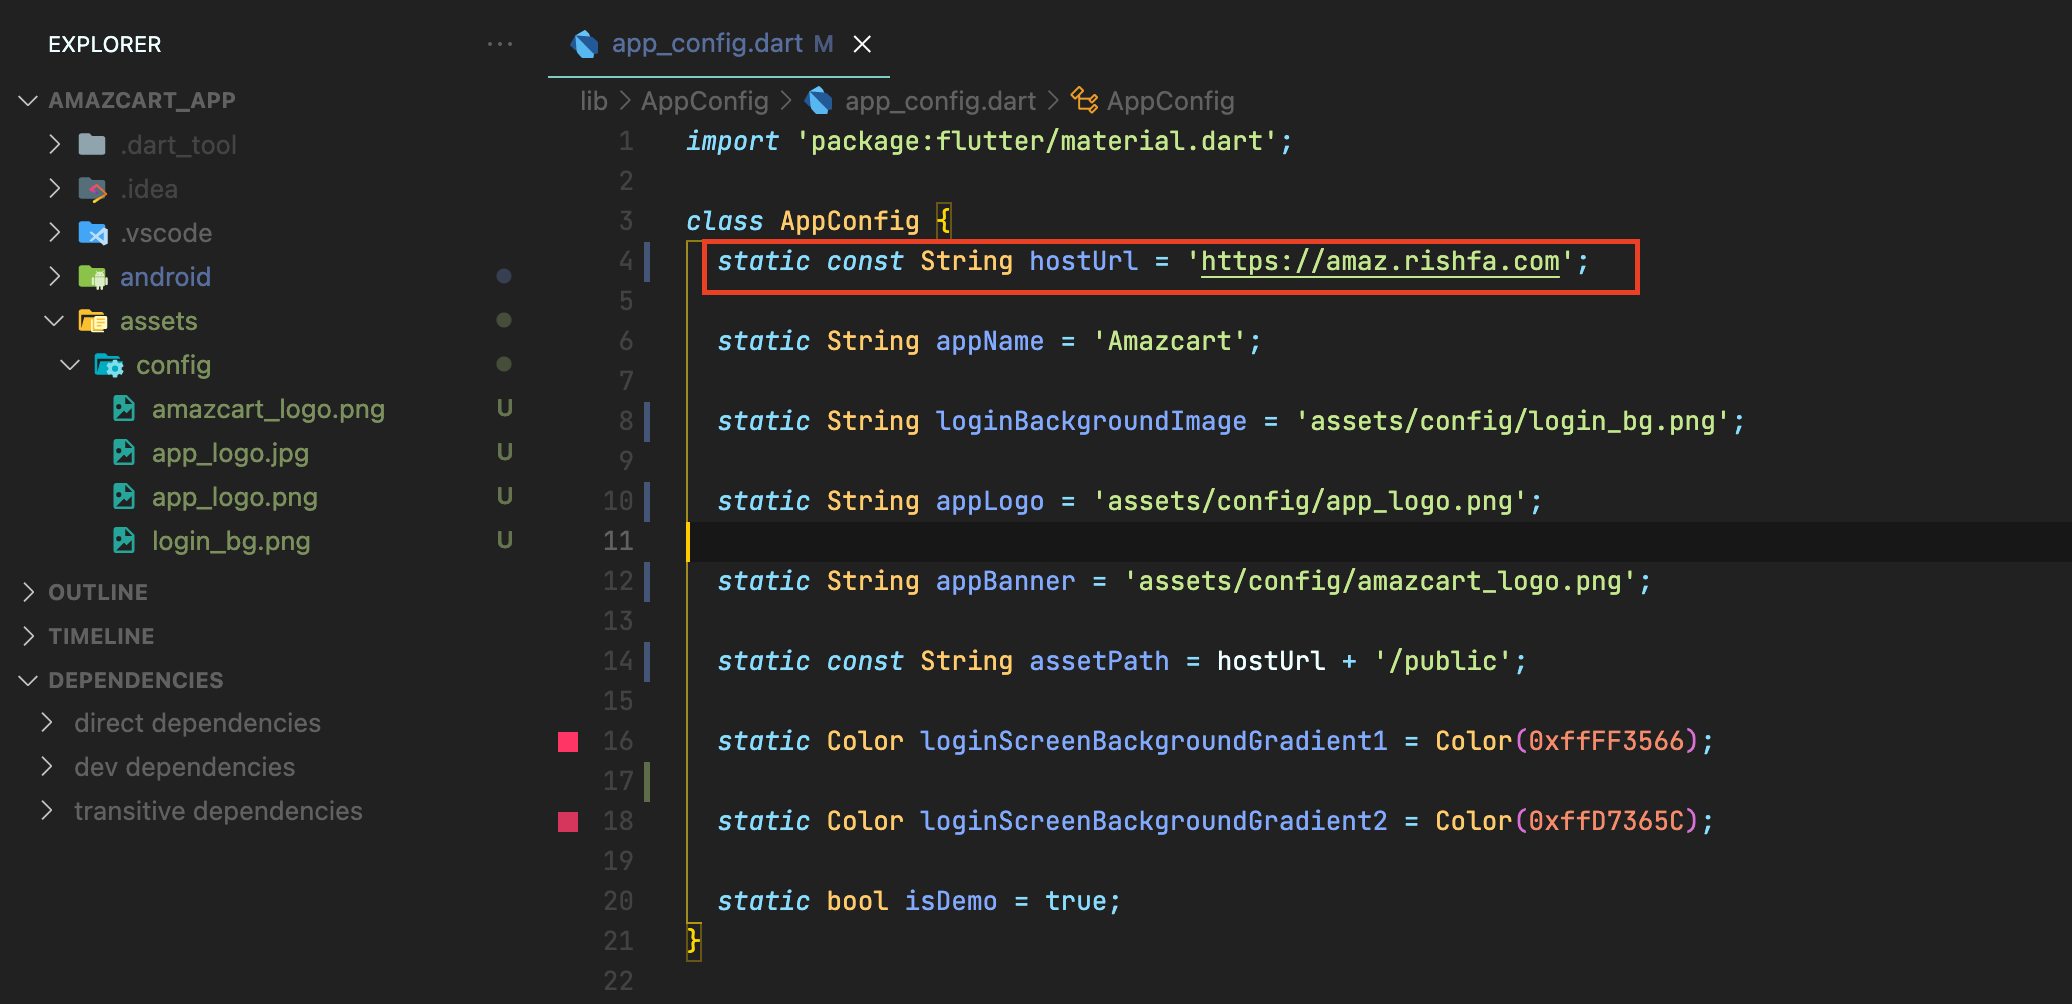
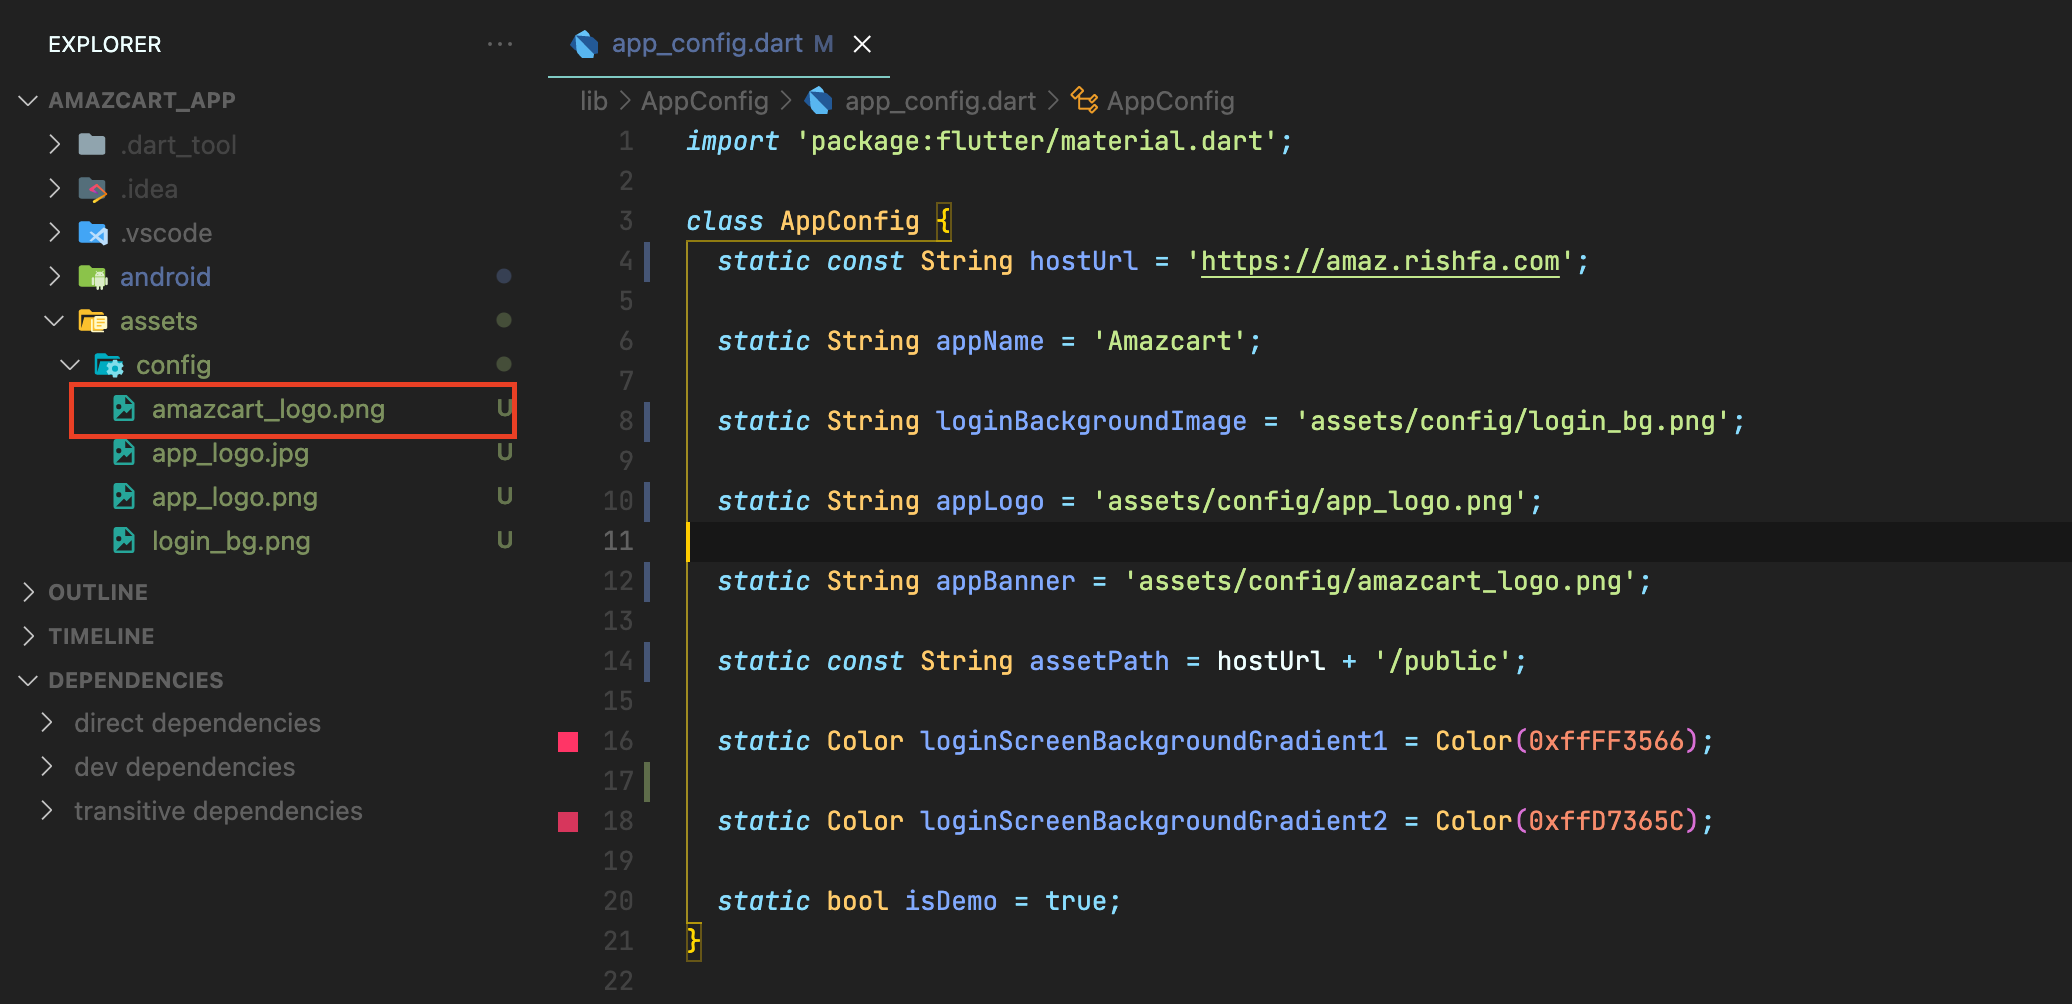
Where to put the Server Url in the Application?
Go to amazcart_app > lib folder > AppConfig folder > app_config.dart > then change the hostUrl with your URL
If your Server is https://www.abc.com then the root URL will be
Add Privacy policy URL
First, create dynamic pages from admin dashboard > Frontend CMS > Dynamic pages
Go to amazcart_app > lib folder > AppConfig folder > app_config.dart > then change the privacy policy URL with your Privacy policy URL
Change company name and app graphics
Change App Name
Go to amazcart_app > lib folder > AppConfig folder > app_config.dart > then change appName to your Company Name
Change App Icon

Go to amazcart_app > assets folder > config folder.
Replace app_logo.jpg with your app logo. Keep the file name app_logo.jpg and the image must be a jpg image.
Now run these two commands inside the amazcart_app folder.
flutter pub get
flutter pub run flutter_launcher_icons: main
![]()
Change App Logo
Go to amazcart_app > assets folder > config folder.
Replace app_logo.png with your app logo. Keep the file name app_logo.png and the image must be a png image.
![]()
Change App Banner
Go to amazcart_app > assets folder > config folder.
Replace app_banner.png with your app logo. Keep the file name app_banner.png and the image must be a png image.
Change App Splash Screen Logo
Go to amazcart_app > assets folder > config folder.
Replace splash_screen_logo.png with your splash logo. Keep the file name splash_screen_logo.png and the image must be a png image.
You can also change the background color of the splash screen by changing the color code in amazcart_app > pubspec.yaml file. Change only the color hex code inside the flutter_native_splash section.
Then run this command on terminal flutter pub run flutter_native_splash: create
Change App Color Scheme
Go to amazcart_app > lib folder > AppConfig folder > app_config.dart > then change appColorScheme. The color will be hex code. Change only the string inside appColorScheme.
After doing all these, run this command.
flutter pub get
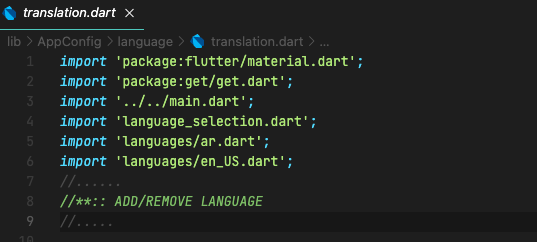
Change App Language
For adding a new language, you need to add a file for example you want to add French so your file name should be fr_FR.dart. Check the language code from here
Make a copy of the file en_US.dart inside lib/AppConfig/language/languages folder.
Now open the file and modify the file.
See the below image, here we store data as a "key" and "value" pair ( "Home": "Home",) so make sure that you don't change the key, always change the value(right side string)
Make sure to change en_US to your language code from line number 1. For example, if your language is French, then put fr_FR here.

Now open lib/language/translation.dart file and add the newly added file.
For example, if your language file is fr_FR.dart then add this line after line number 6
and import 'languages/fr_FR.dart';
After that copy this 'en_US': en_US, line and paste it on the next line. (Enter and paste)
The line should be exactly like this for your language-
'fr_FR': fr_FR,

After that copy the marked lines and paste them on the next line. (Enter and paste)
The lines should be exactly like this for your language-
else if (language == 'fr_FR') {
LanguageSelection.instance.val = 'fr_FR';
LanguageSelection.instance.drop = 'fr_FR';
appLocale = 'fr_FR';
}

After that scroll down and copy the marked lines and paste on the next line. (Enter and paste)
The lines should be exactly like this for your language-
LanguageModel(
language text: 'French',
language value: 'fr_FR',
),
The language name on the language text and the language code that your added earlier are the language value

Remember just change the language code strings. Everything else remains the same.
Setup Payment Gateways
Paypal
Go to amazcart_app > lib folder > AppConfig folder > api_keys.dart > then change paypalDomain, PayPalCurrency, paypalClientId, paypalClientSecret
Change PayPal domain to https://api.paypal.com
Change PayPal currency
Change PayPal client ID from your Paypal Developer Dashboard (developer.paypal.com)
Change PayPal client secret from your Paypal Developer Dashboard (developer.paypal.com)
Change PayPal client secret from your Paypal Developer Dashboard (developer.paypal.com)
Once these are done, You can re-build the project.
Stripe
Before installing Stripe to your Flutter app, you need a server with nodejs installed. If you do not have server access you can skip ahead and setup stripe with Firebase functions
Node Js
Go to amazcart_app > lib folder > AppConfig folder > api_keys.dart > then change stripeMerchantID,stripePublishableKey,stripeCurrency You'll get these from your PayTm merchant dashboard
Change appPackageName to the package name you've set before.
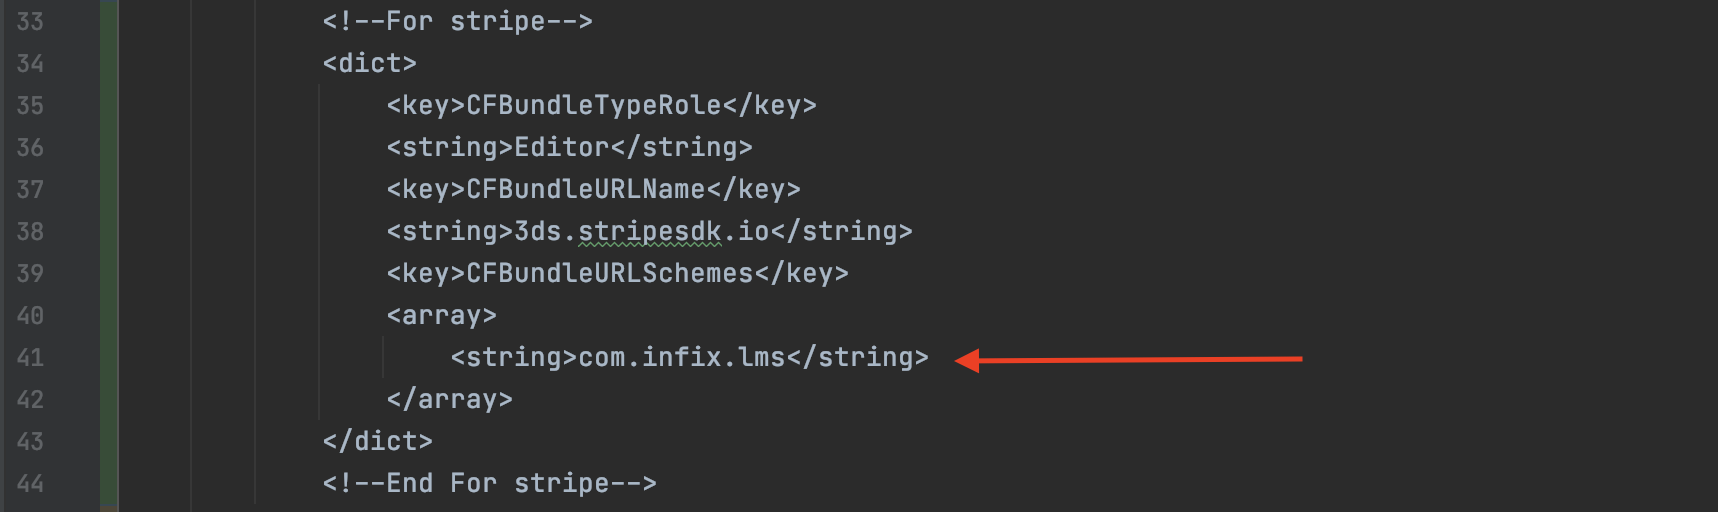
For Android: Go to Project folder -> android -> app -> src -> AndroidManifest.xml and find the "For stripe" comment, then change android:scheme to your app package name.\

For iOS: Go to Project folder -> ios -> Runner -> Info.plist and ind "For stripe" comment, then change CFBundleURLSchemes array's String value to your app package name.\
Open payment-server-nodejs -> index.js and paste your stripe secret key inside\ `const stripe = require('stripe')('YOUR_STRIPE_SECRET_KEY');`
After changing those, Upload payment-server-nodejs folder onto your server.
type cd infixedu-payment-server-nodejs
then type node install
then npm install pm2 -g
Check if pm2 is running, pm2 -V
Now start the server by typing, pm2 start index.js
pm2 startup
pm2 save
Once these are done, You can re-build the project.
Firebase functions
Inside the amazcart_app directory:
Run Firebase login to log in via the browser and authenticate the Firebase tool.
Run Firebase init functions
Select your project name and select javascript for language.
It will create a functions directory inside your amazcart_app directory.
Then run npm install express stripe body-parser
Open amazcart_app -> lib -> AppConfig -> api_keys.dart then change stripeMerchantID, stripePublishableKey, stripeCurrency.
Open payment-server-firebase-functions -> index.js and paste your stripe secret key inside `const stripe = require('stripe')('YOUR_STRIPE_SECRET_KEY');`
Copy payment-server-firebase-functions -> index.js and replace it with index.js inside the newly created functions directory.
Save the file and run npm install
After that run firebase deploy --only functions
Copy your firebase function URL and paste it inside amazcart_app -> lib -> AppConfig -> api_keys.dart -> customServerUrl
Your customServerUrl should be similar to -> https://us-central1-MY_PROJECT.cloudfunctions.net/expressApp
Then rebuild the project.
PayStack
Go to amazcart_app > lib folder > AppConfig folder > api_keys.dart > then change payStackPublicKey
Change the paystack public key. Get the public key from https://dashboard.paystack.com/#/settings/developer
Once these are done, You can re-build the project.
Razorpay (India)
Go to amazcart_app > lib folder > AppConfig folder > api_keys.dart > then change razorPayKey and razorPaySecret from your Razor Pay merchant dashboard.
Once these are done, You can re-build the project.
Instamojo
Go to amazcart_app > lib folder > AppConfig folder > api_keys.dart > then change instaMojoApiUrl, instaMojoApiKey and instaMojoAuthToken from your Instamojo merchant dashboard.
Once these are done, You can re-build the project.
PayTm (India)
Before installing PayTm to your Flutter app, you need a server with nodejs installed. If you don't have server access you can skip ahead and setup stripe with Firebase functions
Node Js
Go to amazcart_app > lib folder > AppConfig folder > api_keys.dart > then change customServerUrl to your server URL
Open the index.js file and change these to your PayTm live credentials: `mid`
`key`
`website`
`transaction URL
You'll get these from your PayTm merchant dashboard Change the callback URL to your server URL and add /payment receipt at the end. Follow the image:

After changing those, Upload the payment-server-nodejs folder onto your server.
type cd payment-server-nodejs
then type node install
then npm install pm2 -g
Check if pm2 is running, pm2 -V
Now start the server by typing, pm2 start index.js
pm2 startup
pm2 save
Once these are done, You can re-build the project.
Firebase functions
Open the index.js file and change these to your PayTm live credentials: `mid`
`key`
`website`
`transaction URL
You'll get these from your PayTm merchant dashboard. Inside the amazcart_app directory,
Run Firebase login to log in via the browser and authenticate the Firebase tool.
Run Firebase init functions
Select your project name and select javascript for language
It will create a functions directory inside your amazcart_app directory.
Then run npm install express
Open amazcart_app -> lib -> AppConfig -> api_keys.dart then change payTMmid to your mID from PayTm live credential
Copy payment-server-firebase-functions -> index.js and replace it with index.js inside the newly created functions directory.
Save the file and run npm install
After that run firebase deploy --only functions
Copy your firebase function url and paste inside amazcart_app -> lib -> AppConfig -> api_keys.dart -> customServerUrl
Your customServerUrl should be similar to -> https://us-central1-MY_PROJECT.cloudfunctions.net/expressApp
Then rebuild the project.
Midtrans
Before installing PayTm to your Flutter app, you need a server with nodejs installed. If you don't have server access you can skip ahead and setup stripe with Firebase functions
Node Js
Go to amazcart_app > lib folder > AppConfig folder > api_keys.dart > then change midTransServerUrl to your server URL
Open the index.js file and change these to your Midtrans live credentials:

`isProduction to true`
`server-key`
You'll get these from your Midtrans merchant dashboard
After changing those, Upload payment-server-nodejs folder onto your server.
type cd payment-server-nodejs
then type node install
then npm install pm2 -g
Check if pm2 is running, pm2 -V
Now start the server by typing, pm2 start index.js
pm2 startup
pm2 save
Once these are done, You can re-build the project.
Firebase functions
Go to amazcart_app > lib folder > AppConfig folder > api_keys.dart > then change midTransServerUrl to your server URL
Open index.js file and change these to your Midtrans live credentials:

`isProduction to true`
`serverKey`
You'll get these from your Midtrans merchant dashboard
Inside amazcart_app directory,
Run Firebase login to log in via the browser and authenticate the Firebase tool.
Run Firebase init functions
Select your project name and select javascript for language
It will create a functions directory inside your amazcart_app directory.
Then run npm install express midtrans-client
Copy payment-server-firebase-functions -> index.js and replace it with index.js inside the newly created functions directory.
Save the file and run npm install
After that run firebase deploy --only functions
Copy your firebase function url and paste it inside amazcart_app -> lib -> AppConfig -> api_keys.dart -> customServerUrl
Your customServerUrl should be similar to -> https://us-central1-MY_PROJECT.cloudfunctions.net/expressApp
Then rebuild the project.
JazzCash
Go to amazcart_app > lib folder > AppConfig folder > api_keys.dart > then change jazzCashMerchantId, jazzCashPassword, jazzCashReturnUrl and jazzCashIntegritySalt from your JazzCash merchant dashboard.
Once these are done, You can re-build the project.
Flutterwave
Go to amazcart_app > lib folder > AppConfig folder > api_keys.dart > then change flutterWaveEncryptionKey, flutterWavePublicKey from your Flutterwave merchant dashboard.
Once these are done, You can re-build the project.
Setup Social Login
Google Login
Before adding a Google login to your Flutter app, you need to create a Firebase project to connect to your app.
At first, create a project at Firebase
Go to https://console.firebase.google.com and create a project. Give a project name.
Create an Android app
The "Android package name" must match your local project's package name that was created when you started the Flutter project. The current package name can be found in your module (app-level) Gradle file, usually Android/app/build.gradle, defaultConfig section (example package name: com.yourcompany.yourproject).
Once your Android app has been registered, download the configuration file from the Firebase Console (the file is called google-services.json). Add this file to the Android/app directory within your Flutter project.
Create an iOS app
On the Firebase Console, add a new iOS app or select an existing iOS app for your Firebase project. The "iOS bundle ID" must match your local project bundle ID. The bundle ID can be found within the "General" tab when opening ios/Runner.xcworkspace with Xcode.
Download the GoogleService-Info.plist file for the Firebase app.
Next, you must add the file to the project using Xcode (adding manually via the filesystem won't link the file to the project). Using Xcode, open the project's ios/{projectName}.xcworkspace file. Right-click Runner from the left-hand side project navigation within Xcode and select "Add files", as seen below:
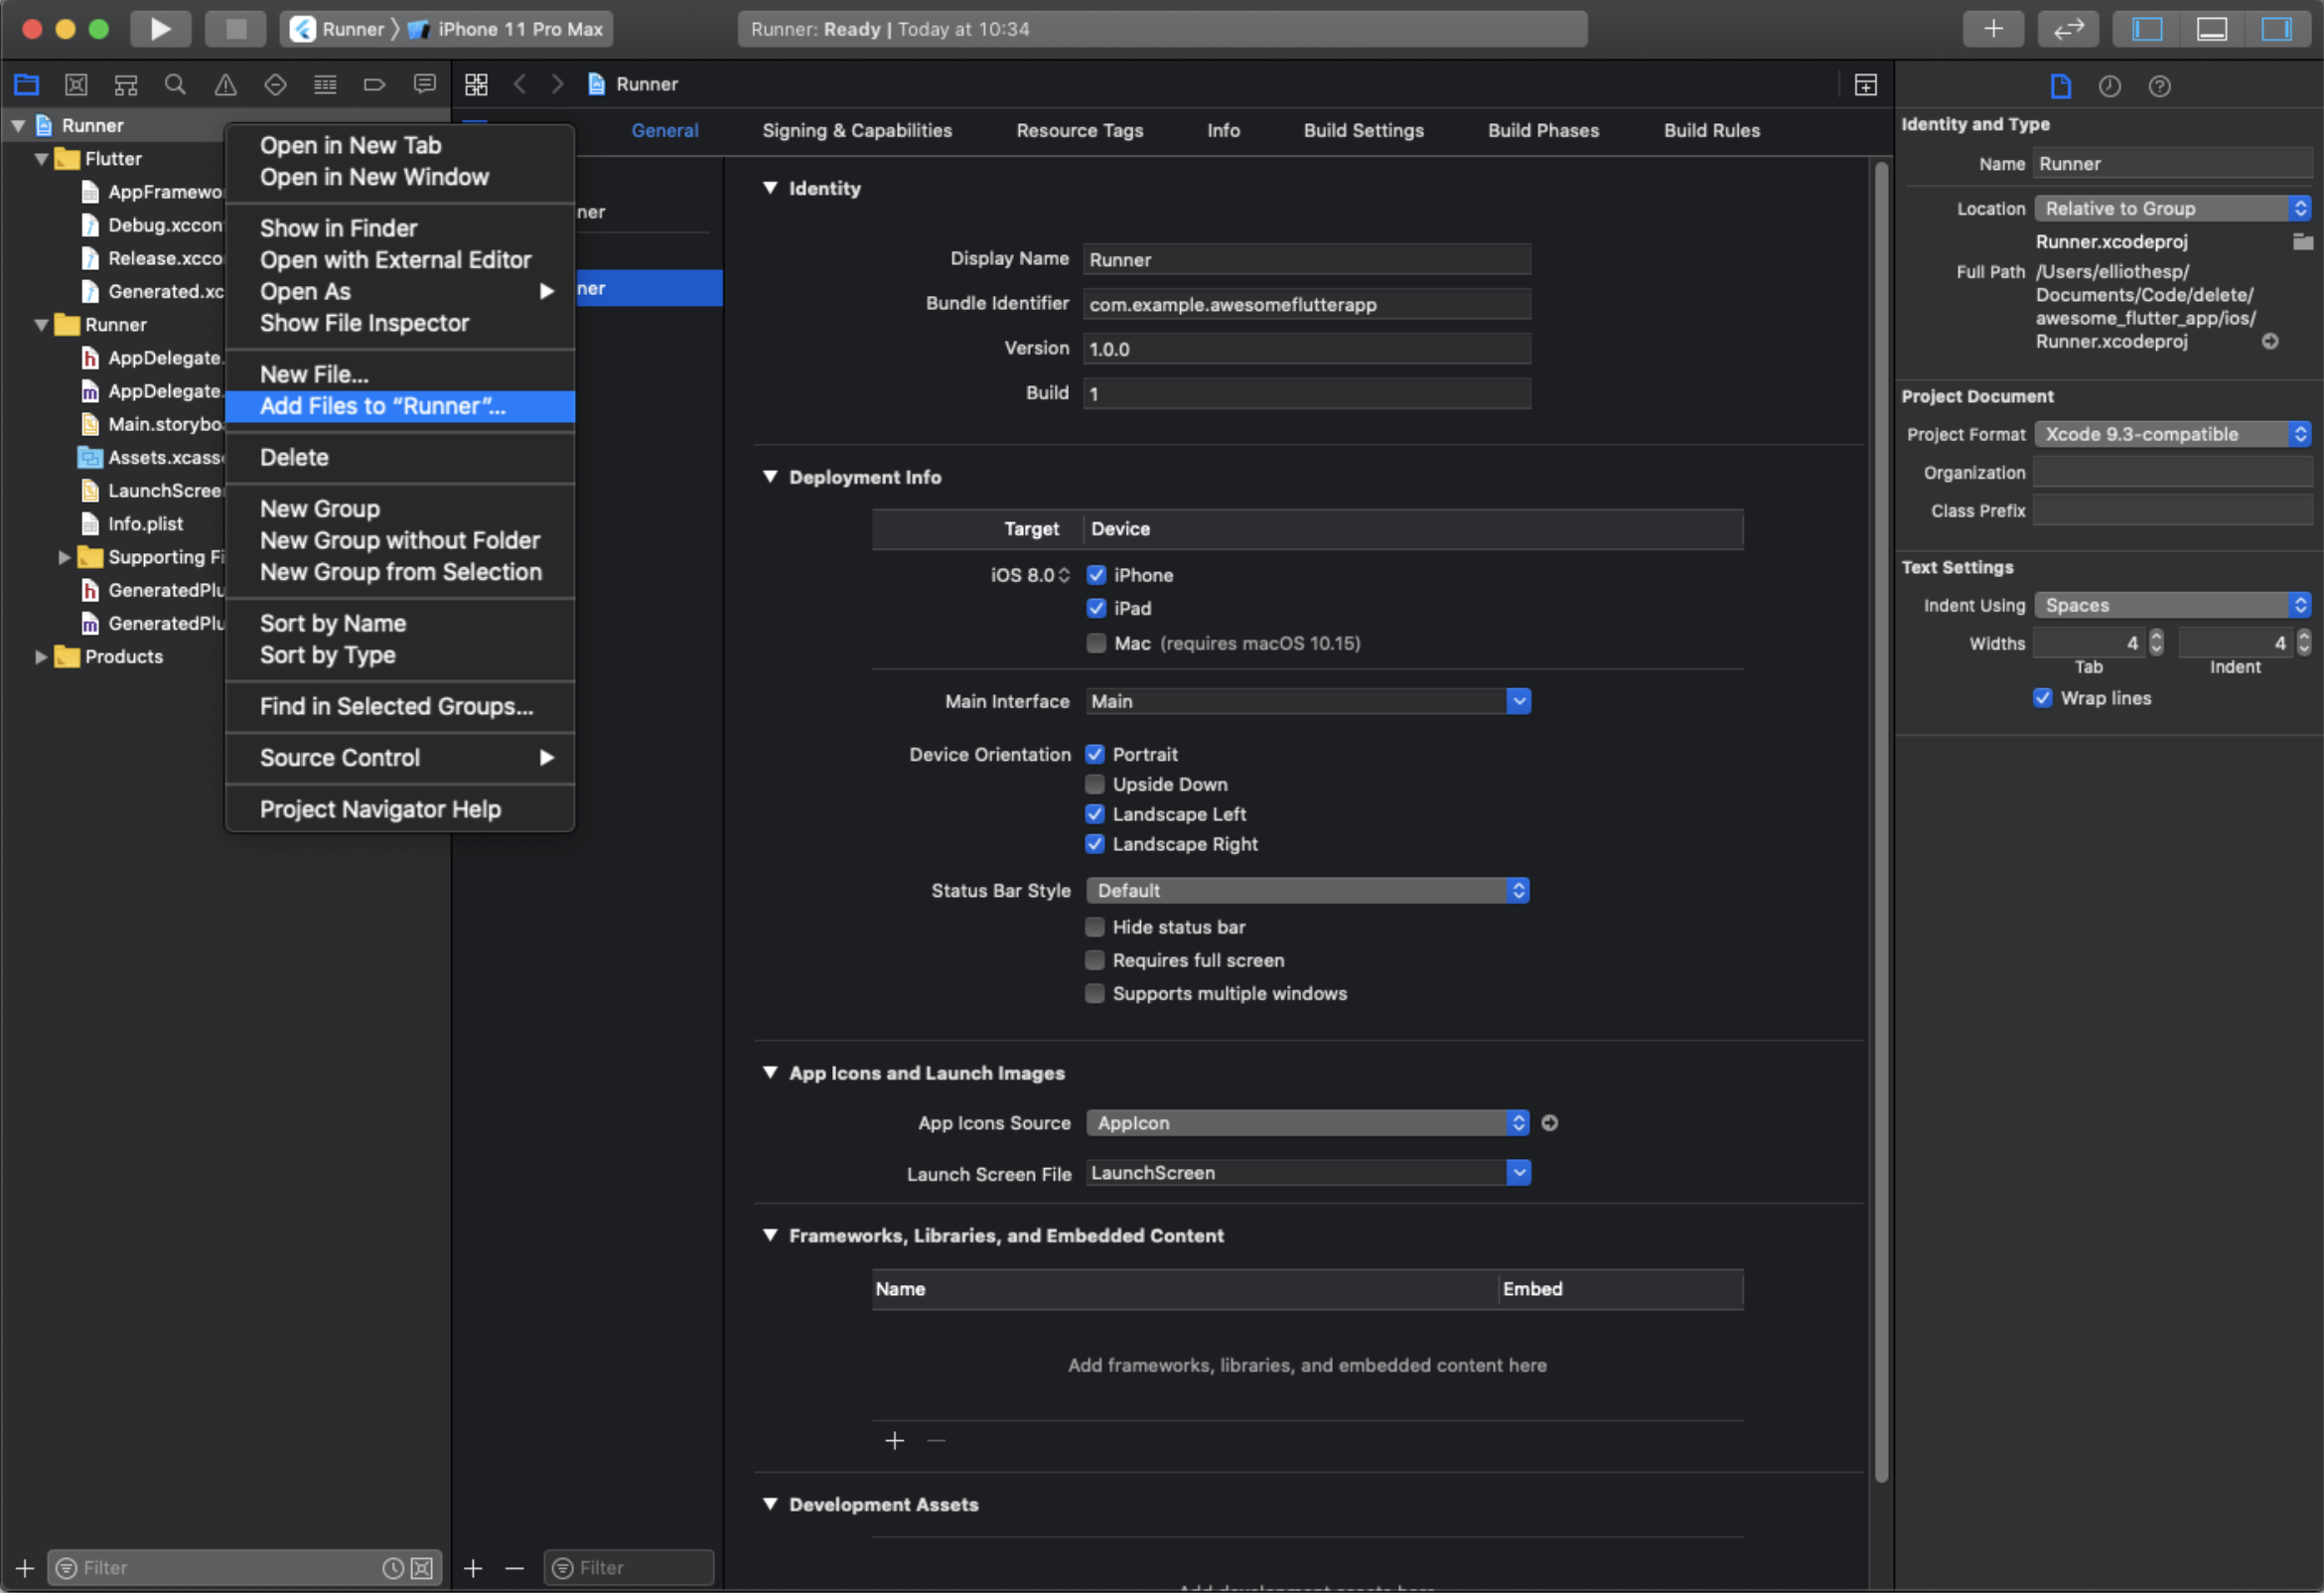
Select the GoogleService-Info.plist file you downloaded, and ensure the "Copy items if needed" checkbox is enabled:
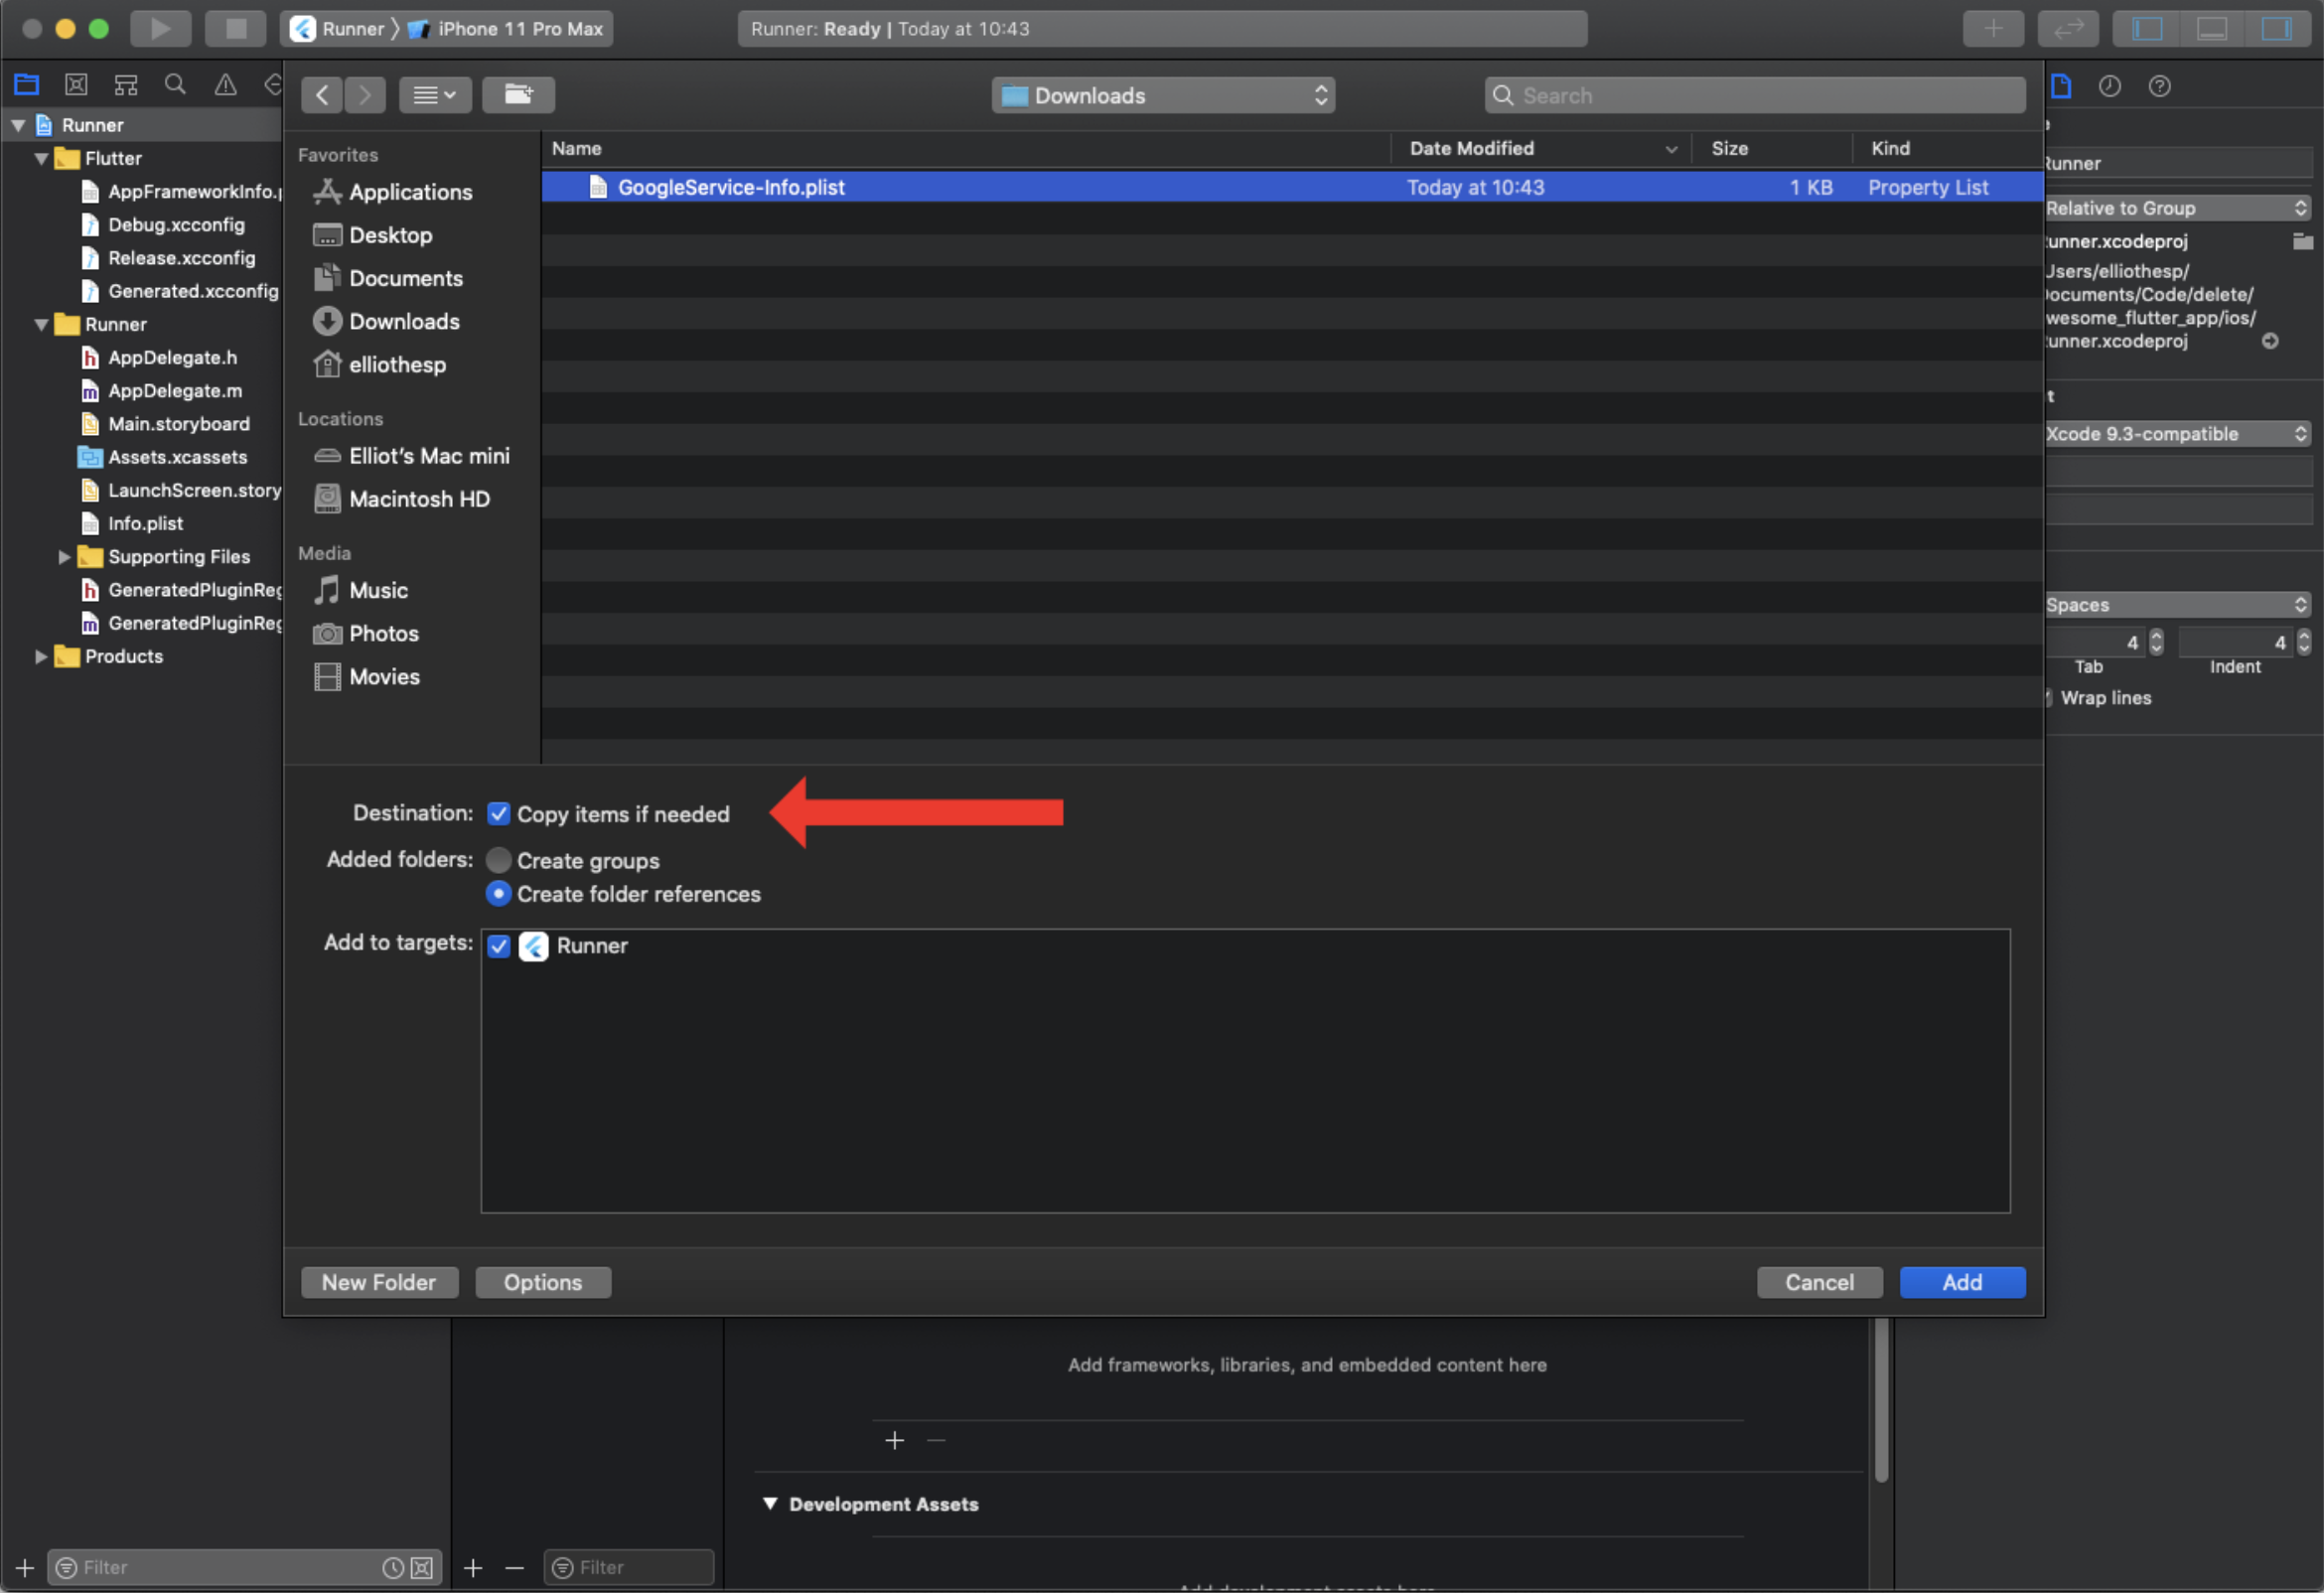
Open amazcart_app > ios > Runner > Info.plist file
Change REVERSED_CLIENT_ID in the Google login option
If you want you may go through this link firebase(android/ios) documentation
Facebook Login
Go to amazcart_app > lib folder > AppConfig folder > app_config.dart > then set Facebook login to true
Android Setup
Go to -> Facebook Login for Android - Quickstart

To find info on how to generate your key hash go to this link Note: if your application uses Google Play App Signing then you should get a certificate SHA-1 fingerprint from Google Play Console and convert it to base64 You should add the key hashes for every build variants like release, debug, CI/CD, etc.
iOS Setup
Go to -> Facebook Login for iOS - Quickstart


Open amazcart_app > ios > Runner > Info.plist file
Change FacebookAppID, FacebookClientToken, FacebookDisplayName strings

Application Showcase in PlayStore
Once you will publish your app to Google Play or any other Android store, send us your app link. We will be happy to showcase your app on our website & CodeCanyon page.
Rating
If you like our app, we will highly appreciate it if you can provide us with a rating of 5. You can rate us from your CodeCanyon Menu > Download page.
Credits
We've used the following sources in this app:
HTTP request for API call
Network Image for showing an image
CardView
OneSignal
ListView
Once again, thank you so much for purchasing this app. As We said at the beginning, I'd be glad to help you if you have any questions relating to this app. No guarantees, but We'll do our best to assist. If you have a more general question relating to the apps on CodeCanyon, you might consider visiting the "FAQ / Support" section and asking your question in the "Comments" section on the CodeCanyon app detail page.


