What your customer sees and how they interact with your content matters. A Content Management System (CMS) is a dynamic function that helps you design a website homepage, social link, return exchange, contact content & dynamic pages. Frontend CMS solution allows you to build a website that meets your unique needs, such as footer setting, subscription, popup content, promotion bar, ads bar, related sale setting & login page.
Home Page:
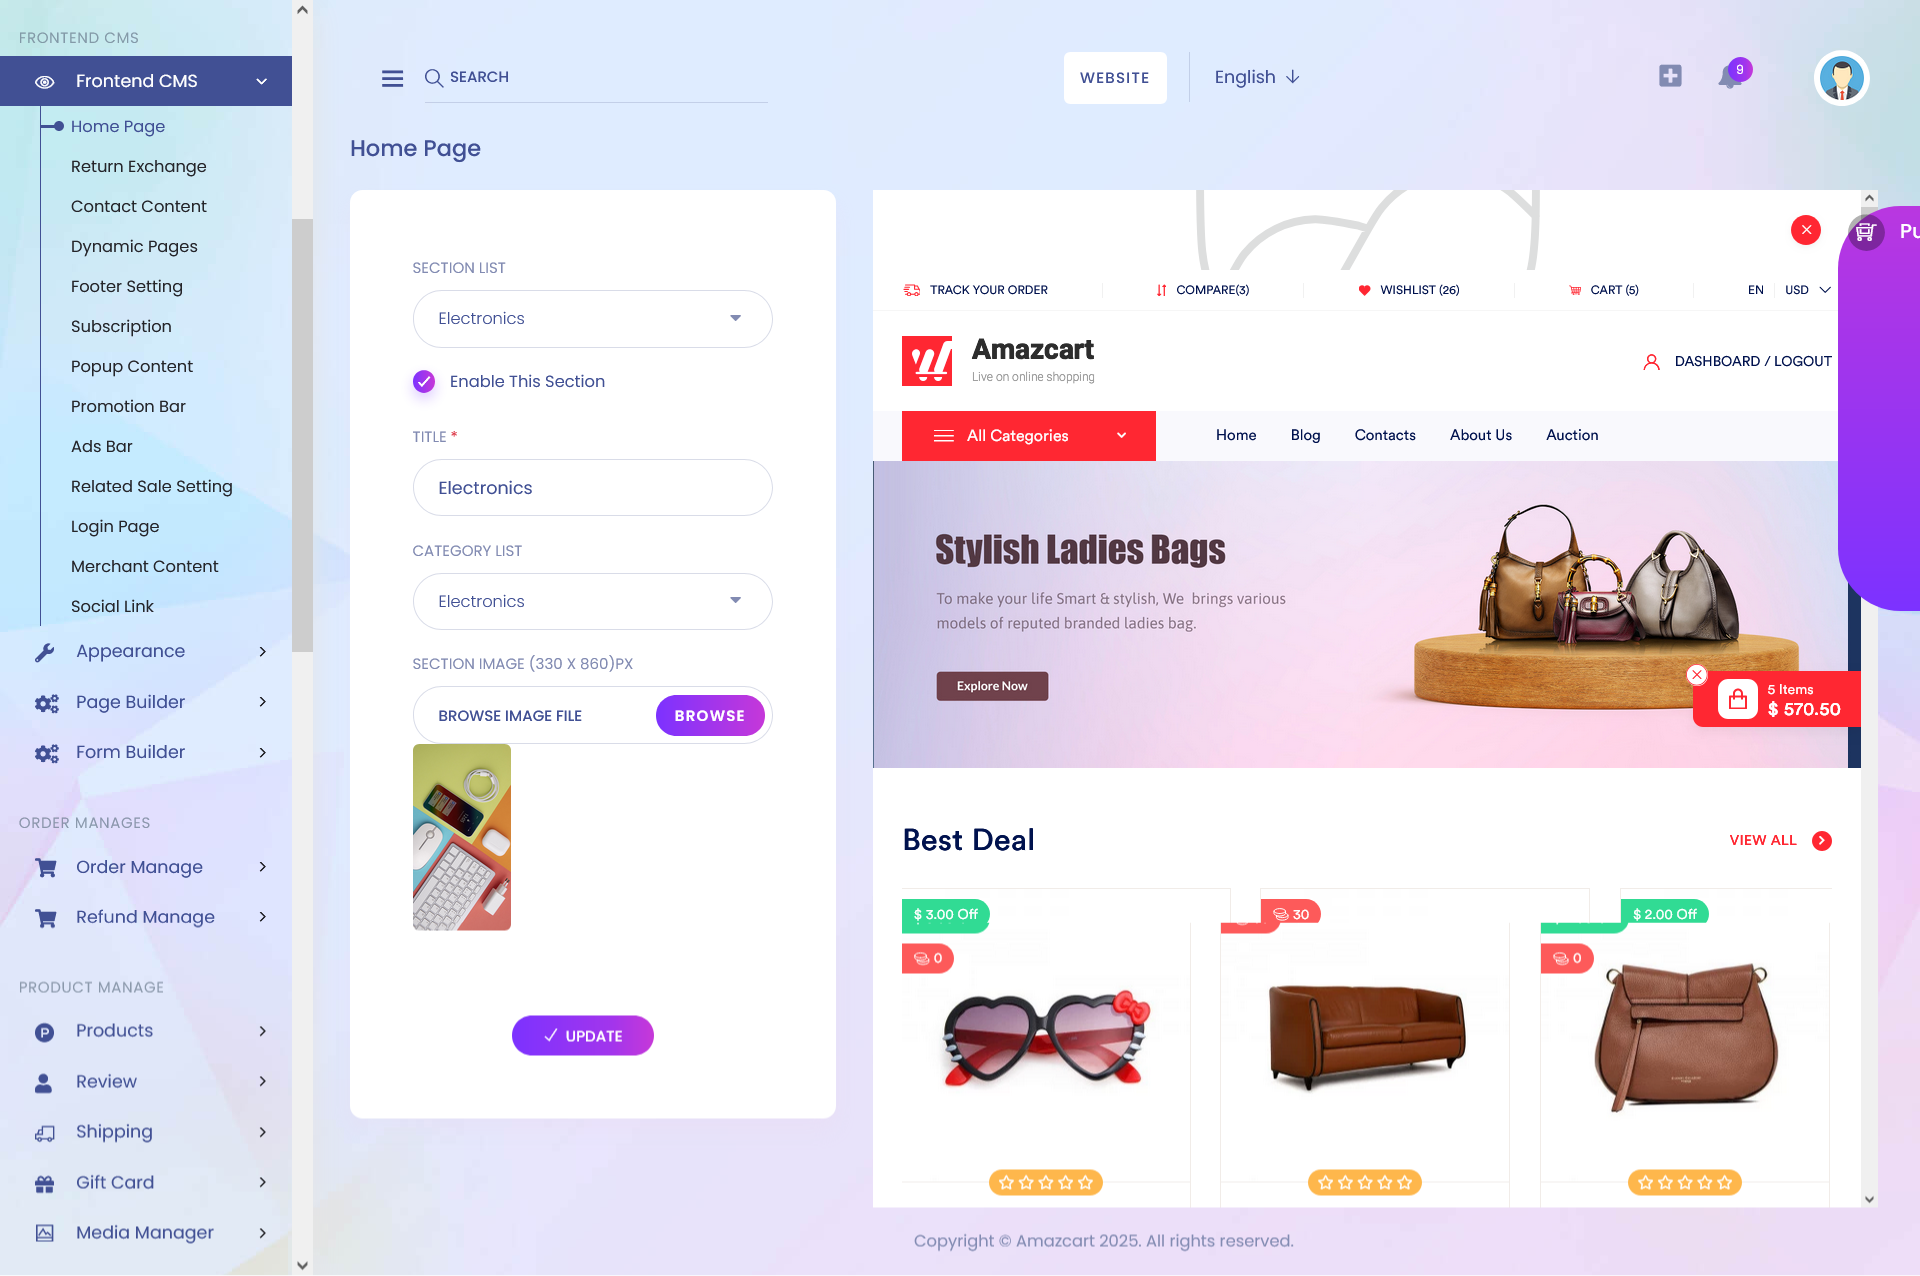
A home page is the primary web page that a visitor will view when navigating a website, and it may also function as a manual categories page to attract visitors. Sometimes, the home page is a site directory, particularly the type of this section a website has multiple home pages.
Short Direction: {AmazCart> Dashboard> Frontend CMS> Home Page> Section List> Enable This Section> Title> Type> Category List> Update.}
If you want to design the homepage category section then click on the select list to the title, and type.
1- Frontend CMS
2- Home Page
3- Section List manually to the homepage category.
4- Enable This Section
5- Title based on the new category list.
6- Type in the custom category.
7- Category List .
8- Section Image
9- Update it.
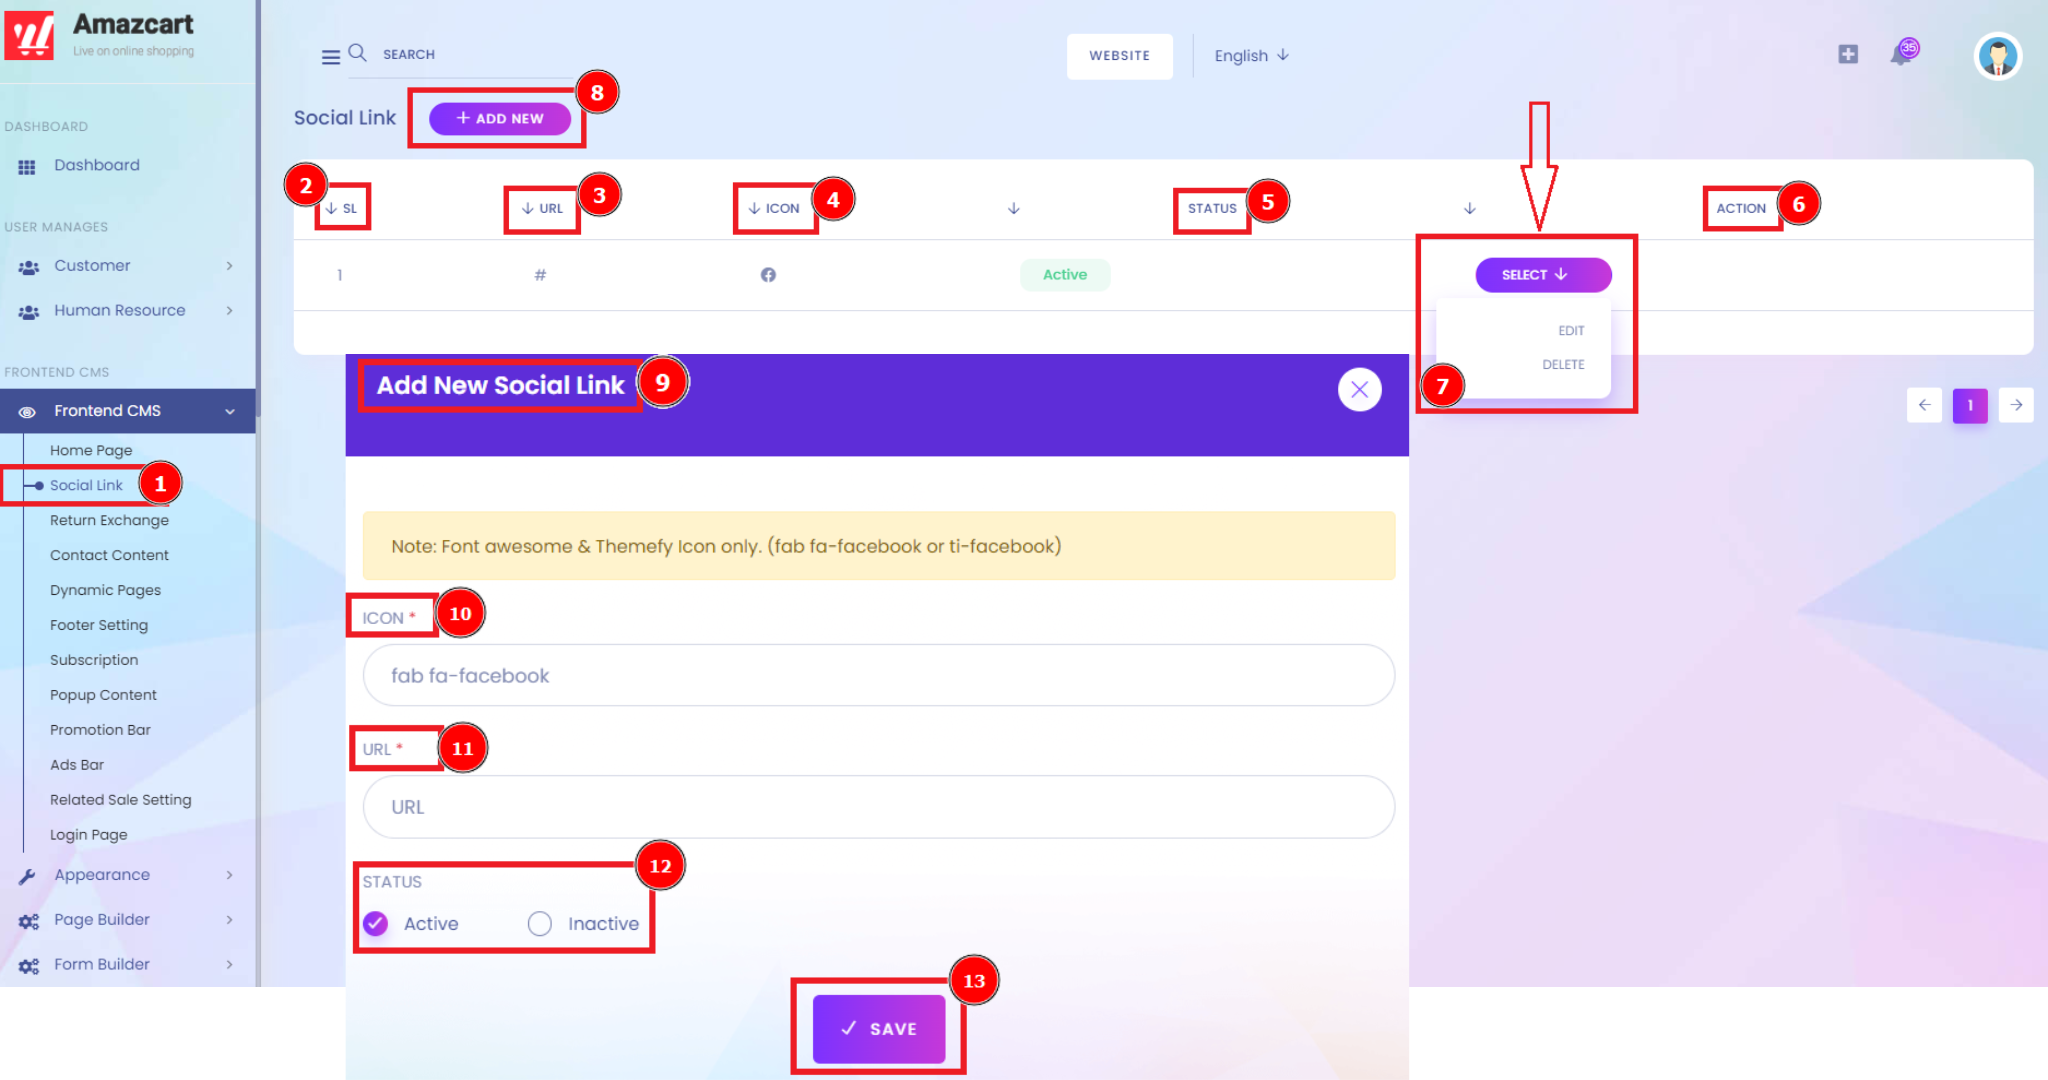
Social Link:
Adding social media links to your website is a way to increase the spread. You want to make it easier for people to find other content platforms to maintain for your business. Just add the URL of the web page, select the social media platform you want to create a link for and click the “create links” button.
Short Direction: {AmazCart> Dashboard> Frontend CMS> Social Link> SL> URL> Icon> Status> Action> Select> Add New> Add New Social Link> Icon> URL> Status> Save.}
If you want to add on Social Link as on your web section then go to the frontend CMS.
1- Frontend CMS
2- Social Link
3- SL means serial number.
4- URL
5- Icon
6- Status
7- Action
8- Select for edit or delete.
9- Add a New for clicking on the new popup.
10- Add New Social Link
11- Icon
12- URL paste for the social link.
13- Status can be active or inactive.
14- Save it.
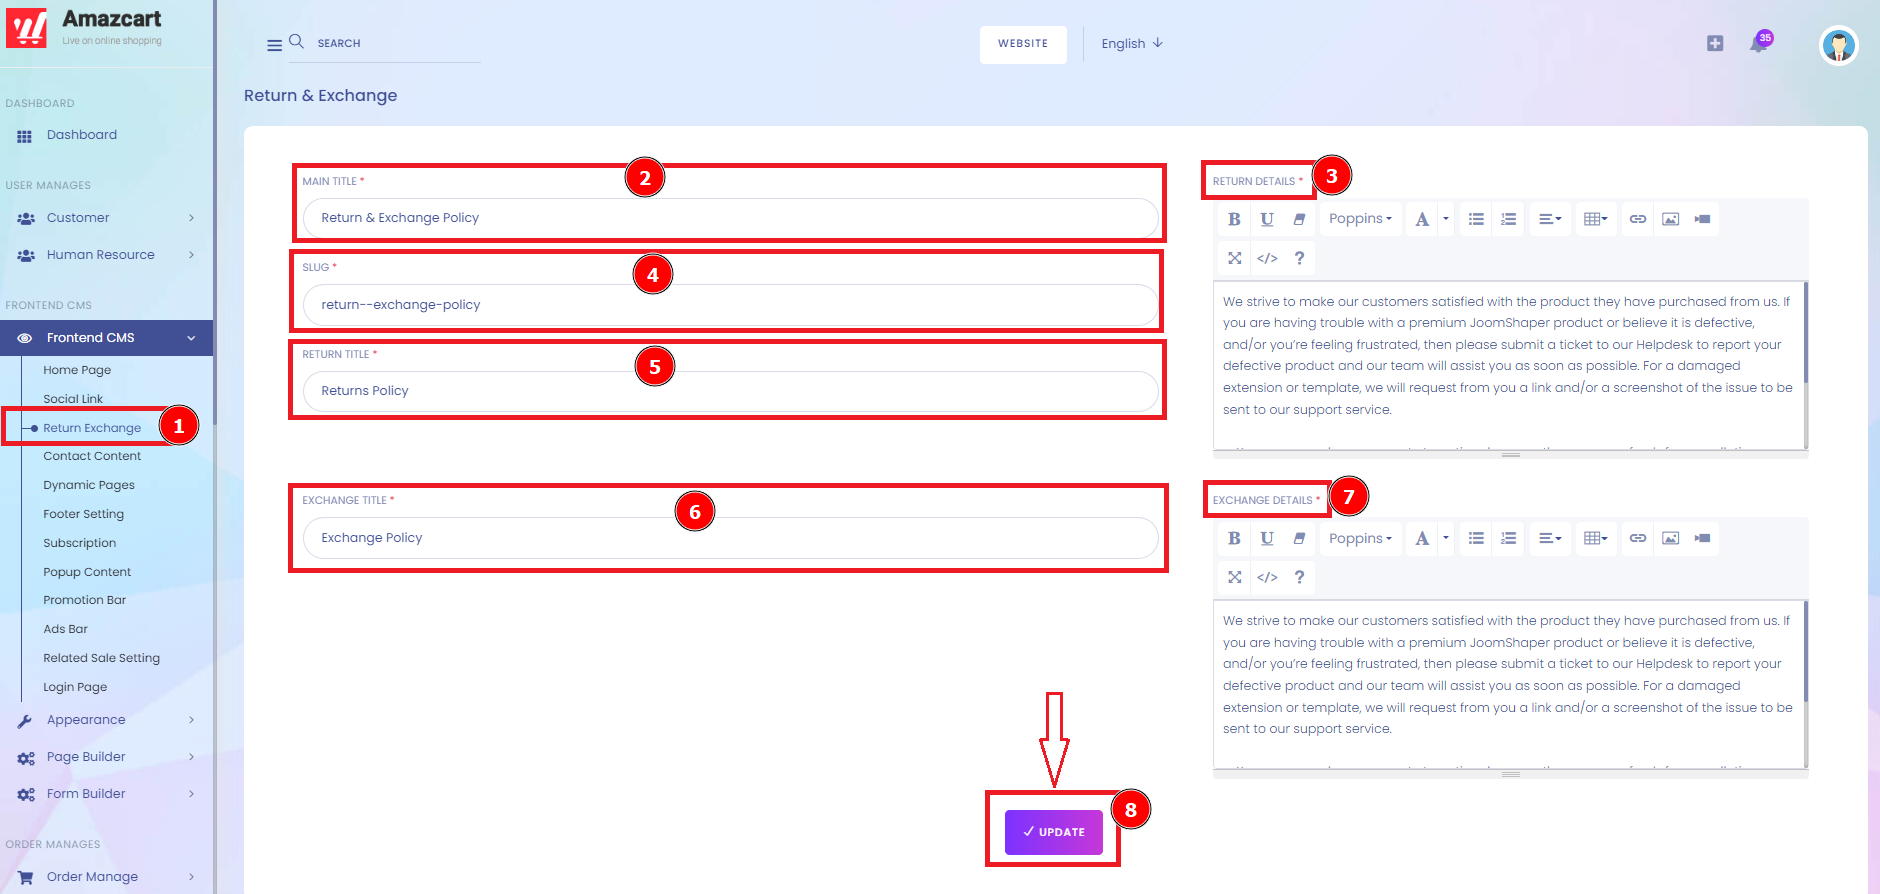
Return Exchange:
A return policy is a set of rules a retailer creates to manage how customers return and exchange unwanted merchandise they've purchased. Return policies tell customers what items can be returned and for what reasons, as well as the timeframe over which returns are accepted. Fill on the return details & exchange details based on company policy.
Short Direction: {AmazCart> Dashboard> Frontend CMS> Return Exchange> Main Title> Return Details> Slug> Return Title> Exchange> Title> Exchange Details.}
An exchange policy explains which items can be exchanged and the details of the exchange process. If you want to set it on the Return Exchange then go to the Frontend CMS.
1- Return Exchange
2- Main Title
3- Return Details
4- Slug
5- Return Title
6- Exchange
7- Title
8- Exchange Details
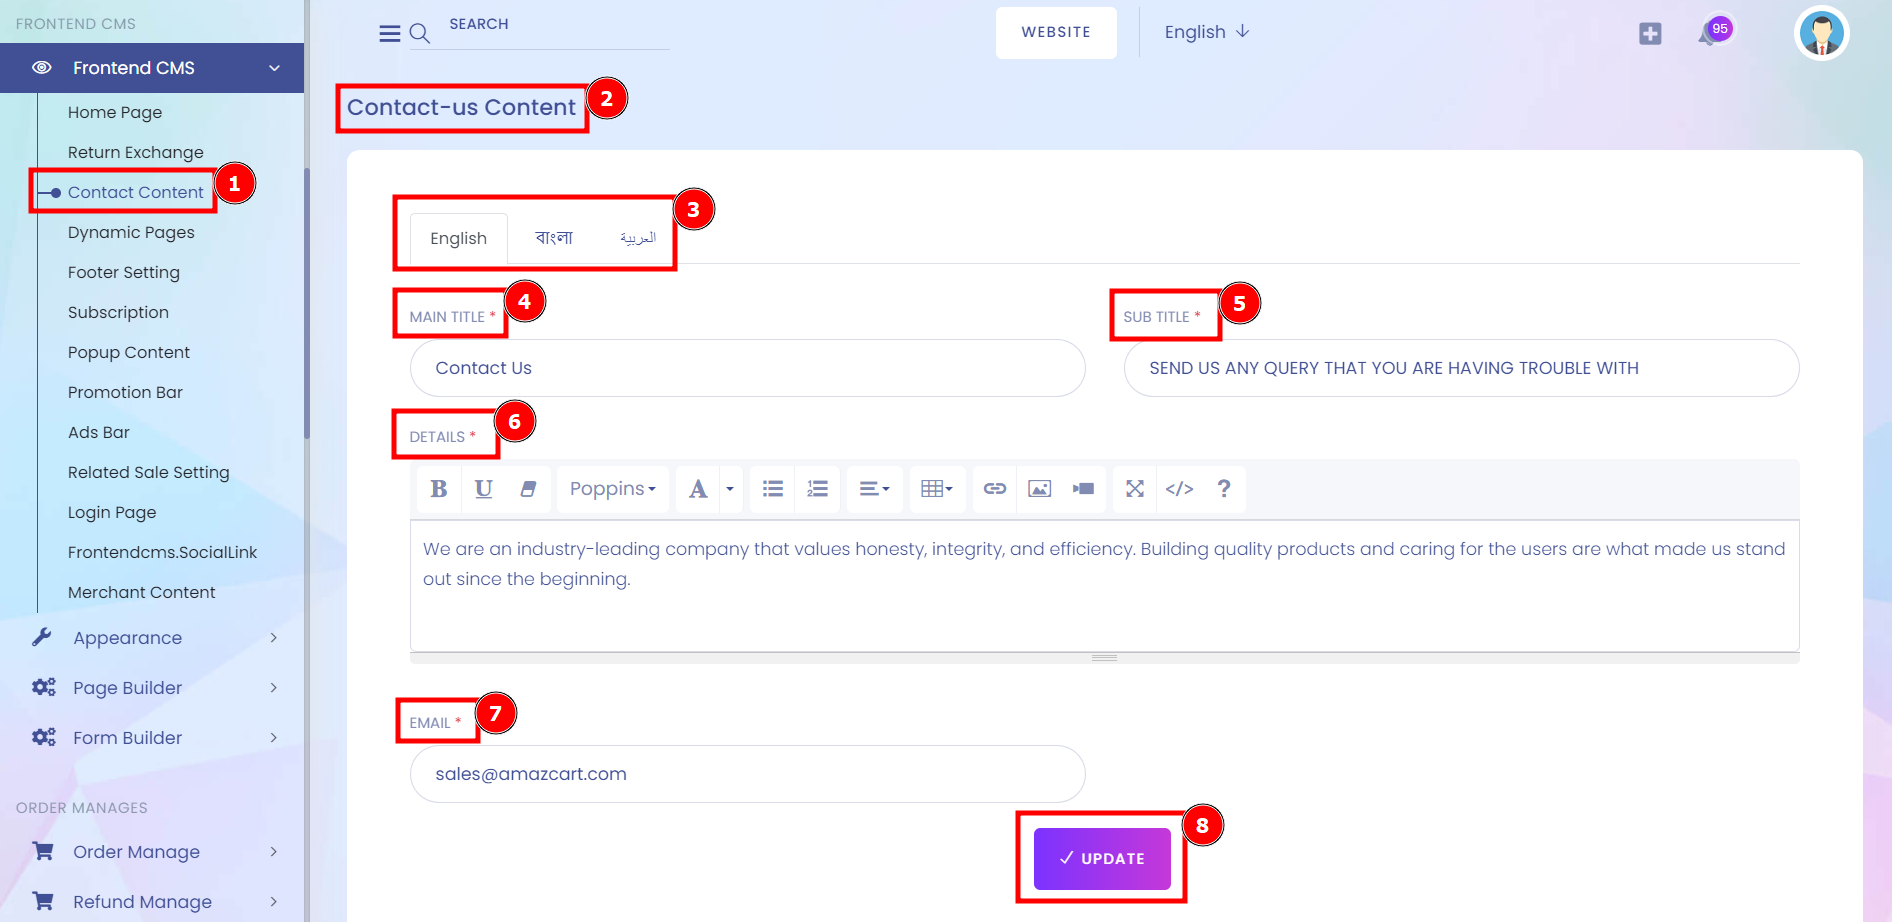
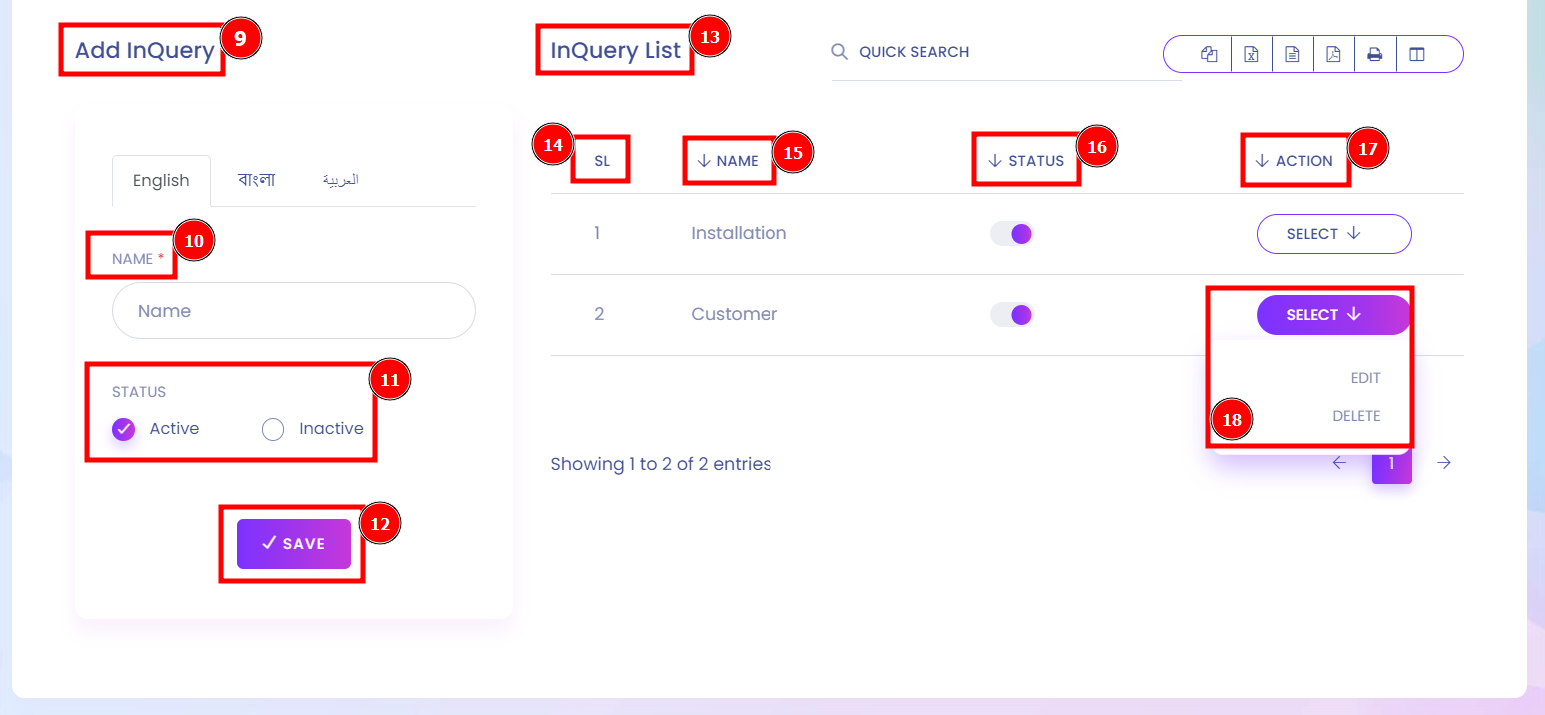
Contact Content:
Explain why someone should contact your business. Describe how your business can help solve the visitors' problems. Include an email, Add inquiry, and phone number so visitors can contact you on their first attempt.
Short Direction: {AmazCart> Dashboard> Frontend CMS> Content Contact> Contact Us Content> English/ Bangla/ Arabic> Main Title> Sub Title> Details> Email> Update> Add Inquiry> Name> Status> Save> Inquiry List> SL> Name> Status> Action> Select.}
Good contact information makes you look accessible. And that in turn makes people trust you. Looking for contact information is one of the top tasks on many websites. So make sure you get it right. If you want to add contact information then go to the AmazCart Dashboard to find the Frontend CMS option, you will see the Content Contact section.
1- Content Contact
2- Contact Us Content
3- English/ Bangla/ Arabic language that you can choose any of them.
4- Main Title
5- Sub Title
6- Details
7- Email
8- Update
9- Add Inquiry
10- Name
11- Status can be active or inactive.
12- Save
13- Inquiry List
14- SL means serial number.
15- Name
16- Status can be active or inactive.
17- Action
18- Select for Edit or Delete.
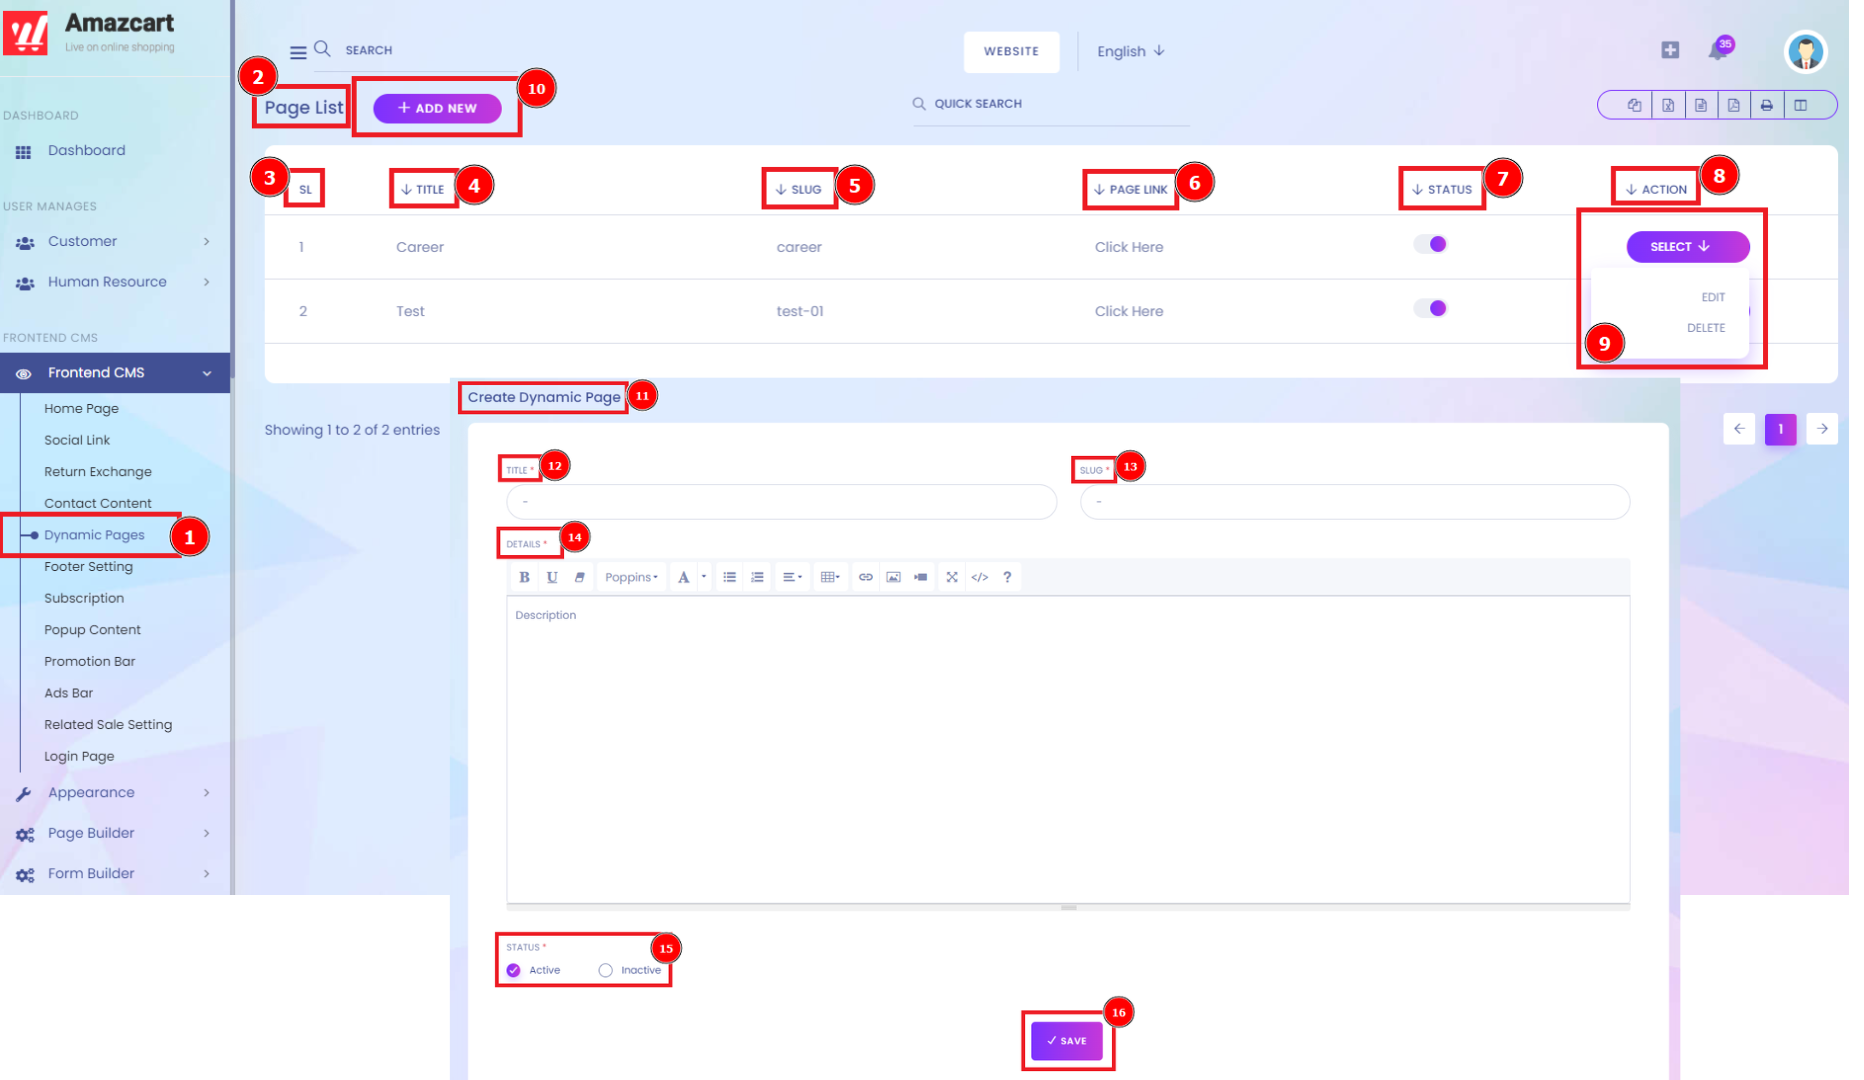
Dynamic Pages:
A dynamic web page is a web page that displays different content each time it's viewed. In dynamic web pages, the Content of pages is different for different visitors. It takes more time to load than a static web page. Dynamic web pages are used where the information is changed frequently. It accesses content from a database or Content Management System.
Short Direction: {AmazCart> Dashboard> Frontend CMS> Dynamic Pages> Page List> SL> Title> Slug> Page Link> Status> Action> Select> Add New> Create Dynamic Page> Title> Slug> Details> Status> Save.}
If you want to create on the Dynamic pages then go to the frontend cms function to find the page list.
1- Dynamic Pages
2- Page List
3- SL means serial number.
4- Title
5- Slug
6- Page Link
7- Status
8- Action
9- Select for edit or delete.
10- Add a New
11- Create a Dynamic Page
12- Title
13- Slug
14- Details
15- Status can be active or inactive.
16- Save it.
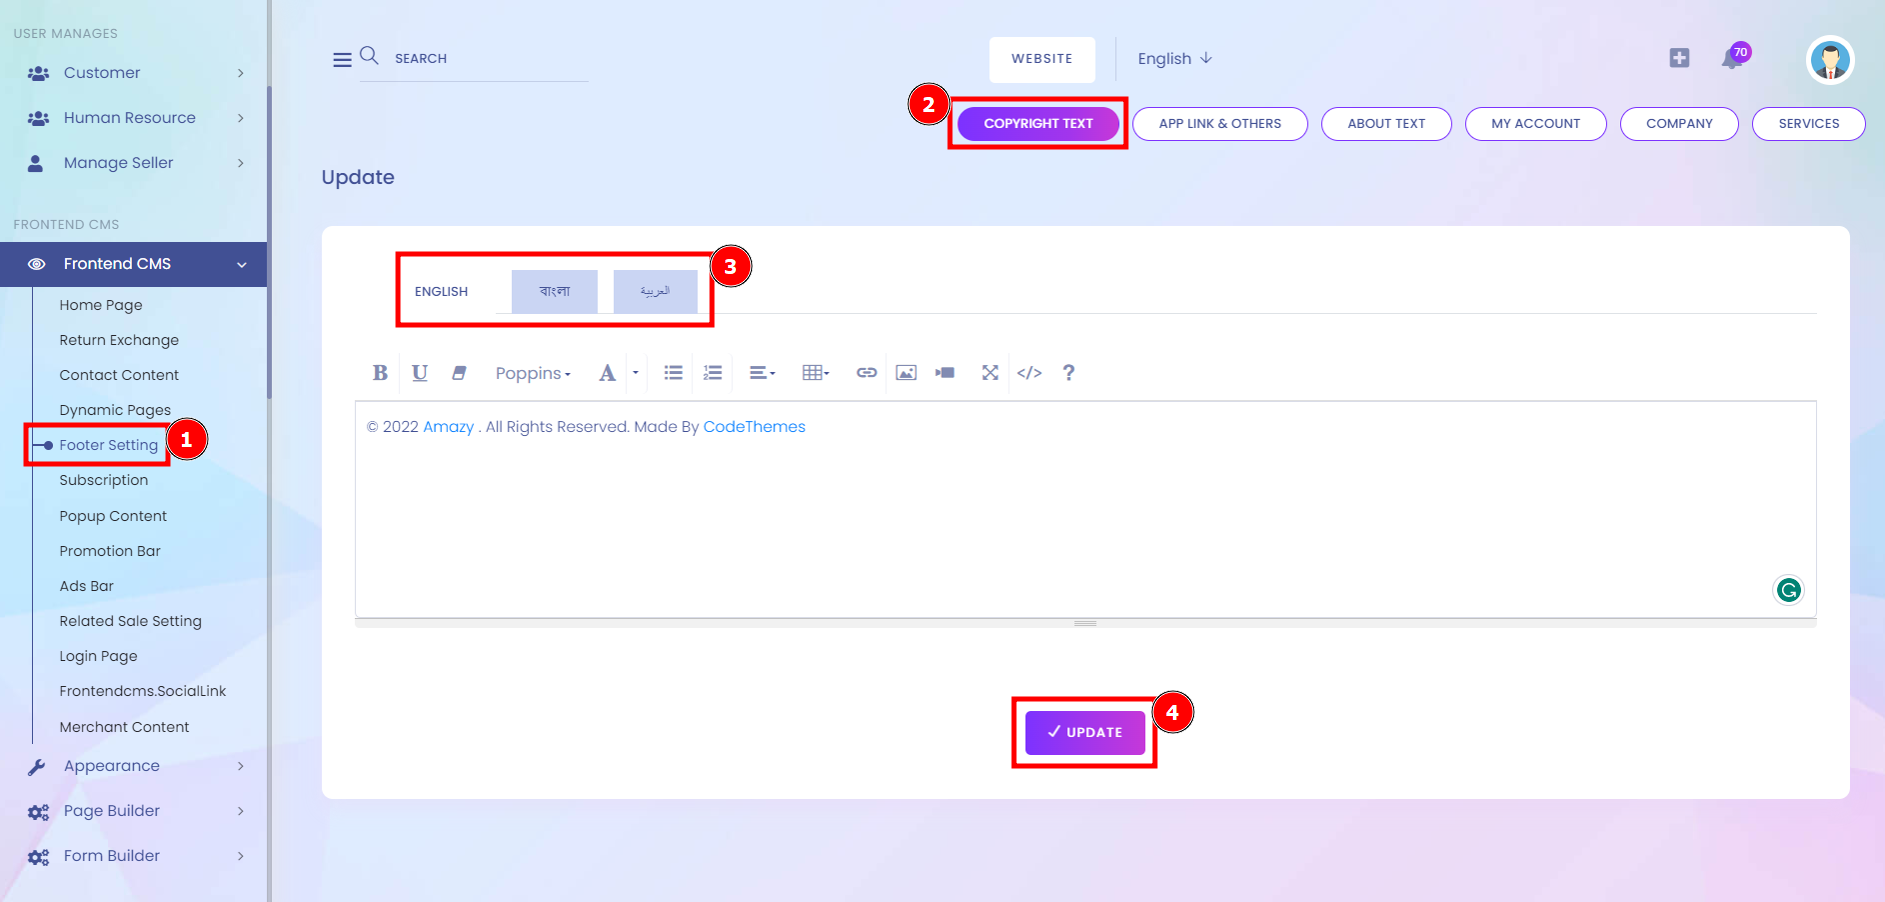
Footer Setting:
The header and footer typically define the style and design of a website and contain links to other pages, a logo or title of the website, and contact information. It typically contains a copyright notice, App link & others, About text, My Account, Company, and Service.
Short Direction: {AmazCart> Dashboard> Frontend CMS> Footer Setting> Copyright Text> Language> Update> App Link & Others> Play Store Link> App Store Link> Play Store Show in frontend?> App Store Show in frontend?> Payment Image show in frontend?> Browse Image> Update> About Text> Section Name> About Description> Update> Update> My Account> Section Name> Update> Add New Page> SL> Name> Status> Action> Select> Company> Select Name> Update> Add New Page> SL> Name> Status> Action> Select> Service> Select Name> Update> Add New Page> SL> Name> Status> Action> Select. }
A header is the top margin of each page, and a footer is the bottom margin of each page. Headers and footers are useful for including material that you want to appear on every page of a document such as your name, the title of the document, or page numbers.
1- Footer Setting
2- Copyright Text
3- Language
4- Update
5- App Link & Others
6- Play Store Link
7- App Store Link
8- Play Store Show in frontend?
9- App Store Show in frontend?
10- Payment Image show in frontend?
11- Browse the Image
12- Update
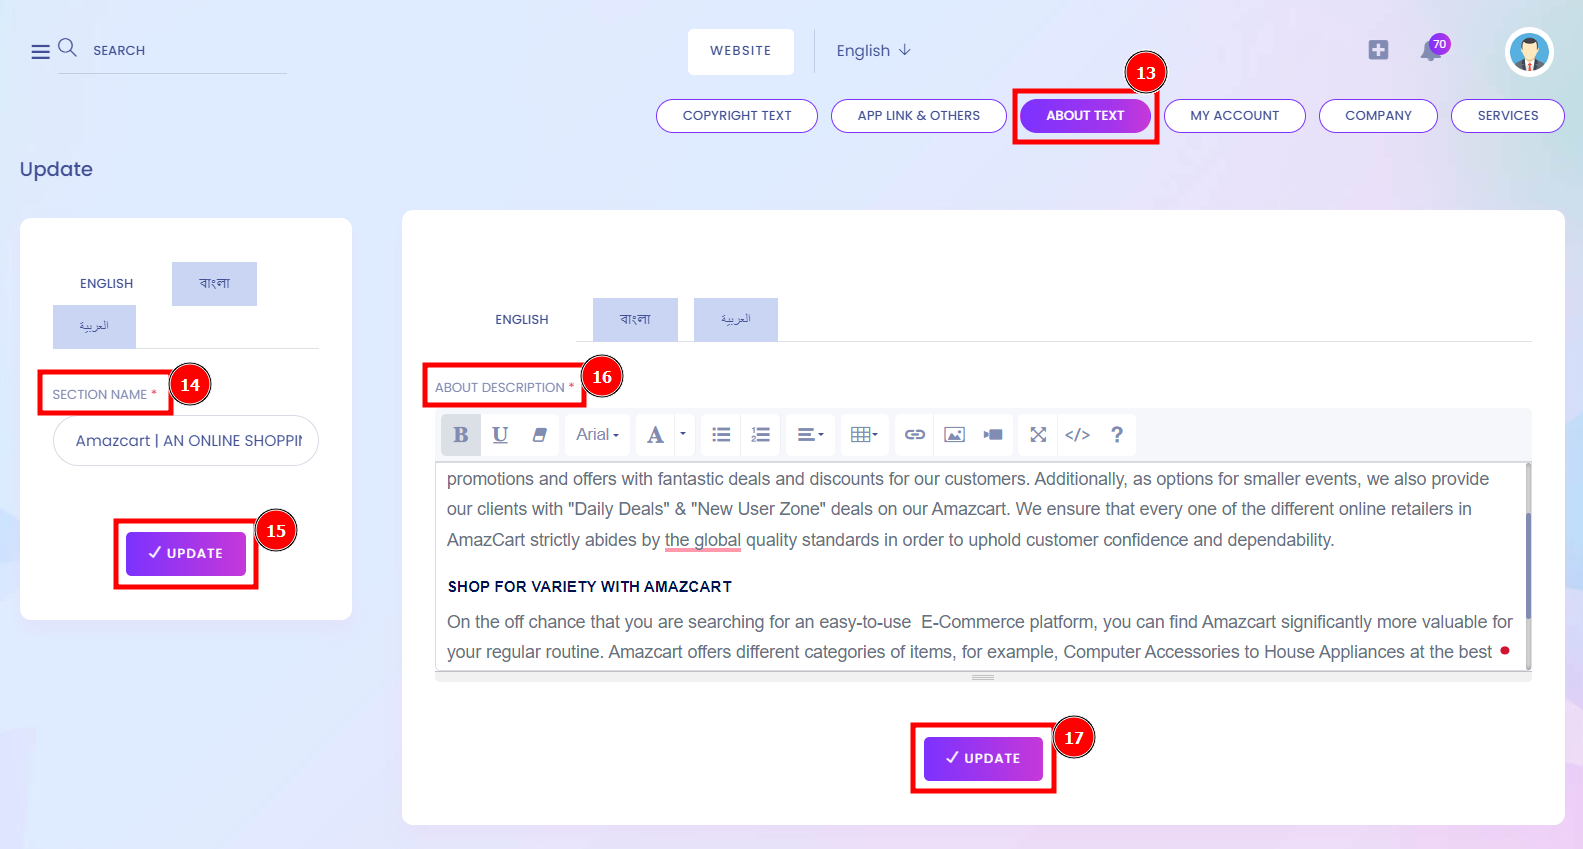
13- About Text
14- Section Name
15- Update
16- About Description
17- Update
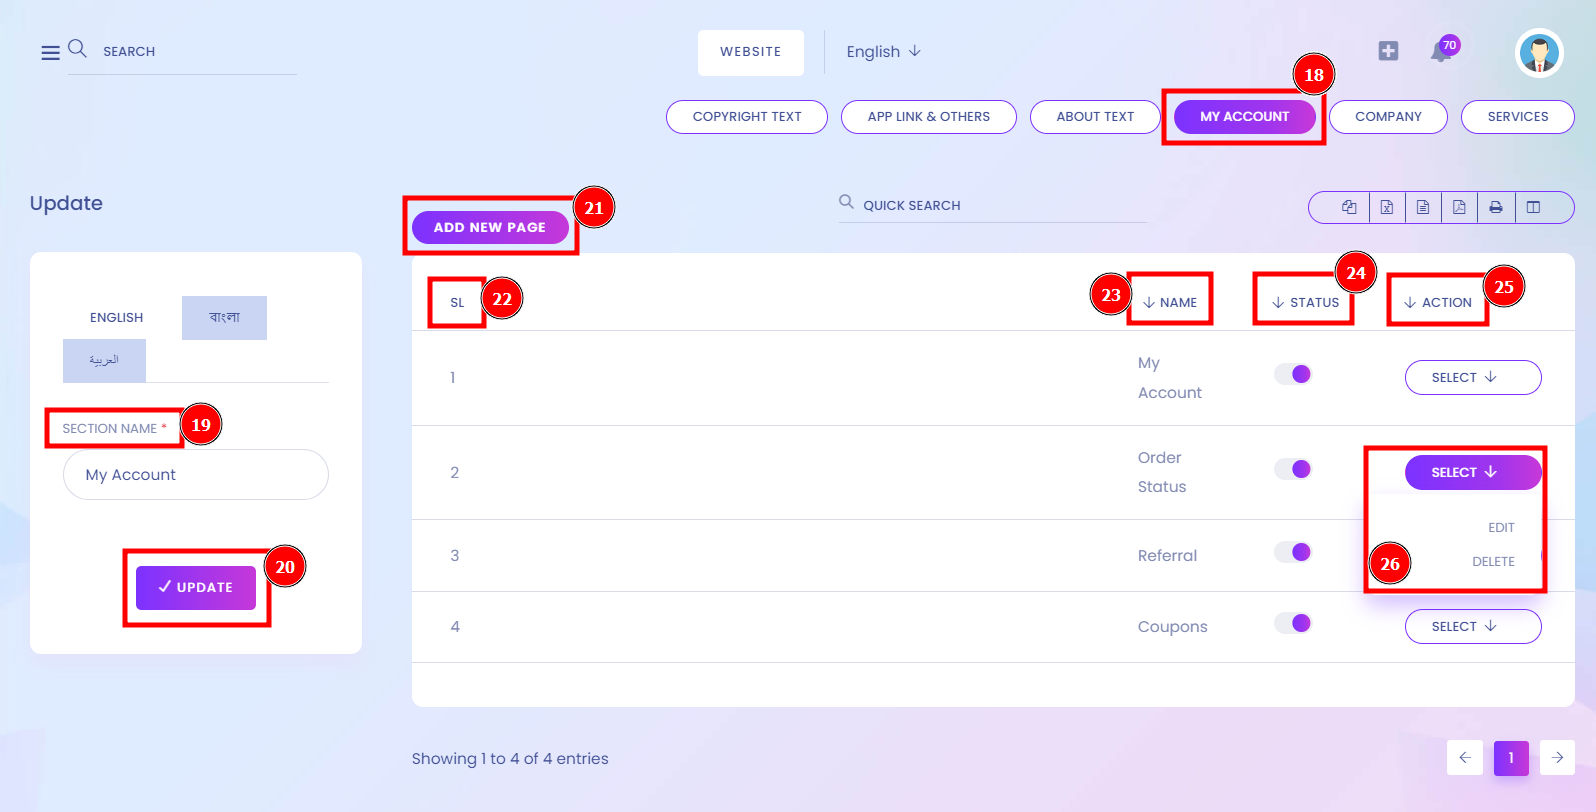
18- My Account
19- Section Name
20- Update
21- Add New Page
22- SL means serial number.
23- Name
24- Status
25- Action
26- Select for edit or delete.
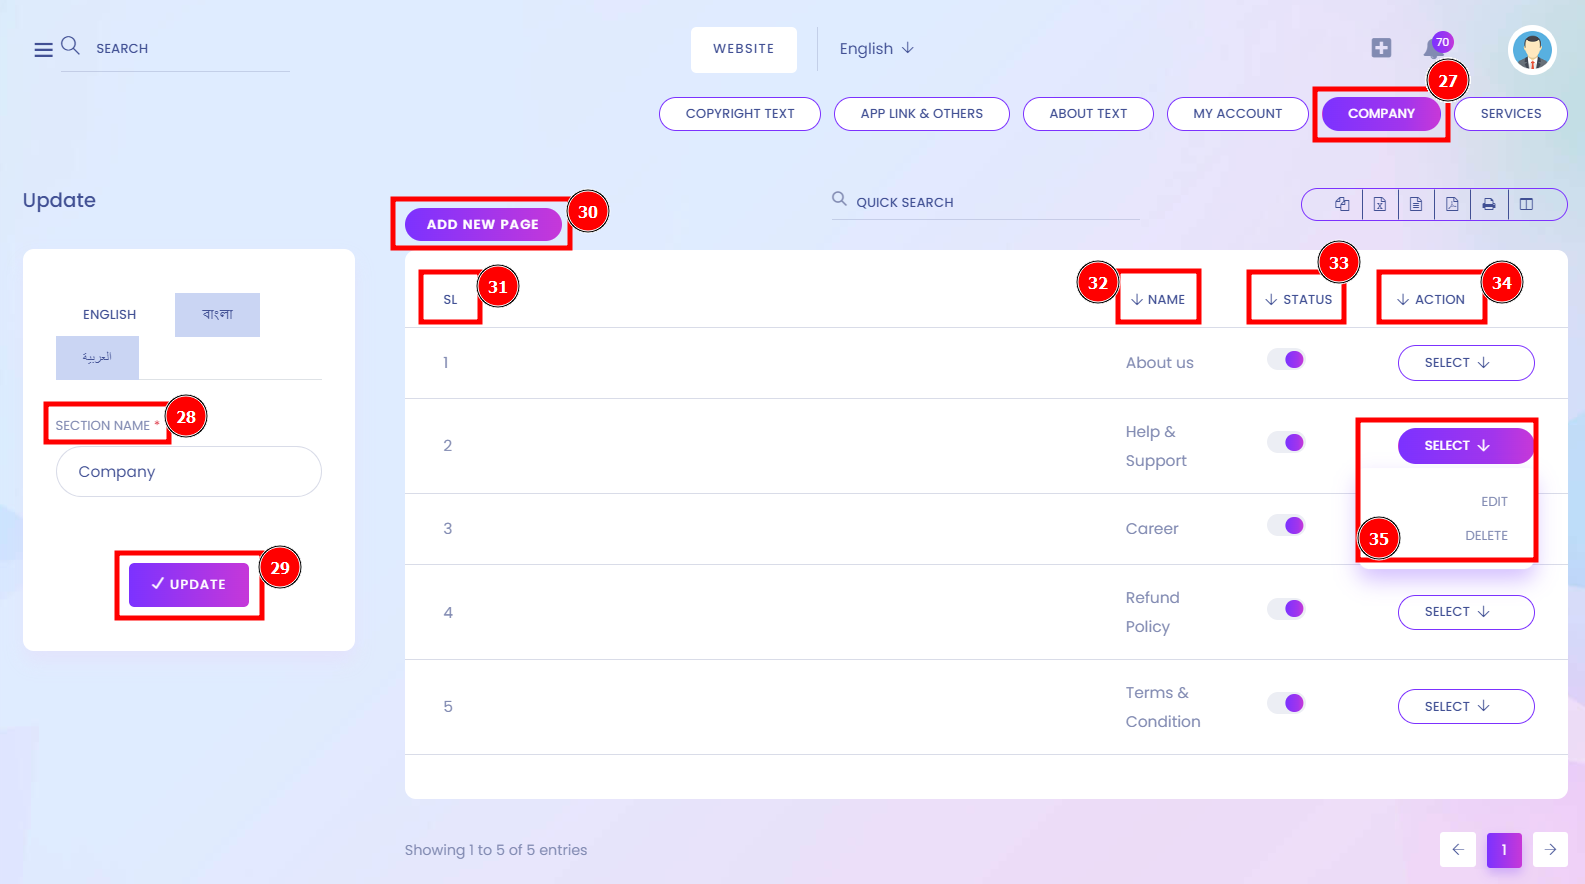
27- Company
28- Select Name
29- Update
30- Add New Page
31- SL means serial number.
32- Name
33- Status
34- Action
35- Select for edit or delete.
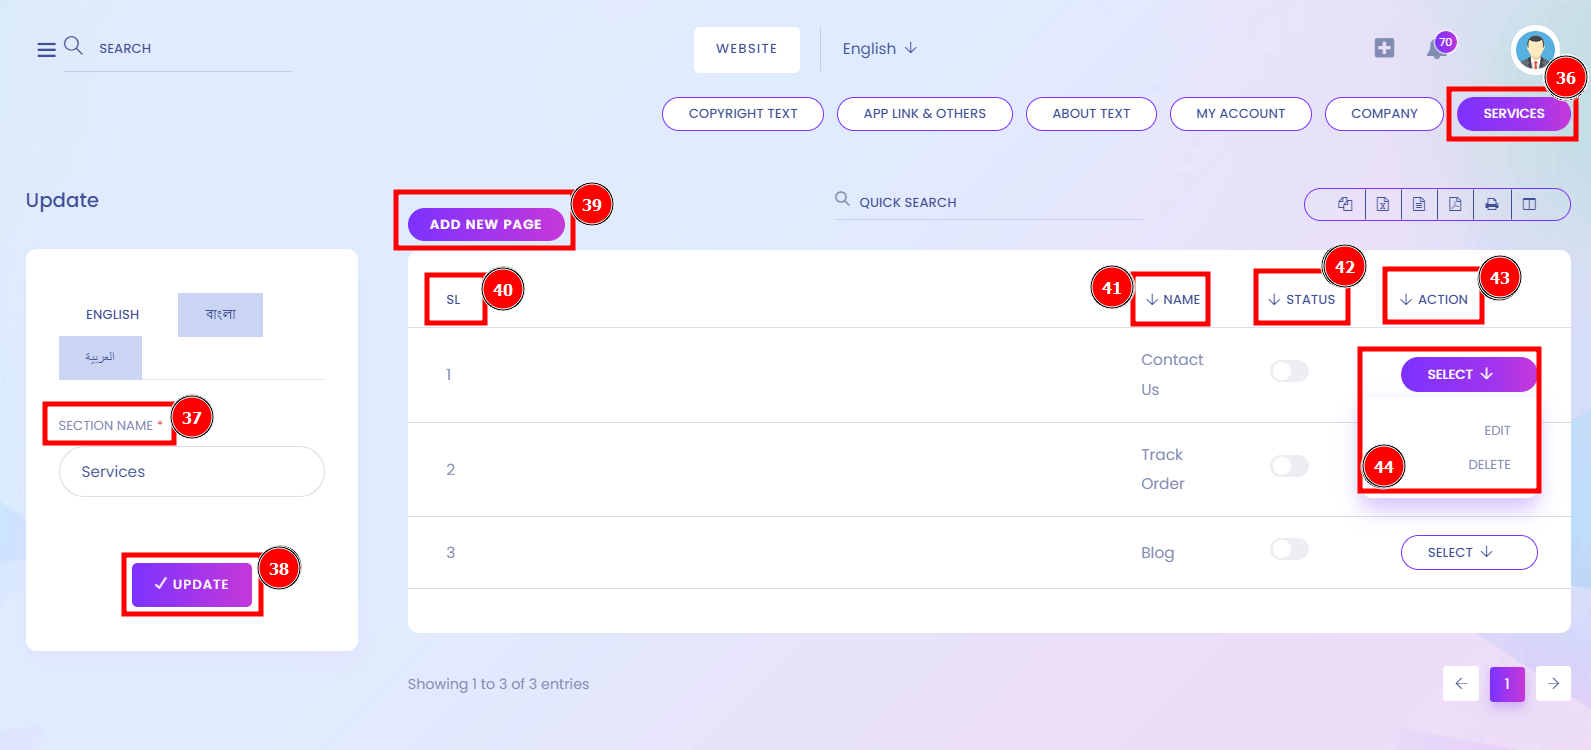
36- Service
37- Select Name
38- Update
39- Add New Page
40- SL means serial number.
41- Name
42- Status
43- Action
44- Select for Edit or Delete.
Subscription:
A subscription website is a site or section with restricted access. This means that people must sign up as members and often pay a fee to access it. Goes into a subscription-based website are a way to provide users with information without giving away the farm. A subscription website is a paid membership platform that keeps content or services behind a paywall and asks customers to pay a recurring fee for access.
Short Direction: {AmazCart> Dashboard> Frontend CMS> Subscription> Title> Sub Title> Details> Update.}
If you want to impress your customer on the way to the Subscription option, then fill in the Title that should be unique & attractive to easy to remember.
1- Subscription
2- Title
3- Sub Title
4- Details
5- Update it.
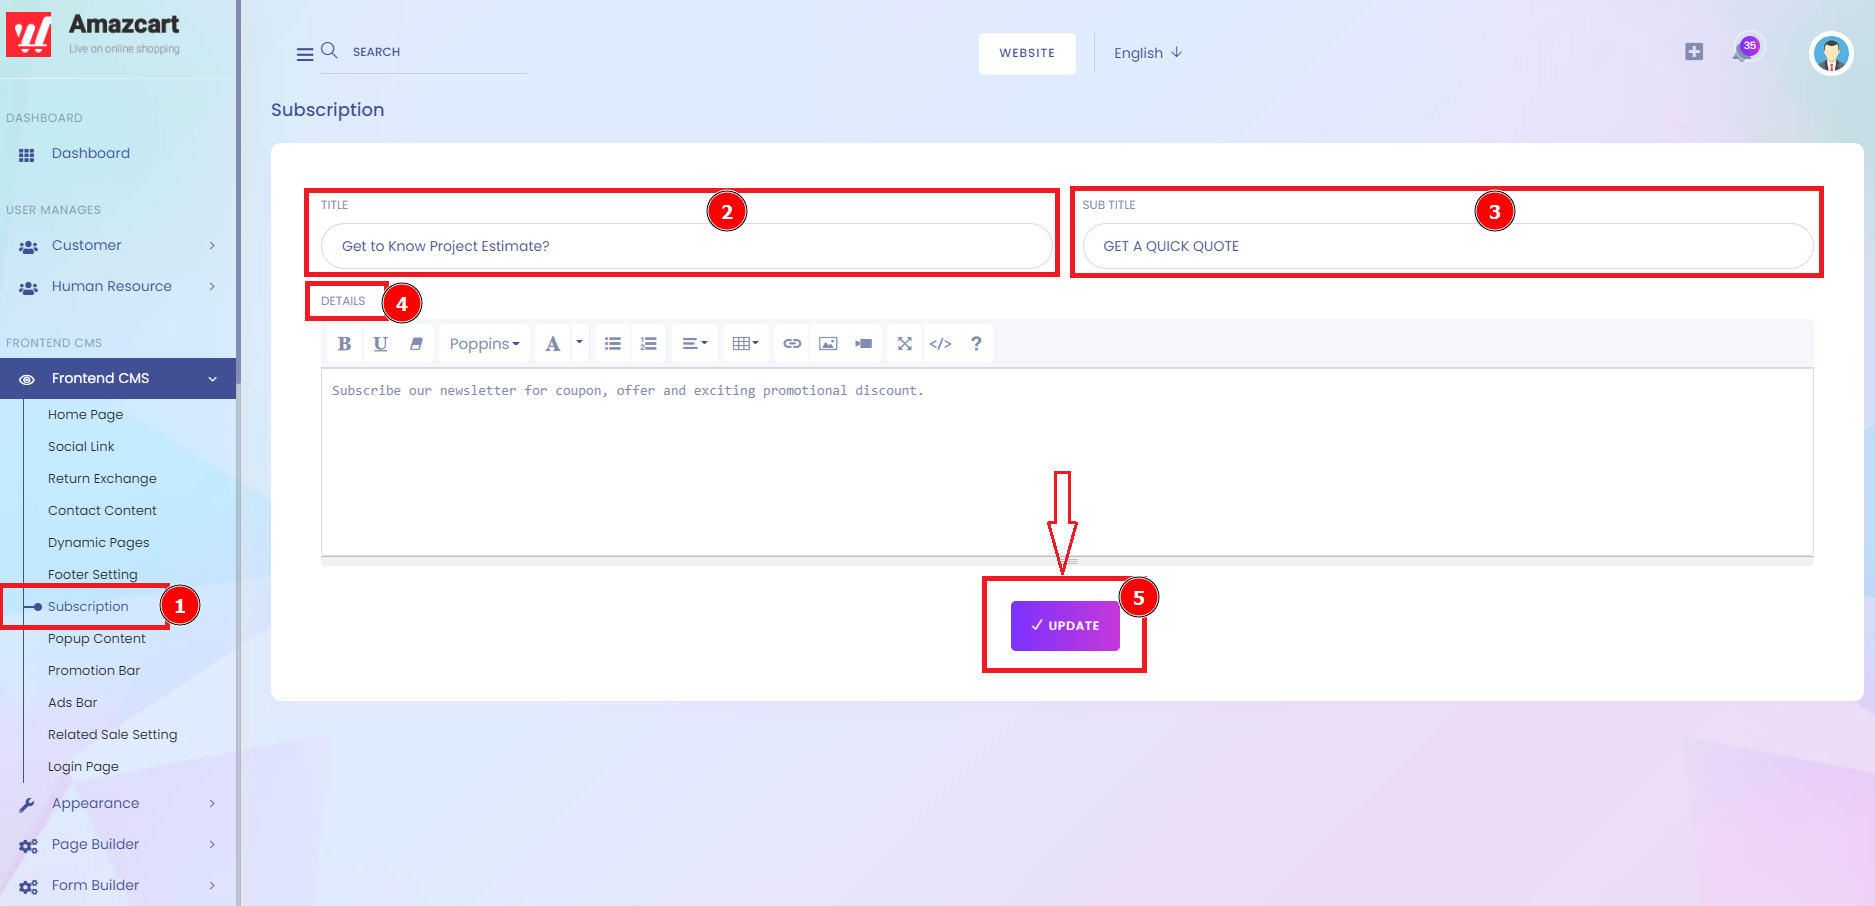
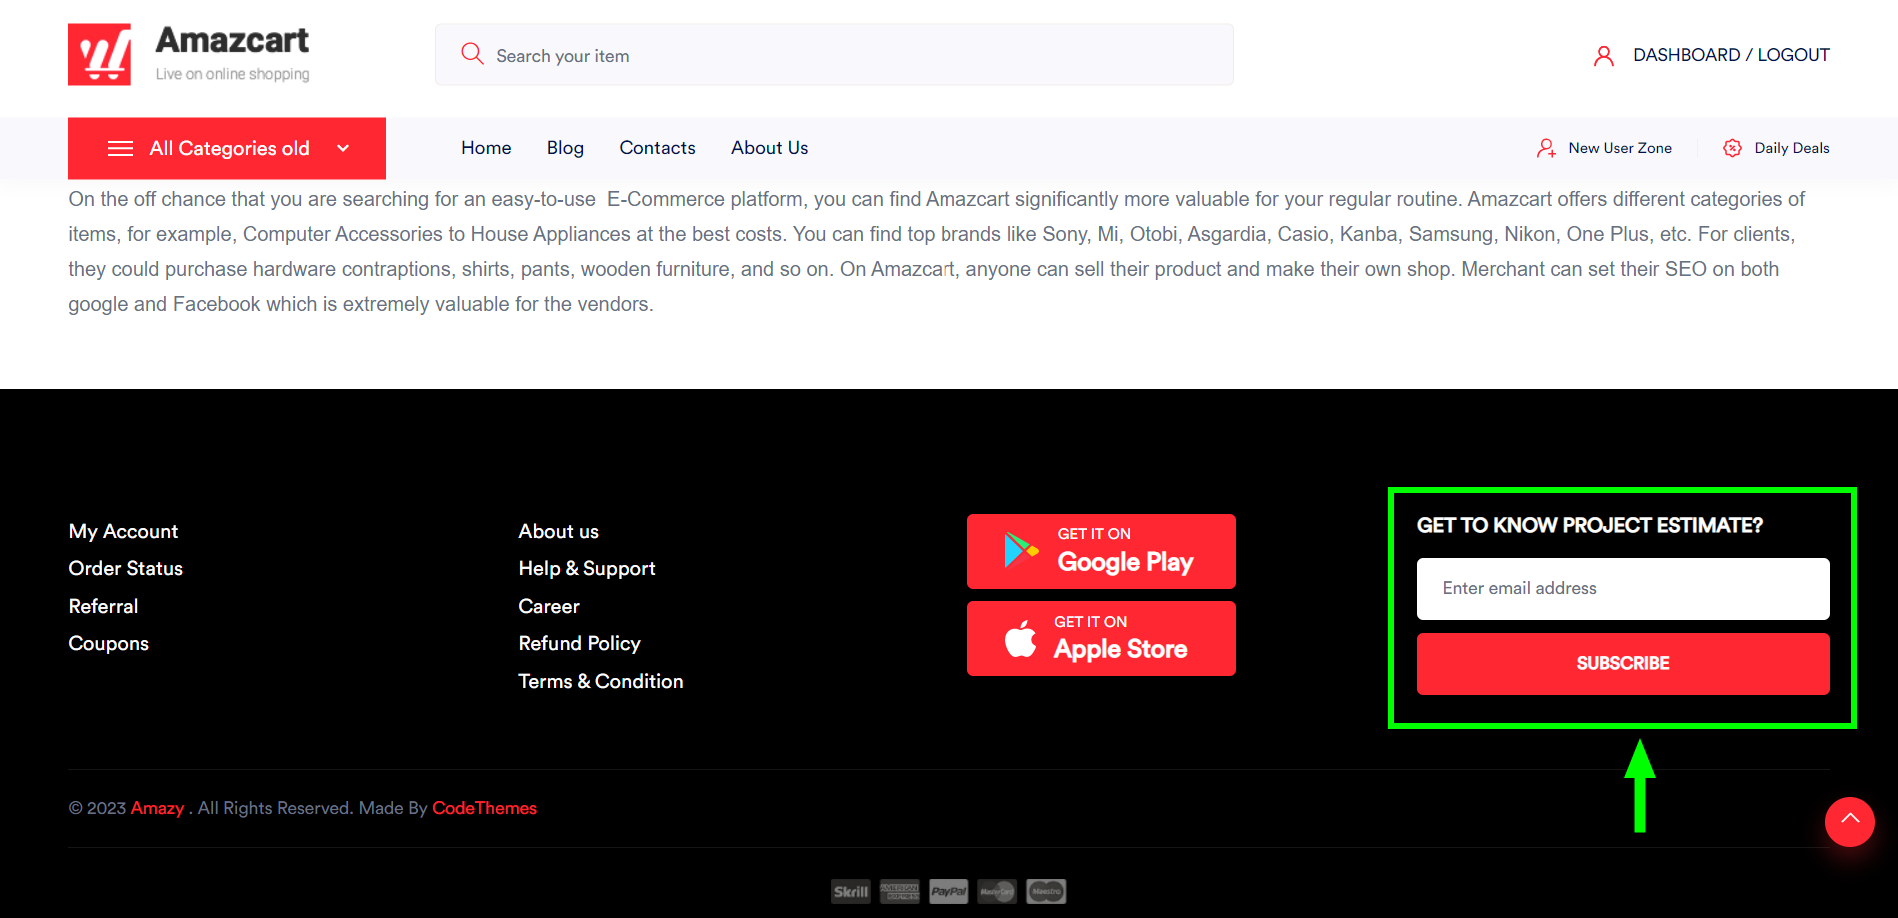
You can go to the AmazCart Homepage to the footer Subscription.
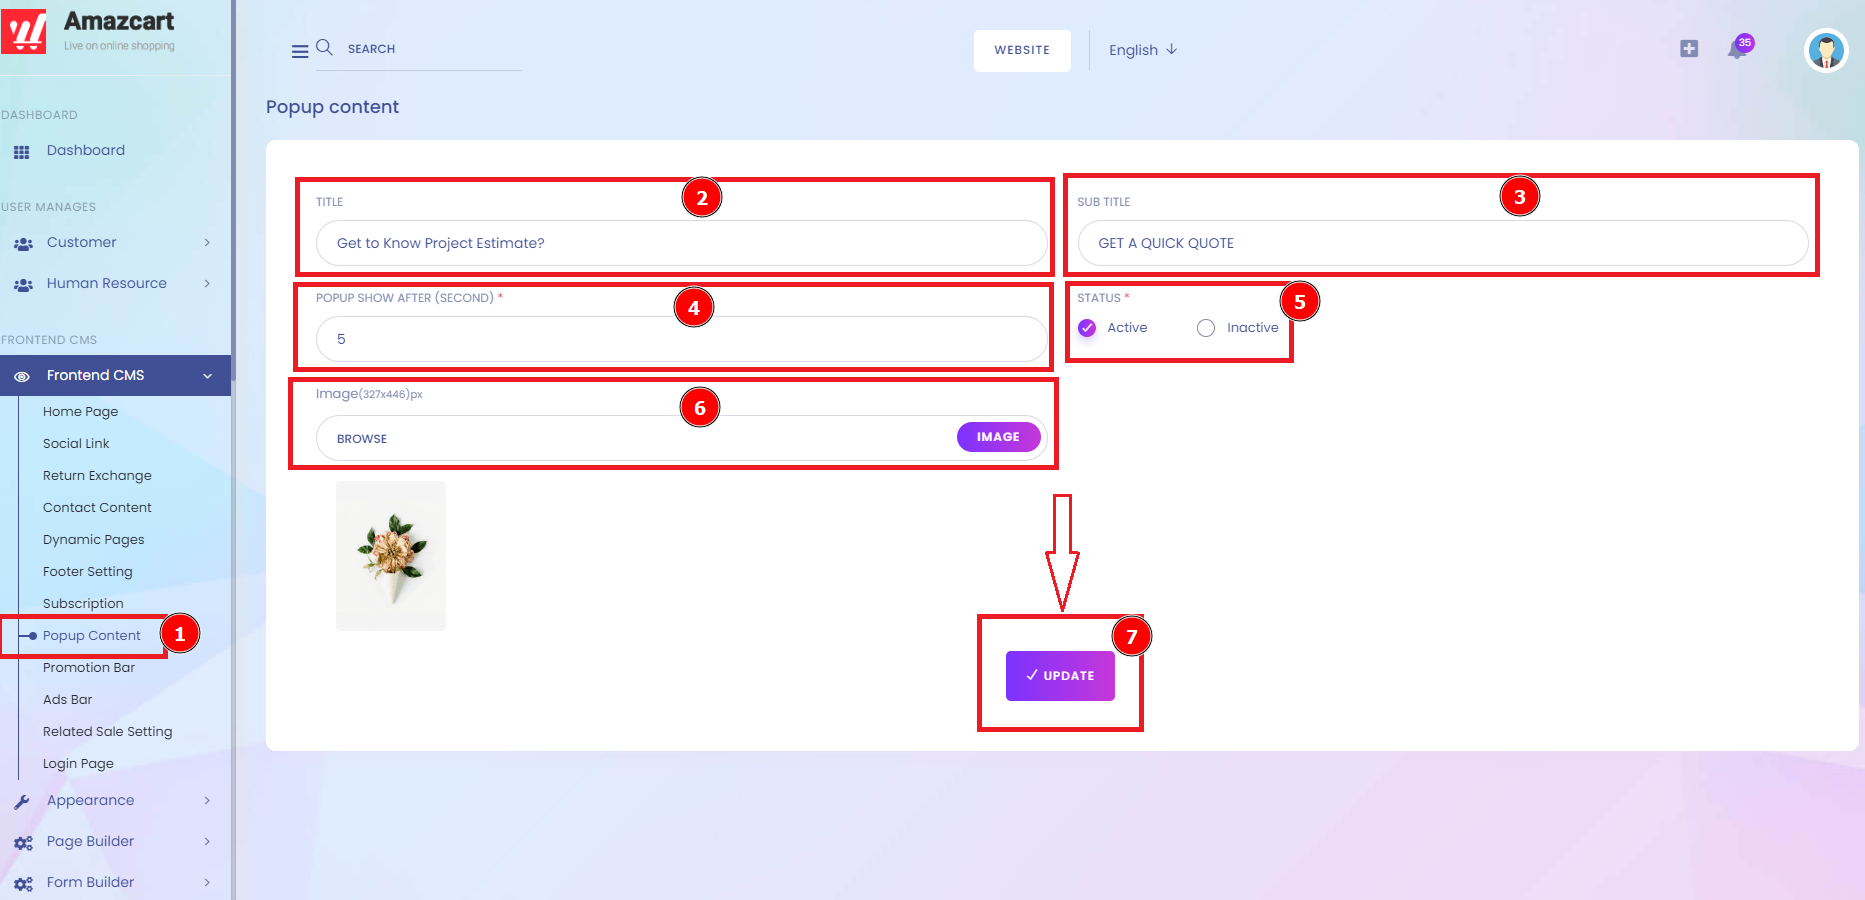
Popup Content:
A website popup is a window that appears in the user interface without an intentional action from the user — they “pop up” into view. Marketers use pop-ups to promote offers and generate leads but can also alert users of other things like cookie use.
Short Direction: {AmazCart> Dashboard> Frontend CMS> Popup Content> Title> Sub Title> Popup Show After> Status> Image> Update.}
If you want to set your popup section then go to the frontend CMS to find the Popup Content and fill in the Title, Sub Title, and Popup Show After, also the Status can be Active or Inactive.
1- Popup Content
2- Title
3- Sub Title
4- Popup Show After
5- Status
6- Image
7- Update it.
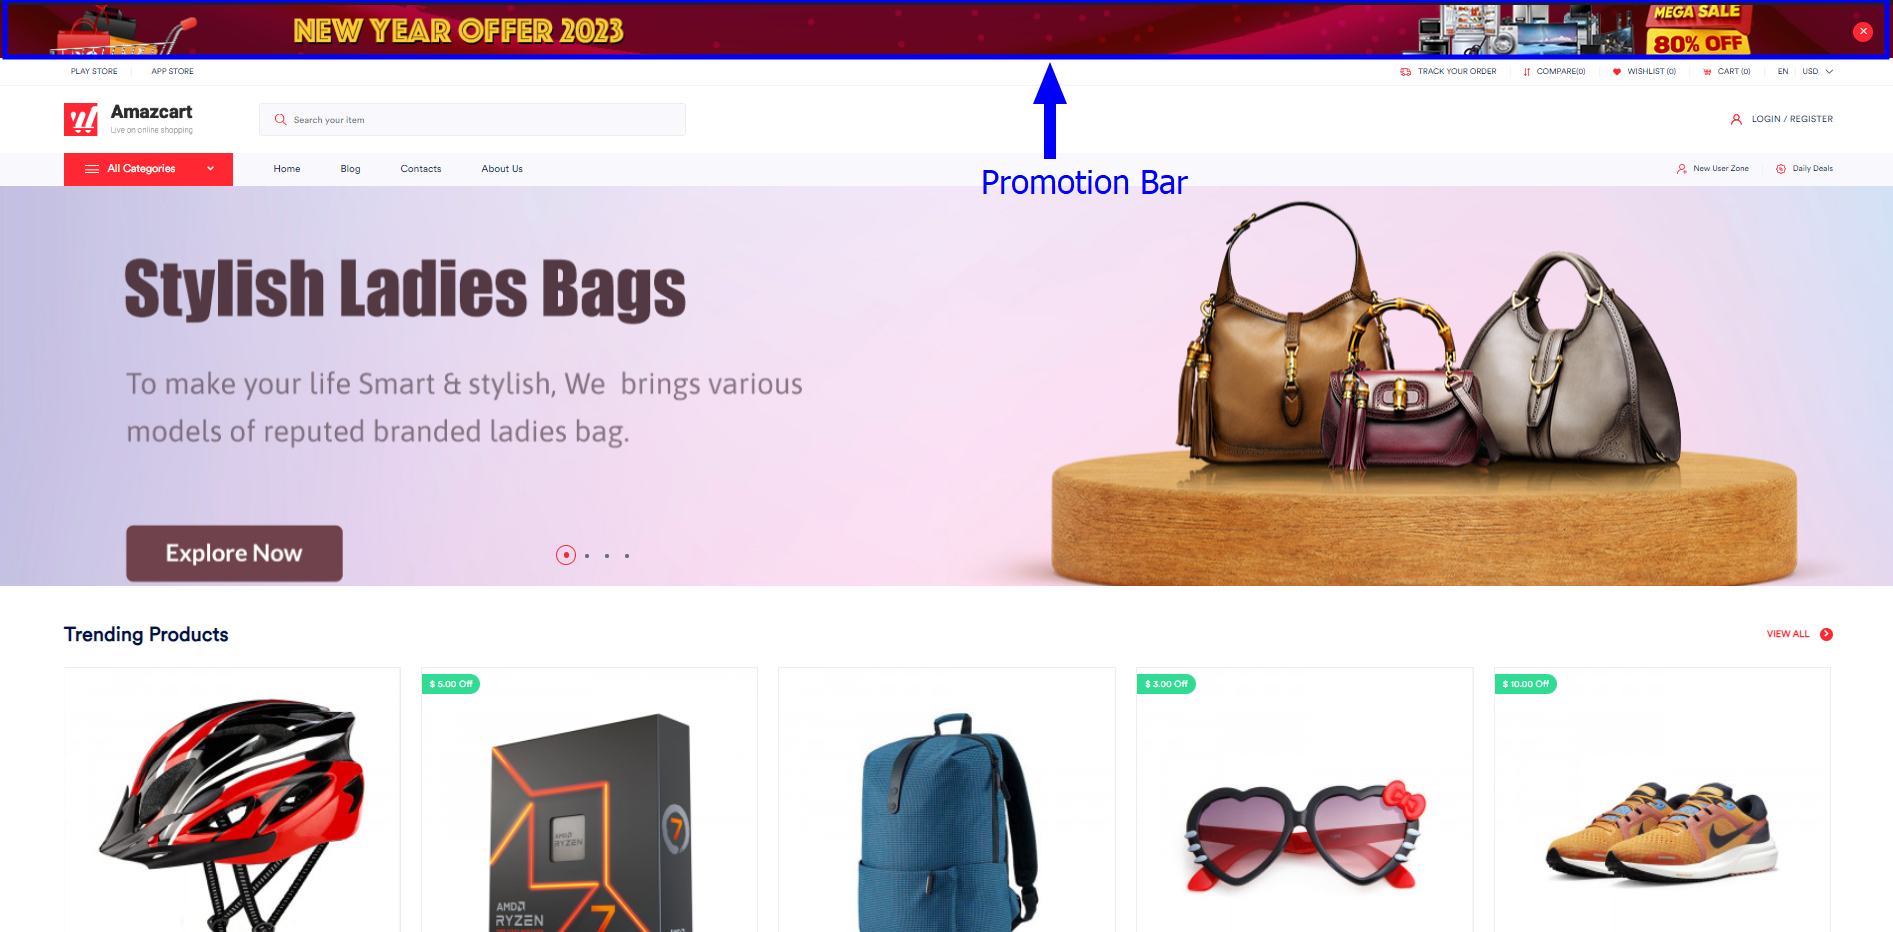
Promotion Bar:
A Promo bar could be a highlight that lets you appear on your website promotions. It is an undeniable truth that one of the prominent compelling ways to dispatch your advancement campaigns is to show appropriate notices to your target customers conveniently.
Short Direction: {AmazCart> Dashboard> Frontend CMS> Promotion Bar> Link> Status> Browse Image> Update.}
If you want to set your Promotion Bar then go to the AmazCart Dashboard to find the Frontend CMS, you will see the Link to select the Status option to mark the Active or Inactive whatever condition is going.
1- Promotion Bar
2- Link
3- Status can be active or inactive.
4- Browse the Image
5- Update it.
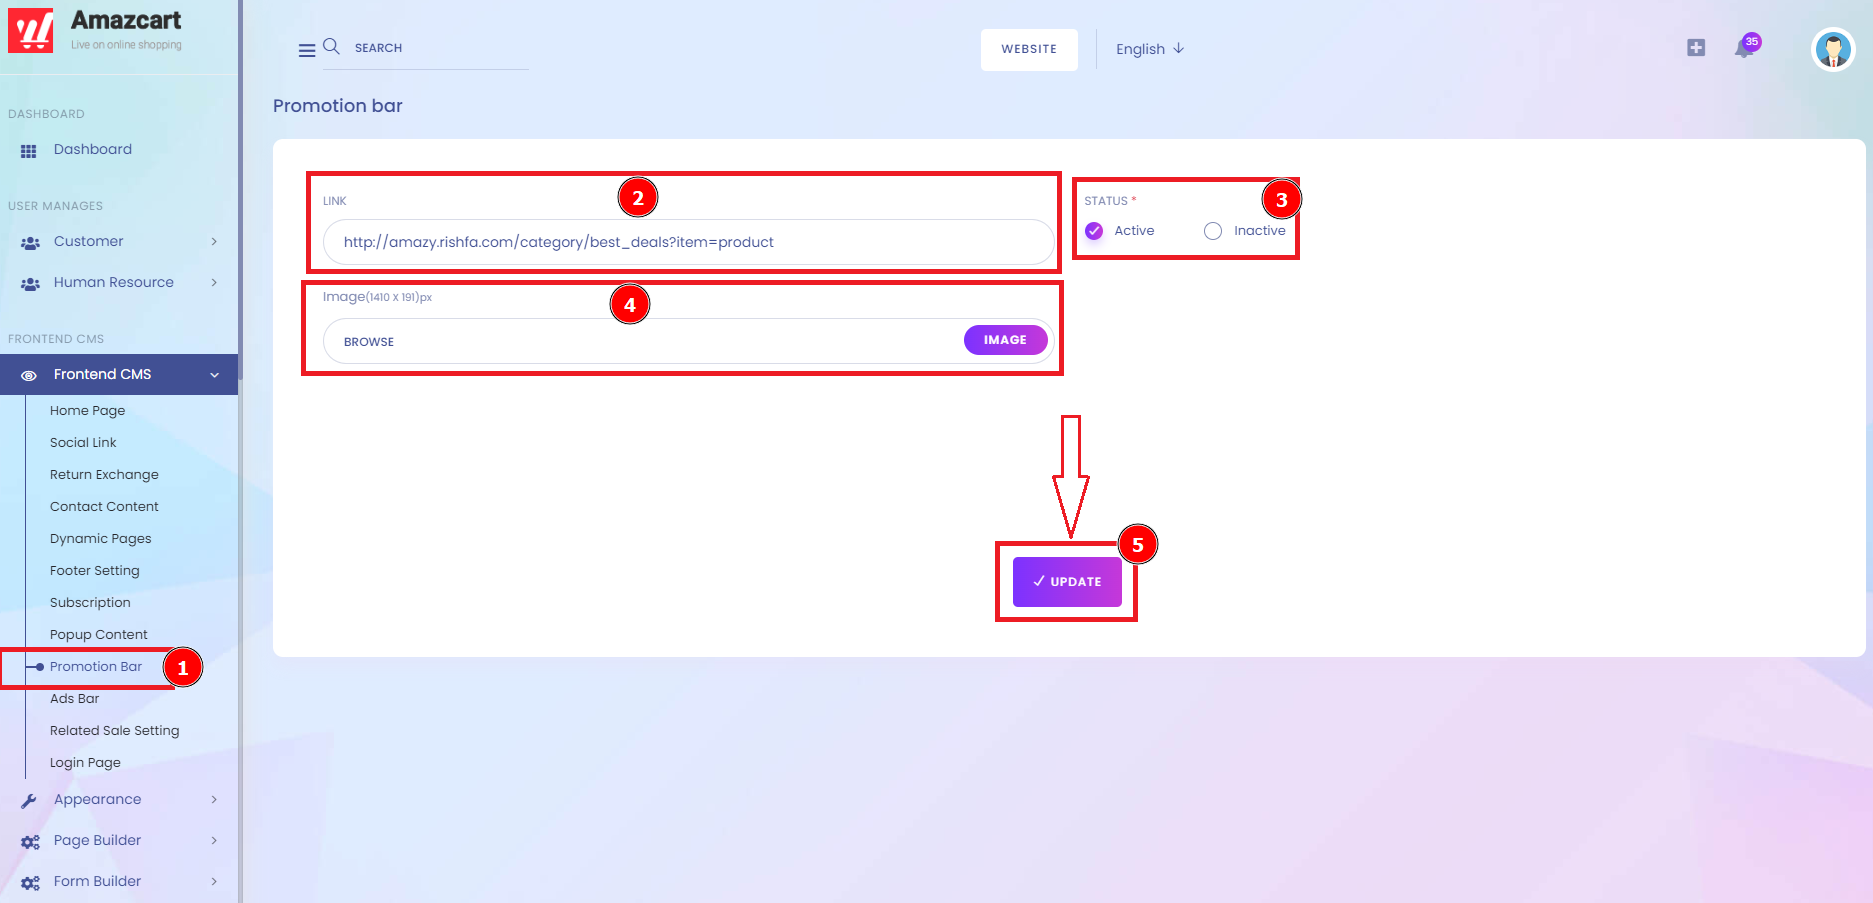
So here is the example of the AmazCart Promotion Bar as the top section.
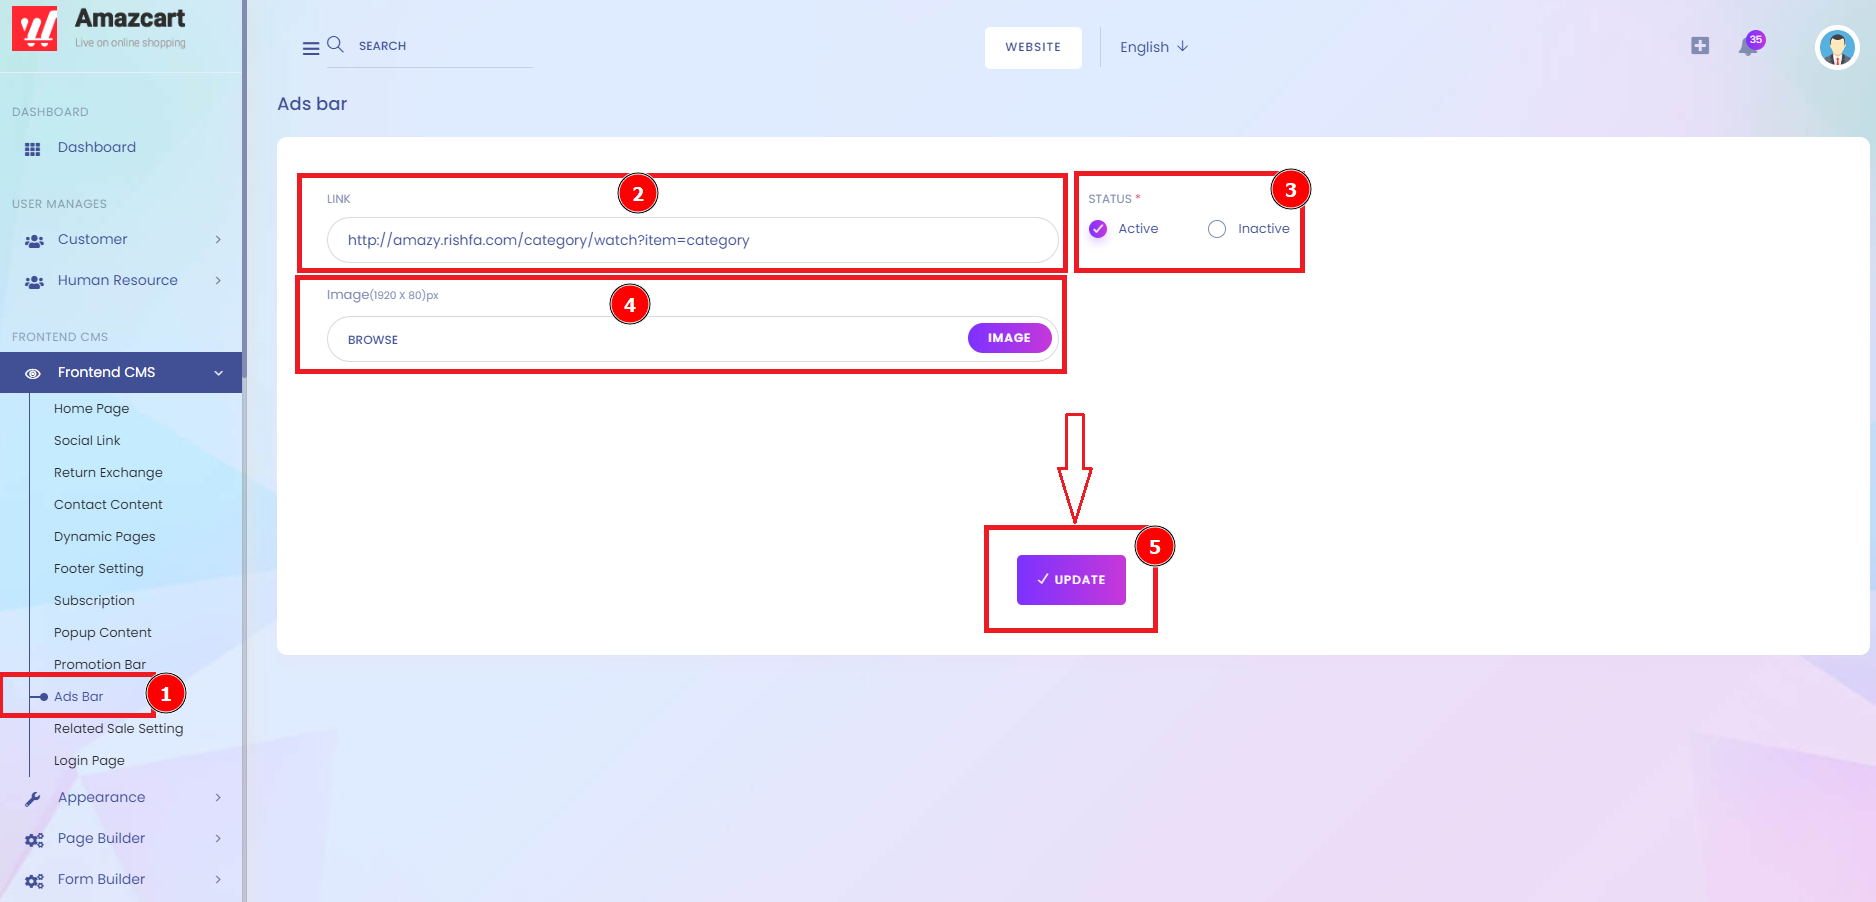
Ads Bar:
Bar advertising is a proven strategy to reach a highly valued demographic. Bar and pub patrons are generally in a good mood, making them more likely to consider and be persuaded by advertising products and services.
Short Direction: {AmazCart> Dashboard> Frontend CMS> Ads Bar> Link> Status> Browse Image> Update.}
If you want to set it on the Ads bar and then added Link, the Status can be Active or Inactive. Also, add Browse Image & hit the Update option.
1- Ads Bar
2- Link
3- Status can be active or inactive.
4- Browse the Image
5- Update it.
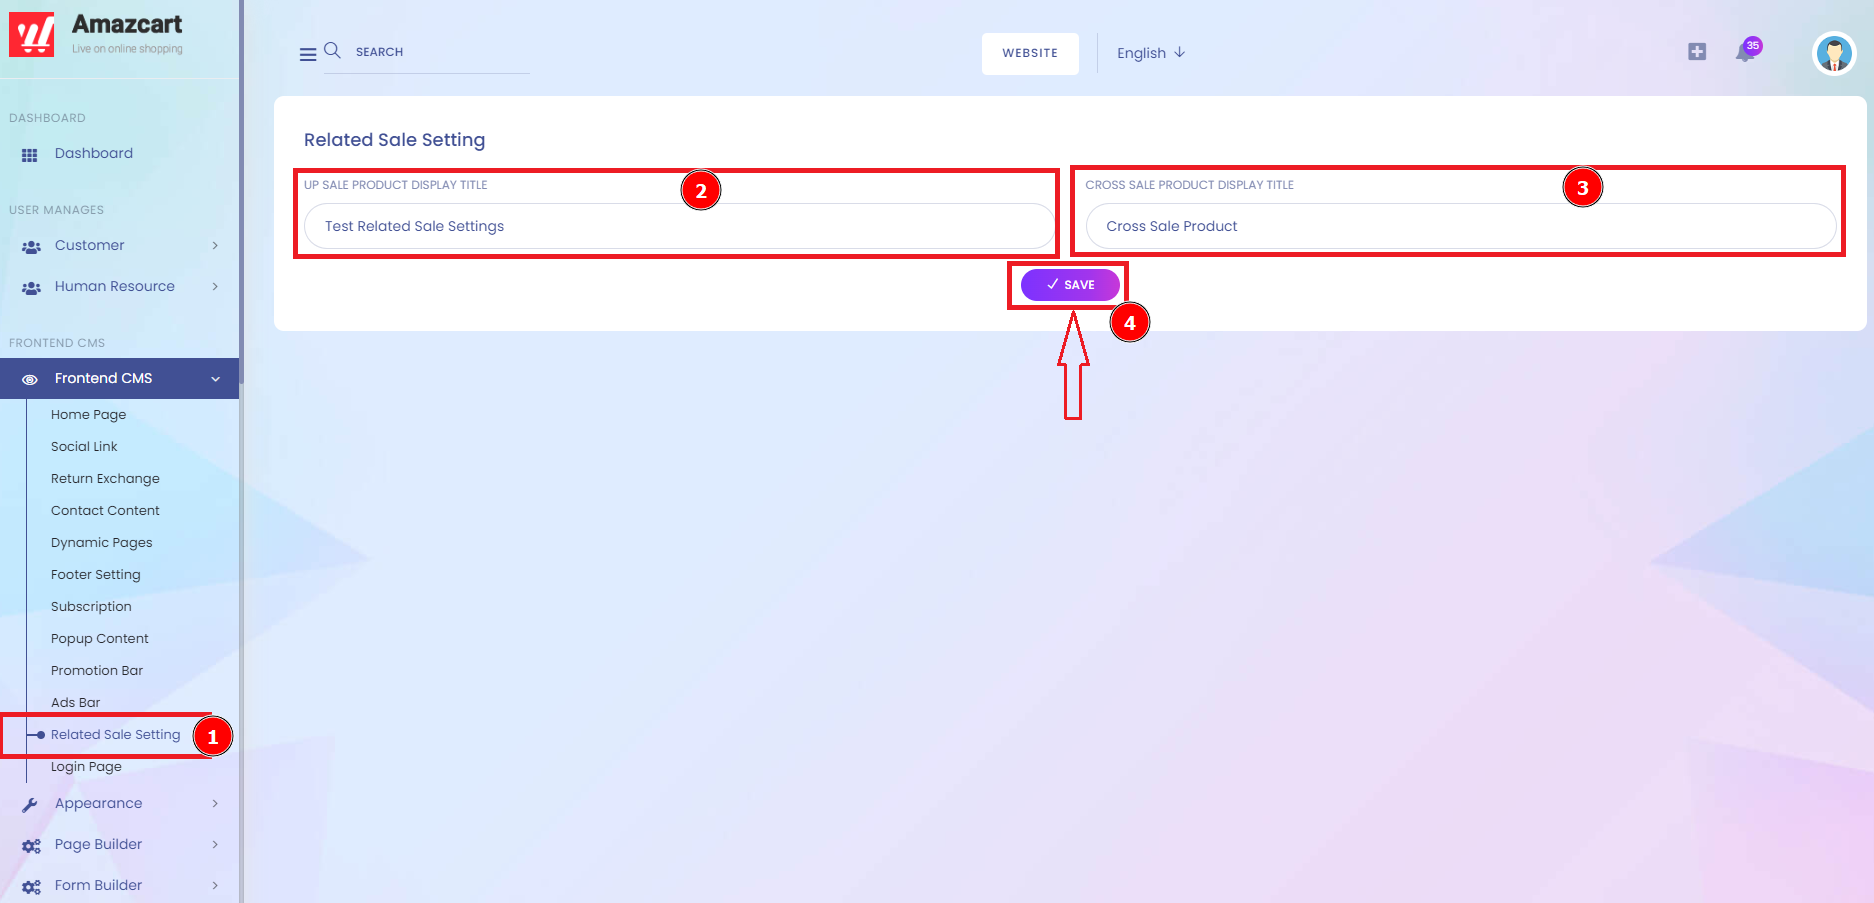
Related Sale Setting:
Related Sale Setting means each purchase agreement is executed to set up the sale product display title & cross-sale product display title. Cross-selling encourages customers to purchase products or services in addition to the original items they intended to purchase. Simply put, the main value of product titles is that they explain what the product is and why users should buy it.
Short Direction: {AmazCart> Dashboard> Frontend CMS> Related Sale Setting> Up Sale Product Display Title> Cross Sale Product Display Title> Save.}
If you want to set on that then click on the Related Sale Setting to find the Up Sale Product Display Title to Cross Sale Product Display Title & Save it.
1- Related Sale Setting
2- Up Sale Product Display Title
3- Cross Sale Product Display Title
4- Save it.
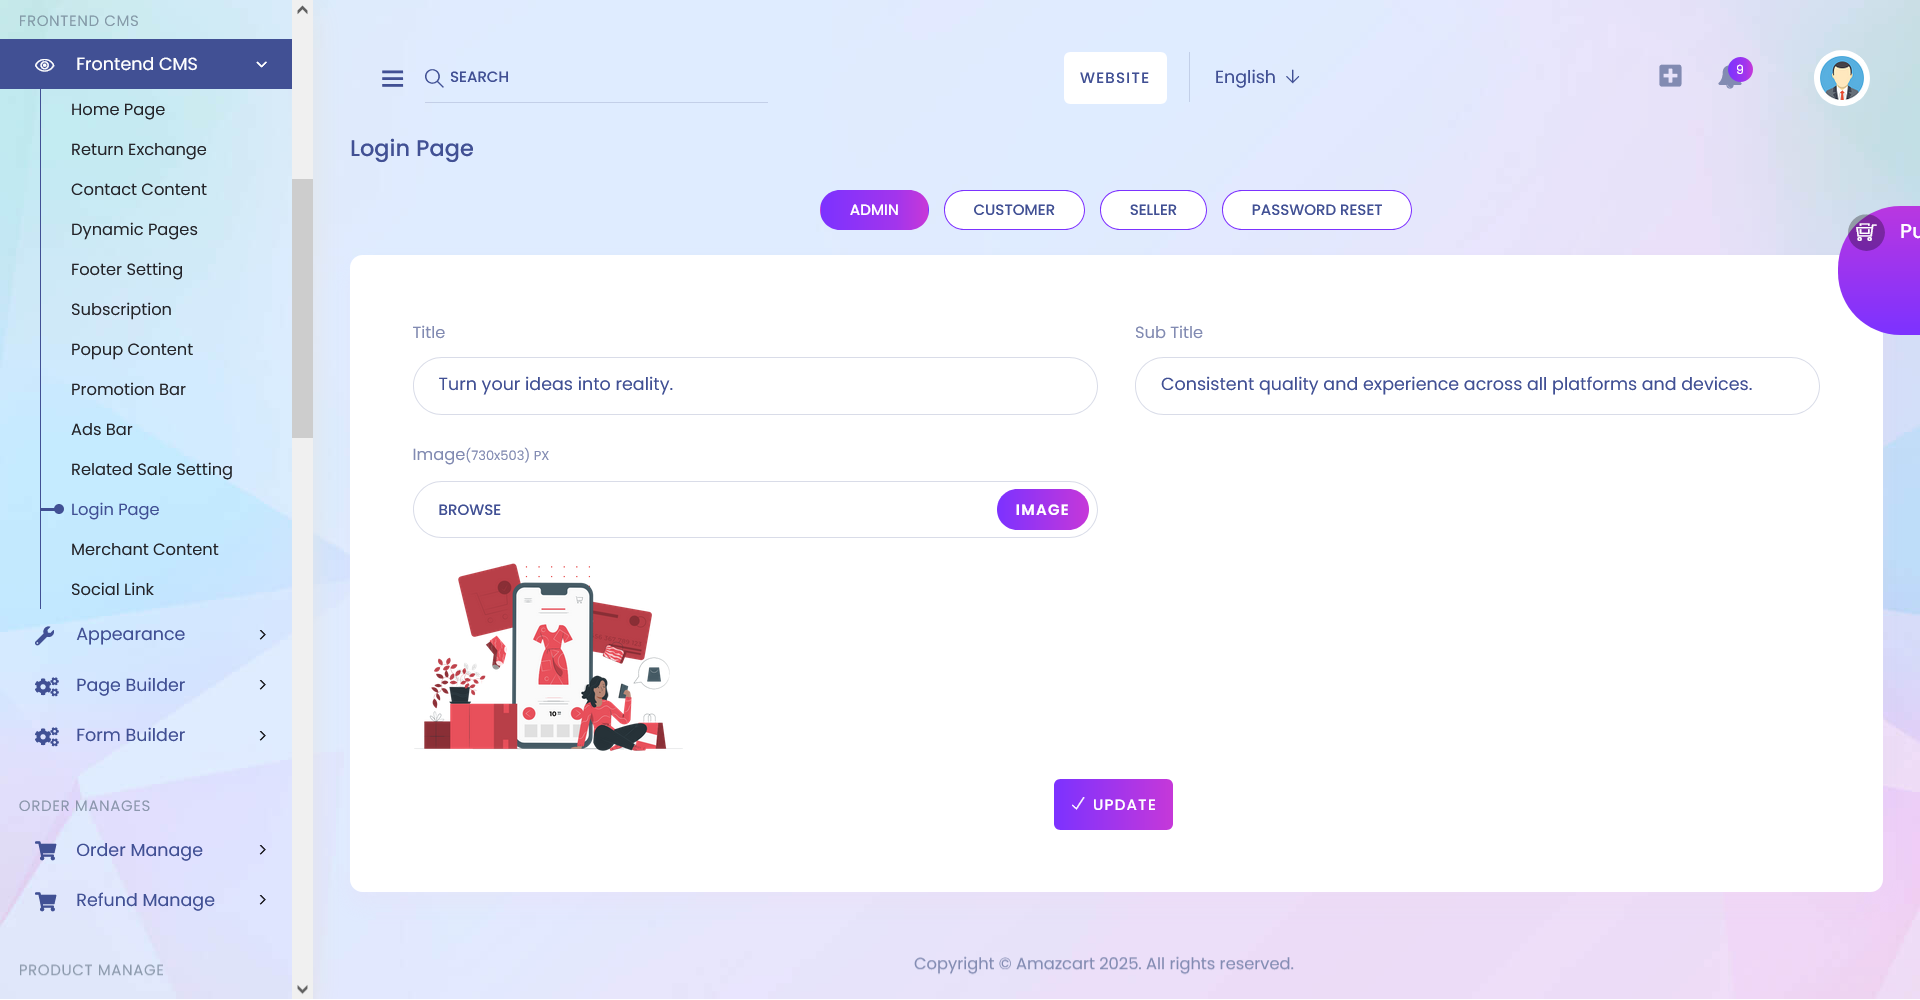
Login Page:
The login page allows users to access an application by entering their username and password or authenticating a social media login. This section is designed for the login interface. Three significant parts of the login segment by user access to the login page on admin, customer & password reset functionality to set on the title, sub-title & Image.
Short Direction: {AmazCart> Dashboard> Frontend CMS> Login Page> Admin/Customer/Password Reset> Title> Sub Title> Browse Image> Update.}
So the Login Page is highly important for every customer, if you want to set it on that then follow the Frontend CMS section to find the Admin, Customer or Password Reset part of AmazCart.
1- Login Page
2- Admin/Customer/Seller/Password Reset
3- Title
4- Sub Title
5- Browse the Image
6- Update it.
Merchant Content:
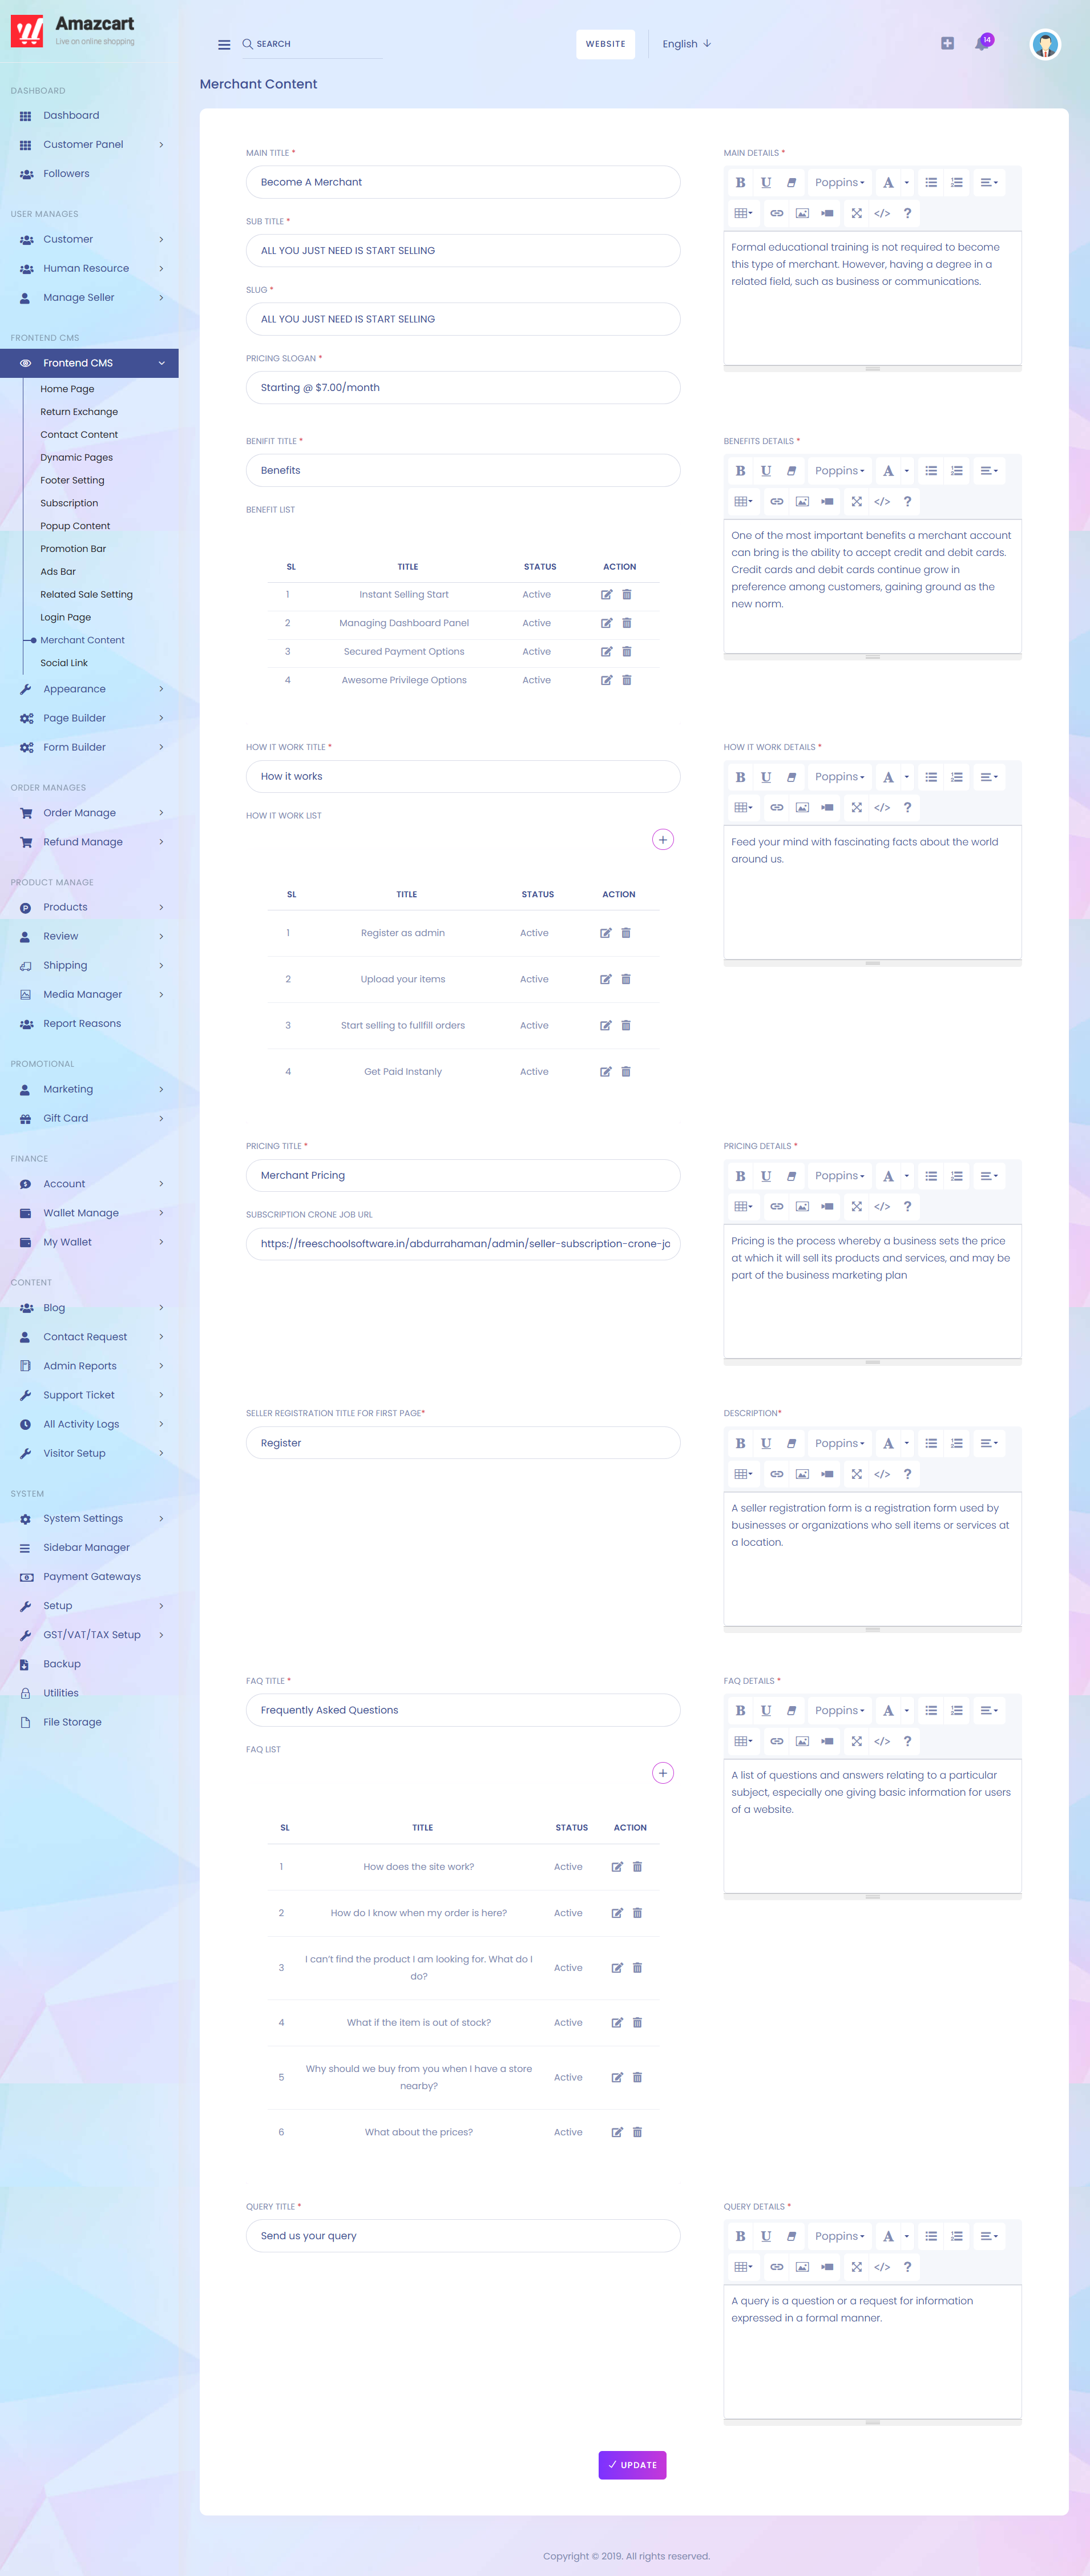
1. Main Title
Here you can add main title.
2. Sub Title
Here you can add sub title.
3. Slug
Here you can add slug.
4. Pricing Slogan
Here you can add pricing slogan.
5. Main Details
On that section you can add details.
6. Benefit Title
Here you can add benefit title.
7. Benefit List
On that section you can edit and delete data from the list.
8. Benefit Details
Here you can add benefit details.
9. How it Work Title
Here you can add how it work title.
10. How it Work List
On that section you can add, edit and delete data from the list.
11. How it Work Details
Here you can add how it work details.
12. Pricing Title
Here you can add pricing title.
13. Subscription Crone Job URL
Here you can add URL for subscription crone job.
14. Pricing Details
Here you can add pricing details.
15. Seller Registration Title For First Page
Here you can add title for seller registration.
16. Description
Here you can add description.
17. FAQ Title
Here you can add FAQ title.
18. FAQ List
On that section you can add, edit and delete data from the list.
19. FAQ Details
Here you can add FAQ details.
20. Query Title
Here you can query title.
21. Query Details
Here you can add query details.
22. Update
After filling all the required fields press "Update" button to save your data that you provided.
Social Link: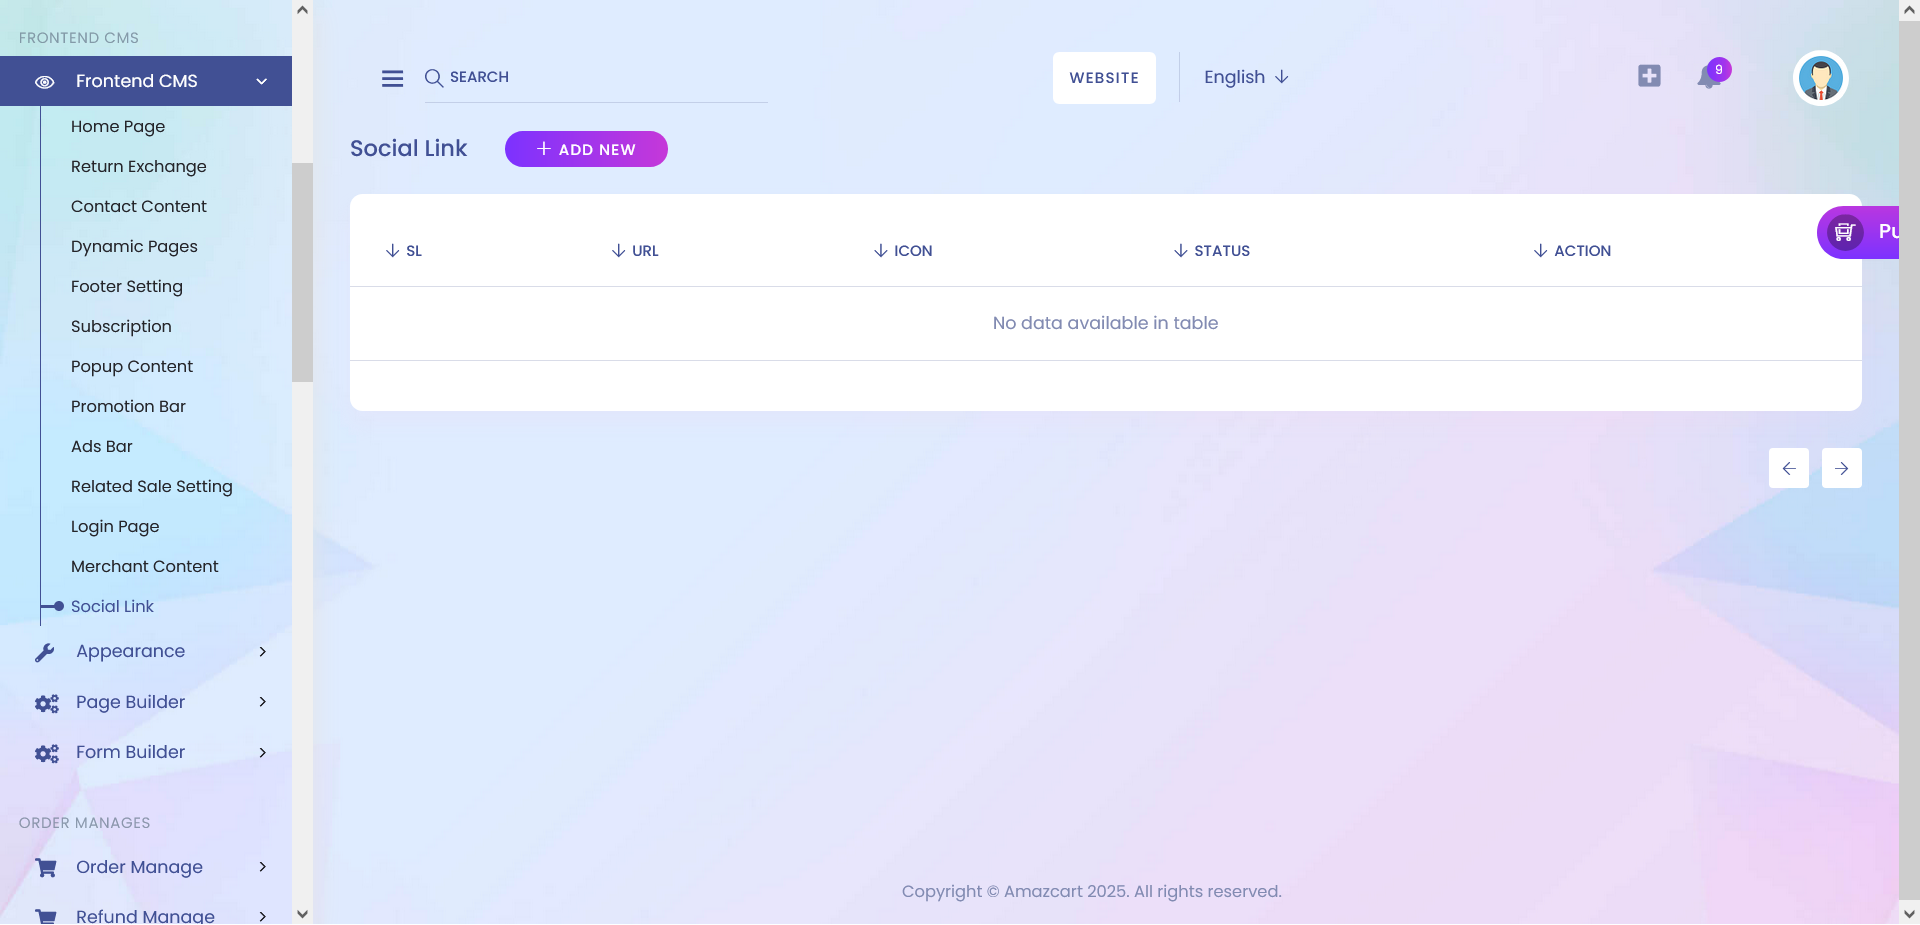
1. Add New
Here you can add a new social link.
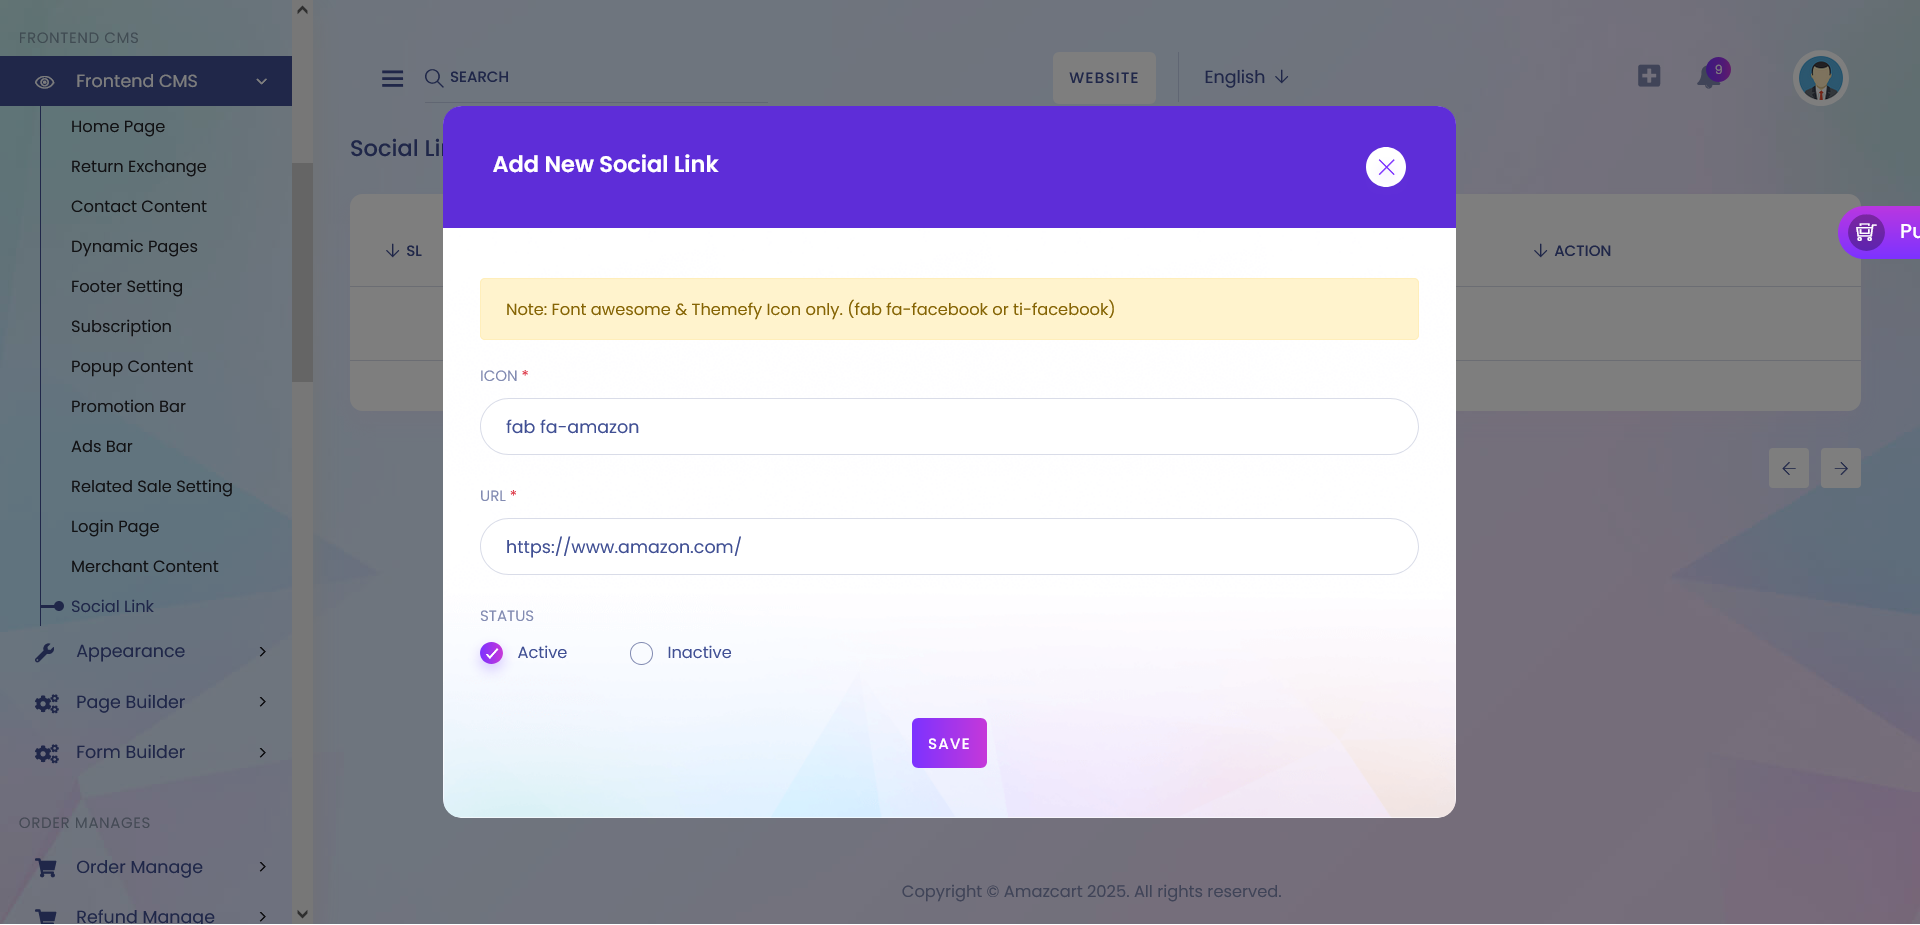
1. Icon
Here you can add icon.
2. URL
Here you can add url link.
3. Status
On that section you can select the status.
4. Save
After filling all the required filled then click the Save button to create new social link.


