Managing sellers in AmazCart involves overseeing and administering the activities of individual vendors or sellers who operate within the AmazCart multi-vendor e-commerce platform. Overall, managing sellers in AmazCart involves creating a thriving marketplace where multiple vendors can offer their products to a diverse customer base. It requires monitoring seller performance, ensuring a smooth buying experience for customers, and maintaining the integrity and reputation of the platform.
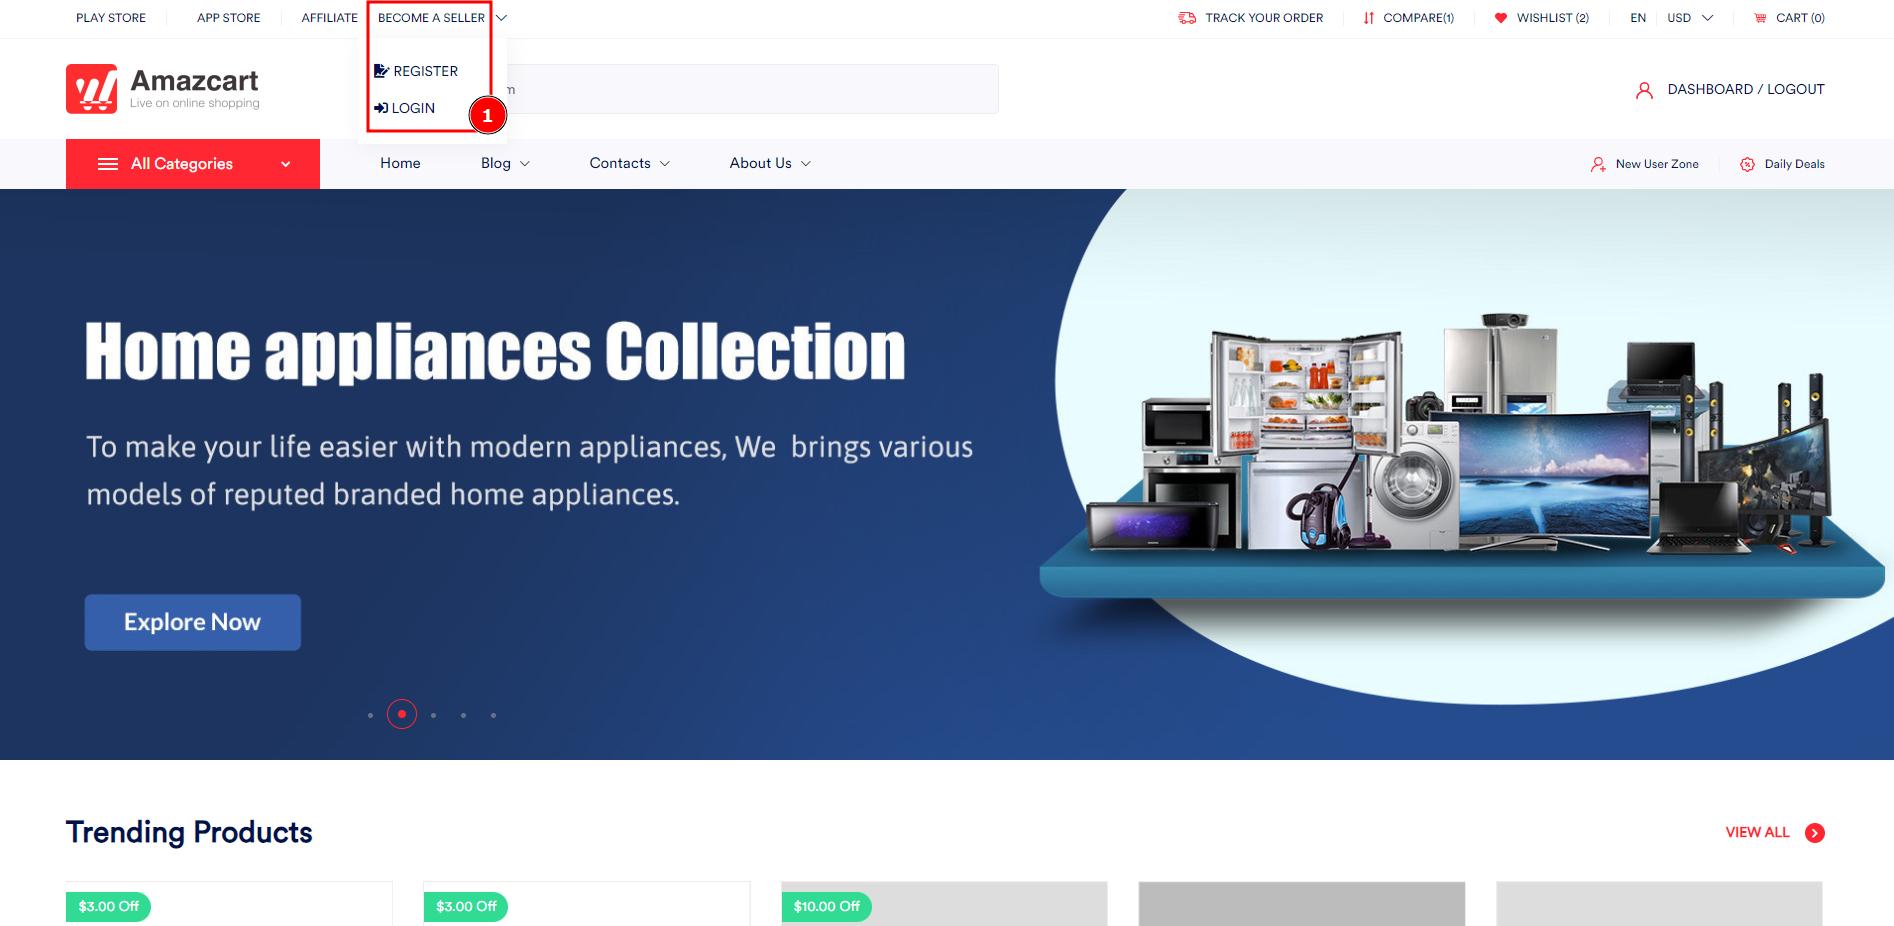
Become A Seller:
Using More Than One Online Marketplace Platform Is Good Marketing for an e-Commerce Business. One of the most obvious reasons to sell items on multiple sites is to create influence and allow yourself to have a backup plan in case your primary sales channel isn't substantial.
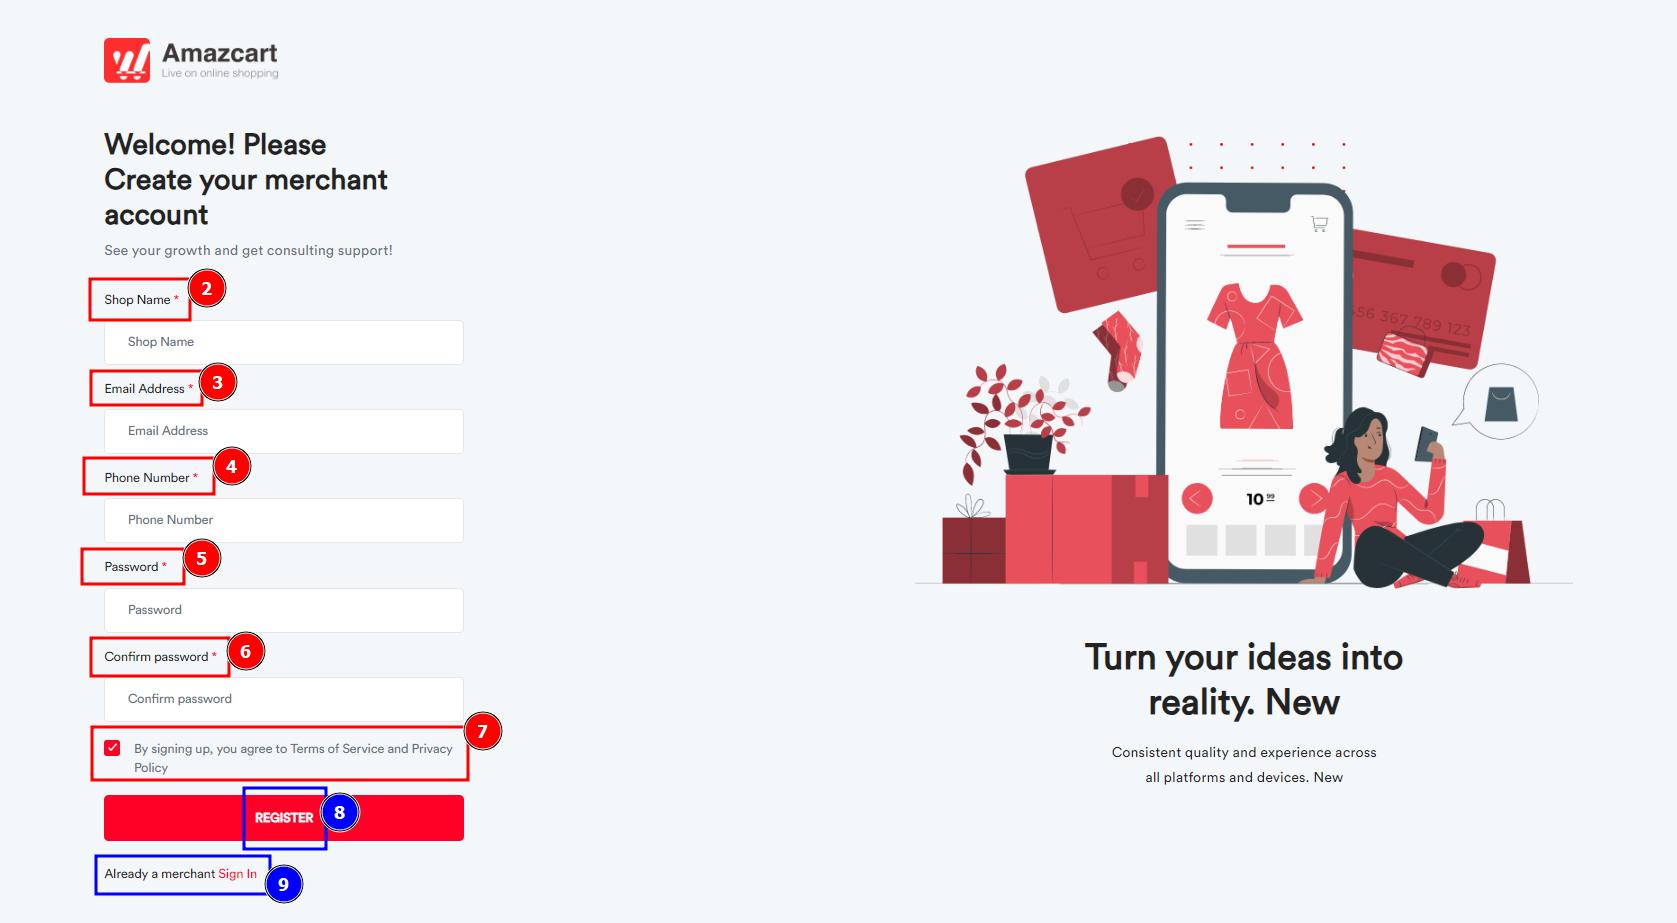
Short Direction: {AmazCart> Website Front Page> Become A Seller> Shop Name> Email Address> Phone Number> Password> Confirm Password> By signing up, you agree to terms of service and privacy policy> Register> Already a merchant sign In.}
If you want to a become new seller for AmazCart then go to the web front page to click on Become a Seller.
1- Become A Seller
2- Shop Name
3- Email Address
4- Phone Number
5- Password
6- Confirm Password
7- By signing up, you agree to the terms of service and privacy policy
8- Register
9- Already a merchant sign-in.
Create Your Merchant Account:
Merchant accounts are e-commerce accounts that help process online selling products for other business's sites. It allows companies to accept their vendors & resell to other companies.
Seller List:
Admin can add new sellers or if they looking for new sellers then it is a handy way to reach out to agents. Sharing informative and promotional posts on social networks can bring great results for your e-commerce business. You can also reach out to local vendors who are not available on social networks by visiting them personally.
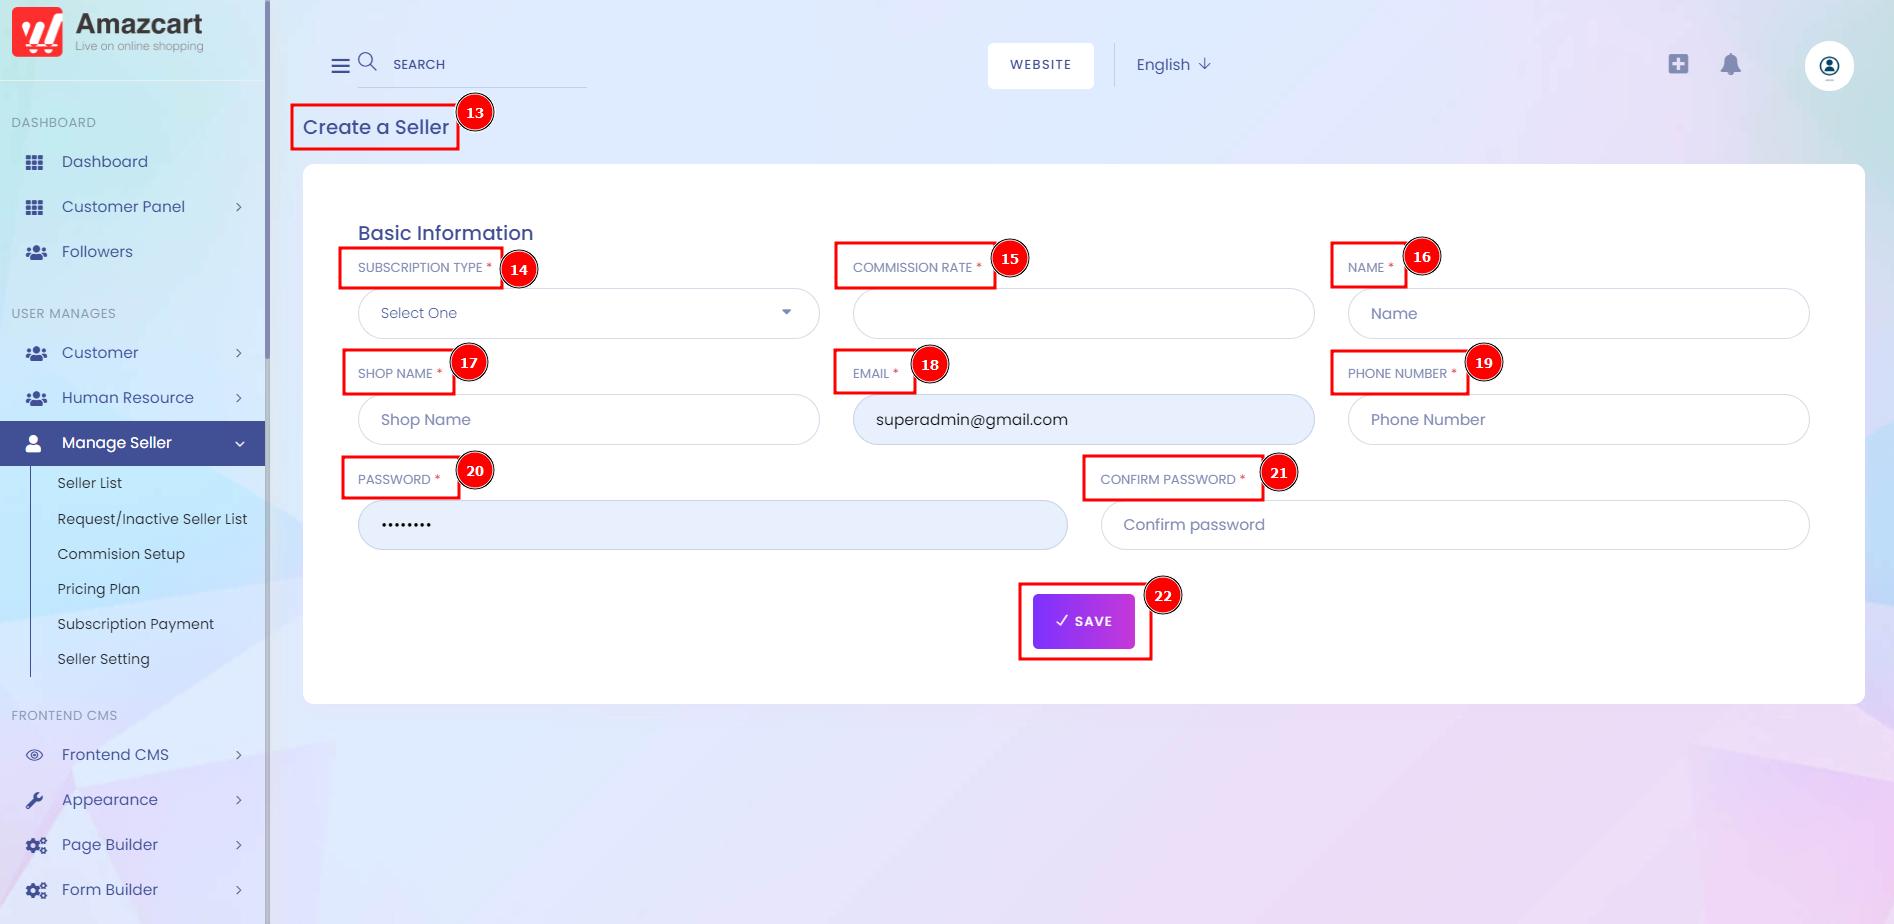
Short Direction: {AmazCart> Dashboard> Manage Seller> Seller List> Add New Seller> SL> Name> Email> Phone> Commission Type> Is Trusted> Shop Name> Wallet Balance> Total Orders> Select for Details, Secret login, Remove From Trusted, Deactivate or Seller Change Password> Create a Seller> Subscription Type> Commission Rate> Name> Shop Name> Email> Phone Number> Password> Confirm Password> Save it.}
If the admin wants to create a new seller for AmazCart then they have to find the Manage Seller section in the seller list & click on Add new Seller.
1- Seller List
2- Add New Seller
3- SL meaning serial number.
4- Name
5- Email
6- Phone
7- Commission Type
8- Is Trusted
9- Shop Name
10- Wallet Balance
11- Total Orders
12- Select for Details, Secret login, Remove From Trusted, Deactivate or Seller Change Password.
13- Create a Seller
14- Subscription Type
15- Commission Rate
16- Name
17- Shop Name
18- Email
19- Phone Number
20- Password
21- Confirm Password
22- Save it.

Admin Can Create A New Seller:
The admin can create the sellers as well. But first admin needs to create the customer and then approve that customer as a seller.
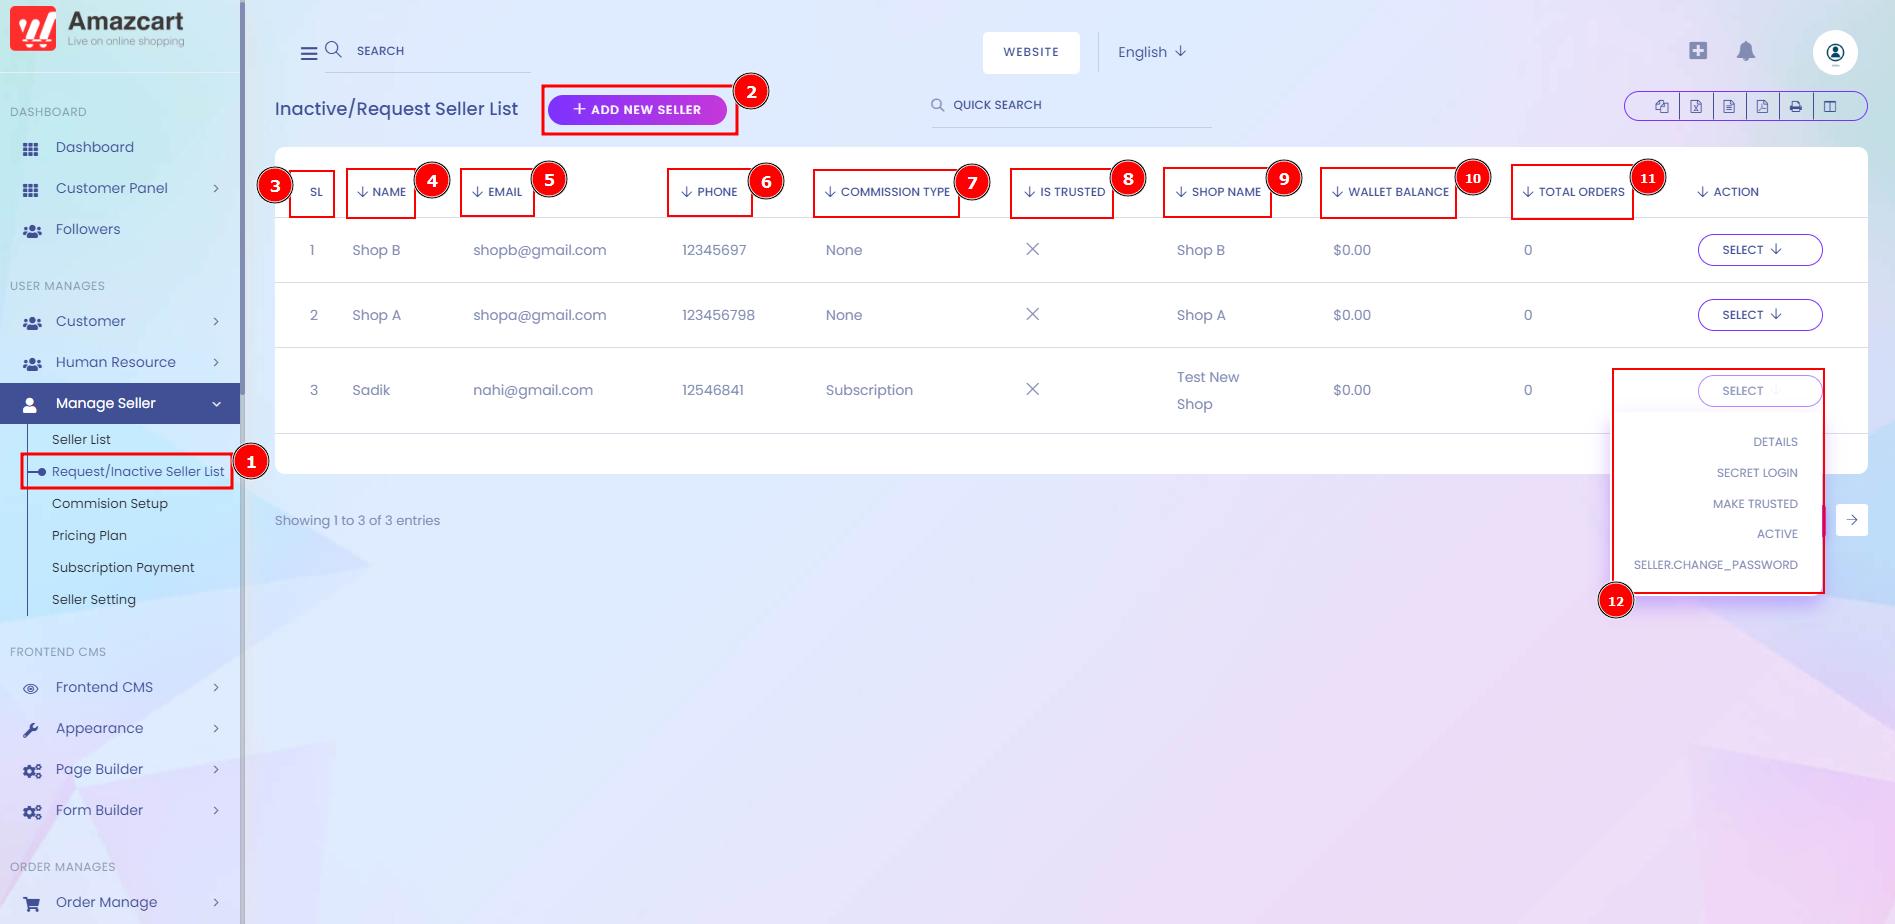
Request or Inactive Seller List:
Active the seller account from admin as Creating the Product by the seller is an easy process and the Seller could easily create multiple products with just clicks at add product. The seller can create Simple. Configurable, Virtual and Downloadable products from the Seller panel.
Short Direction: {AmazCart> Dashboard> Manage Seller> Request/Inactive Saller List> Add New Seller> SL> Name> Email> Phone> Commission Type> Is Trusted> Shop Name> Wallet Balance> Total Orders> Select for Details, Secret login, Make Trusted, Active or Seller Change Password.}
If you want to reactivate or secretly log in to your seller account then go to the AmazCart dashboard to find the request or inactive seller list.
1- Request/Inactive Saller List
2- Add New Sellers as long as the same interface by seller list.
3- SL meaning serial number.
4- Name
5- Email
6- Phone
7- Commission Type
8- Is Trusted
9- Shop Name
10- Wallet Balance
11- Total Orders
12- Select for Details, Secret login, Make Trusted, Active or Seller Change Password.
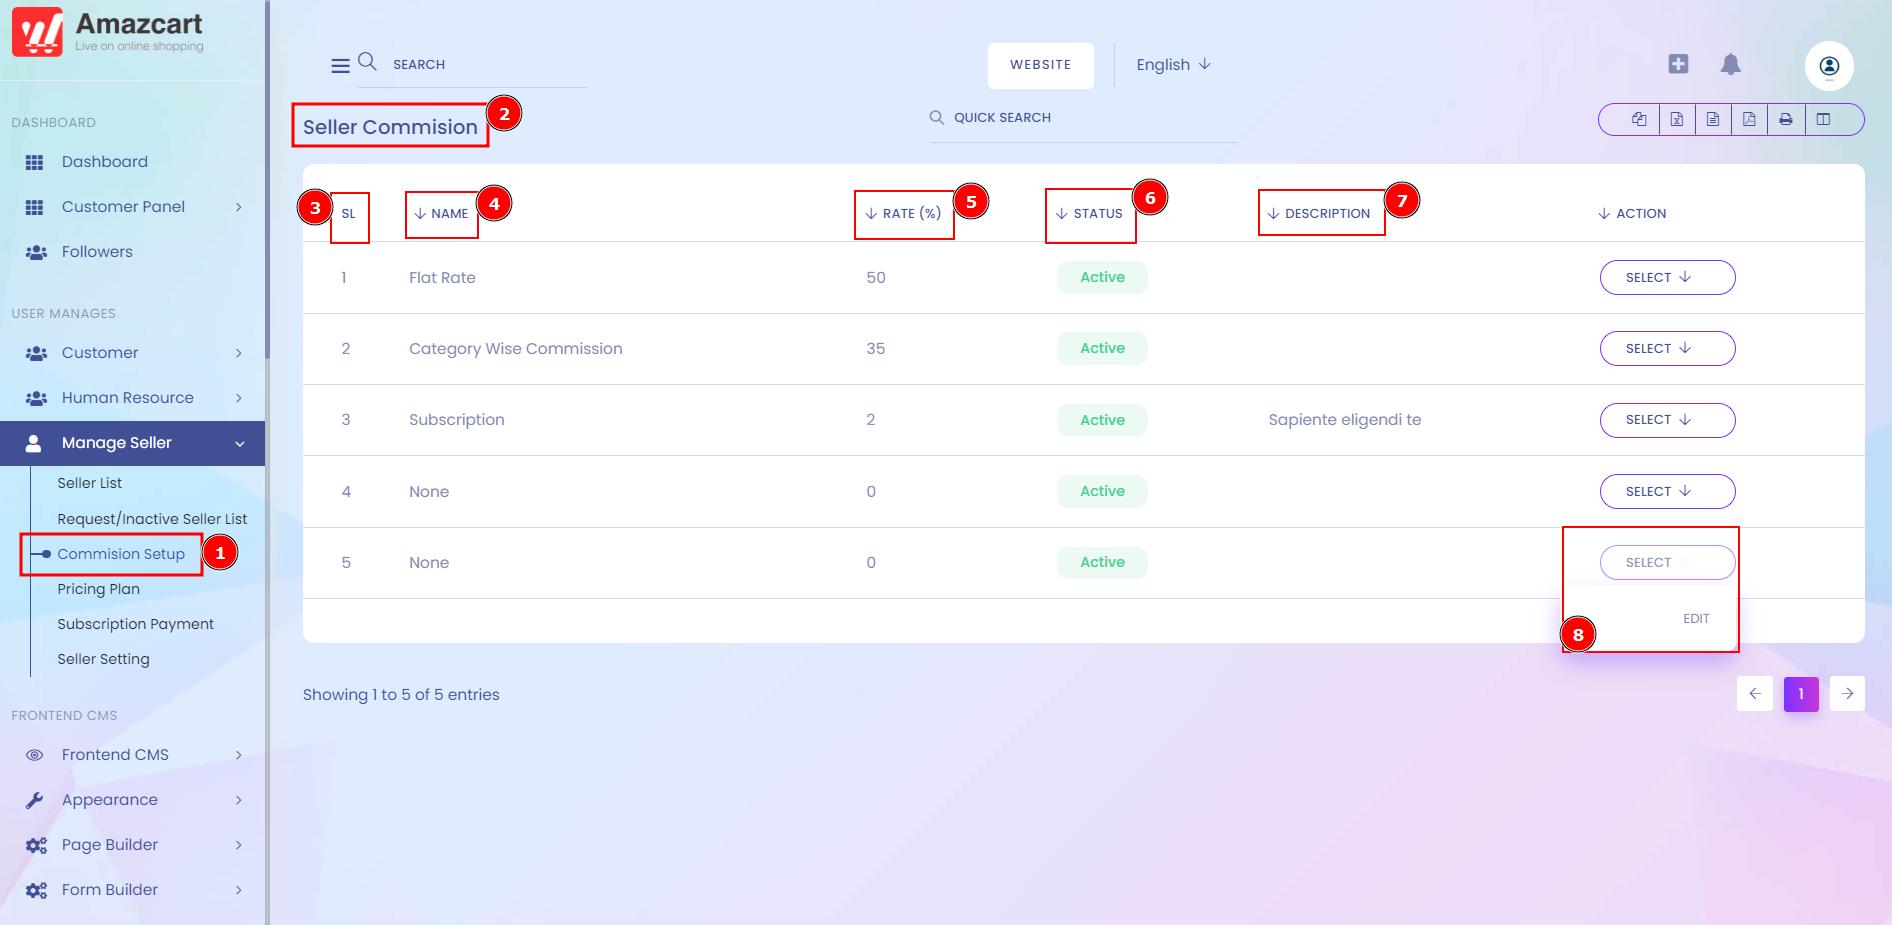
Commission Setup:
There are several commission rates that admin can set for their seller, also product categories depend on commission.
Short Direction: {AmazCart> Dashboard> Manage Seller> Commission Setup> Seller Commision> SL> Name> Rate> Status> Description> Select for edit.}
This commission is fixed for the seller as long as if admin wants to re-write the commission new rate then go to the AmazCart dashboard to find the manage sellers to click on the Commission setup.
1- Commission Setup
2- Seller Commission
3- SL meaning serial number.
4- Name
5- Rate
6- Status
7- Description
8- Select for edit.
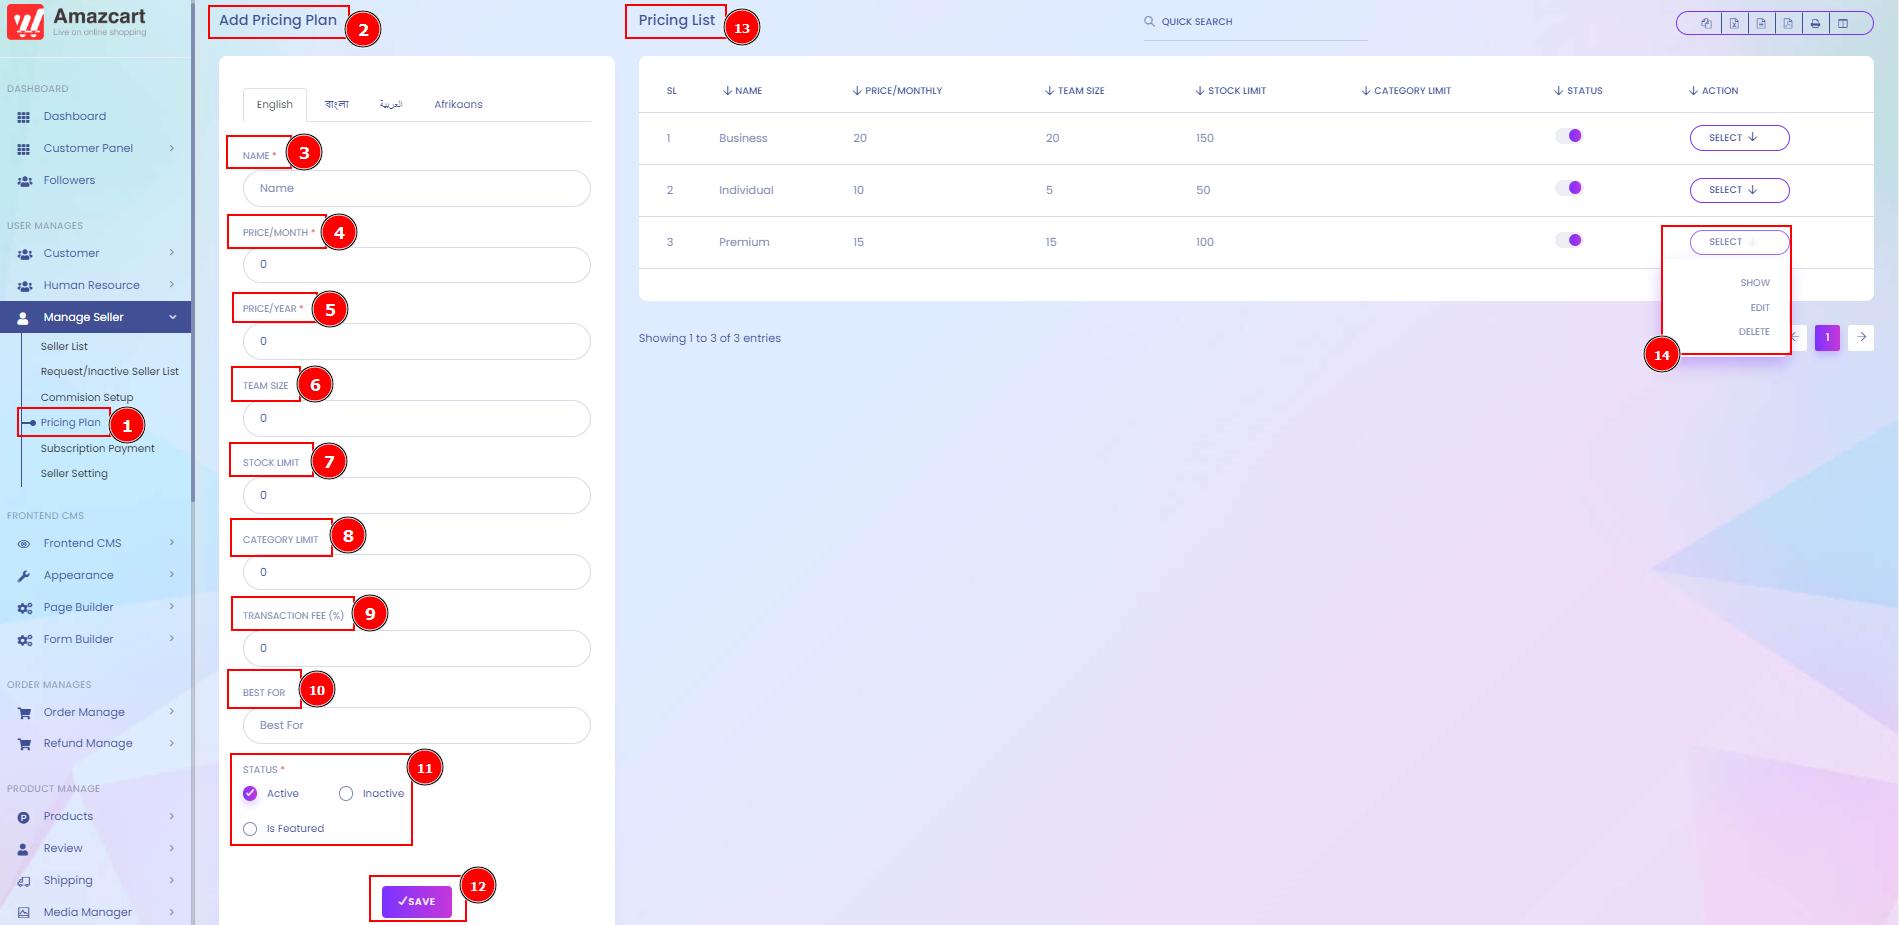
Add New Pricing Plan:
Here a user can set the pricing plan for the new seller as long as sets the team size, stock, category limit, transaction fee or status.
Short Direction: {AmazCart> Dashboard> Manage Seller> Pricing Plan> Add Pricing Plan> Name> Price/Month> Price/Year> Team Size> Stock Limit> Category Limit> Transaction fee> Best For> Status can be active, inactive or Is feature> Save> Pricing List> Select for show, edit or delete.}
If you want to add a new price plan for the seller then go to the AmazCart to find the manage seller to click on pricing plan.
1- Pricing Plan
2- Add Pricing Plan
3- Name
4- Price/Month
5- Price/Year
6- Team Size
7- Stock Limit
8- Category Limit
9- Transaction fee
10- Best For
11- Status can be active, inactive or Is a feature.
12- Save
13- Pricing List
14- Select for show, edit or delete.
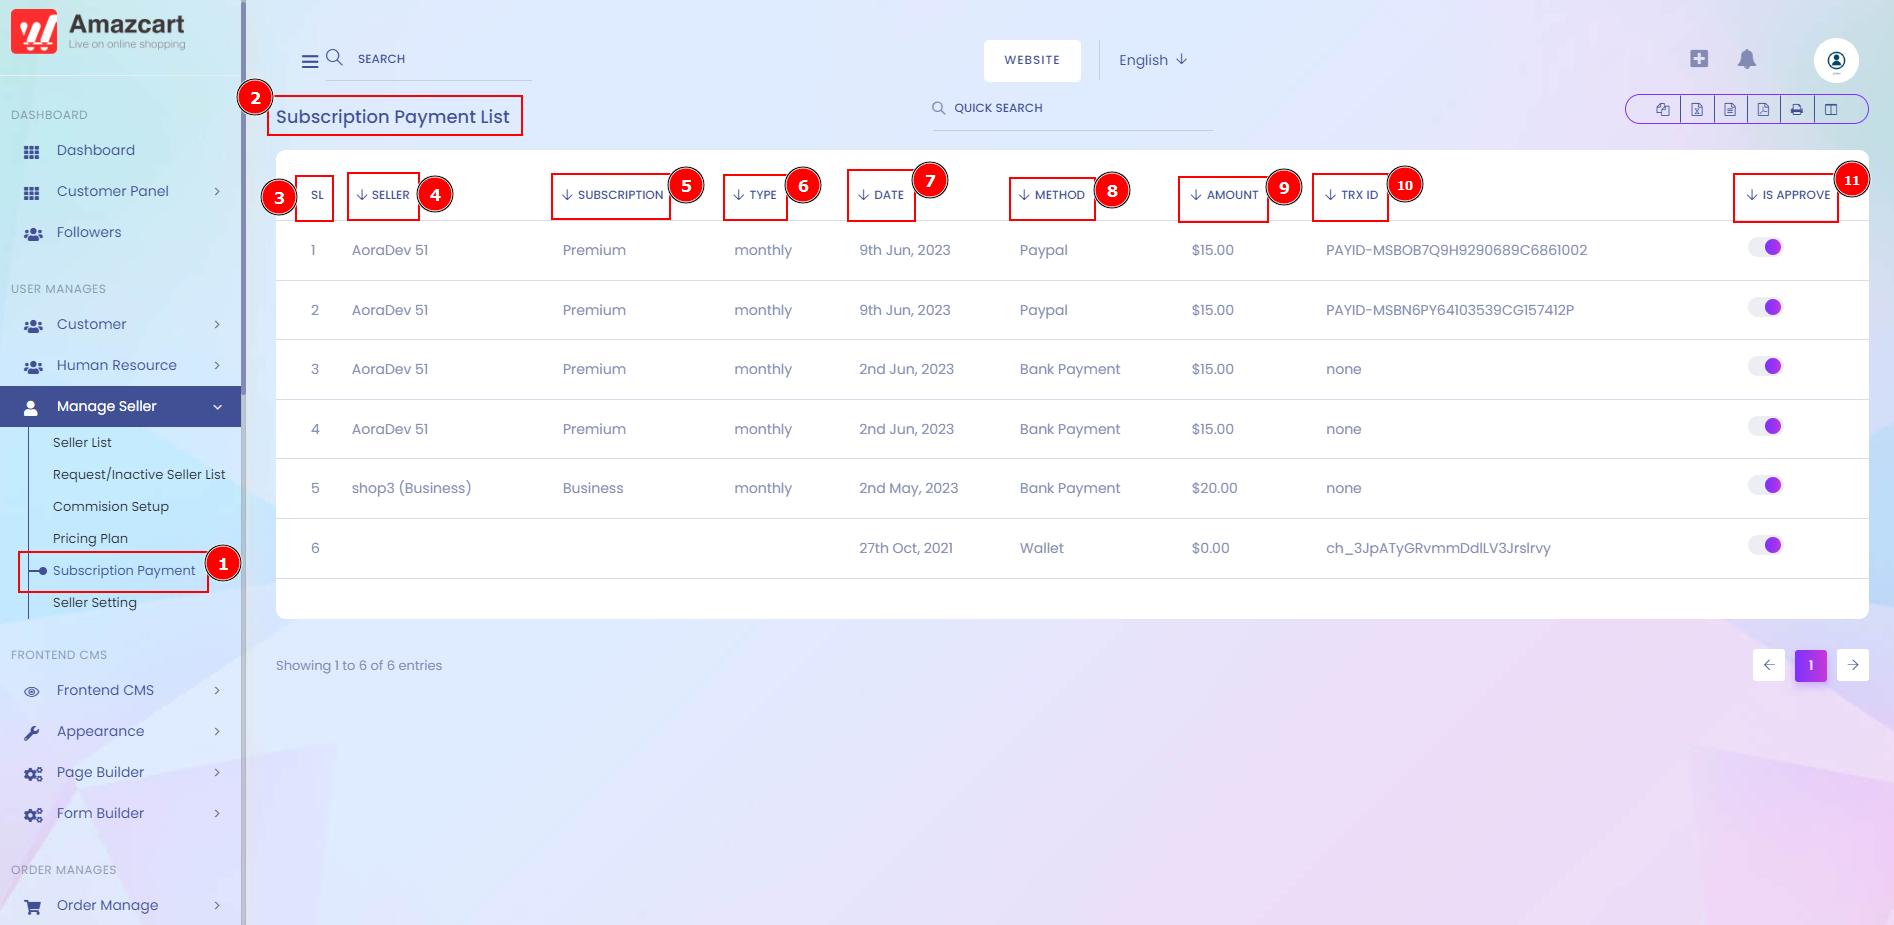
Subscription Payment List:
Subscription payments, also called recurring payments, are automatic payments on a schedule. Particularly, subscription services tend to charge on a monthly or annual schedule, until a customer withdraws permission or cancels the subscription.
Short Direction: {AmazCart> Dashboard> Manage Seller> Subscription Payment> Subscription Payment List> SL> Seller> Subscription> Type> Date> Method> Amount> TRX ID> Is Approve.}
If you want to change the status of the subscription payment list then go to the AmazCart dashboard to find the manage seller section to click on the Subscription payment.
1- Subscription Payment
2- Subscription Payment List
3- SL means serial number.
4- Seller
5- Subscription
6- Type
7- Date
8- Method
9- Amount
10- TRX ID means Each transaction processed by the gateway service provider is issued a reference known as a TrxID. This is typically a long alphanumeric code. It can be viewed as a visible column on the Debtors Transactions tab. The TrxID code is needed if you want to process a refund.
11- Is Approve.
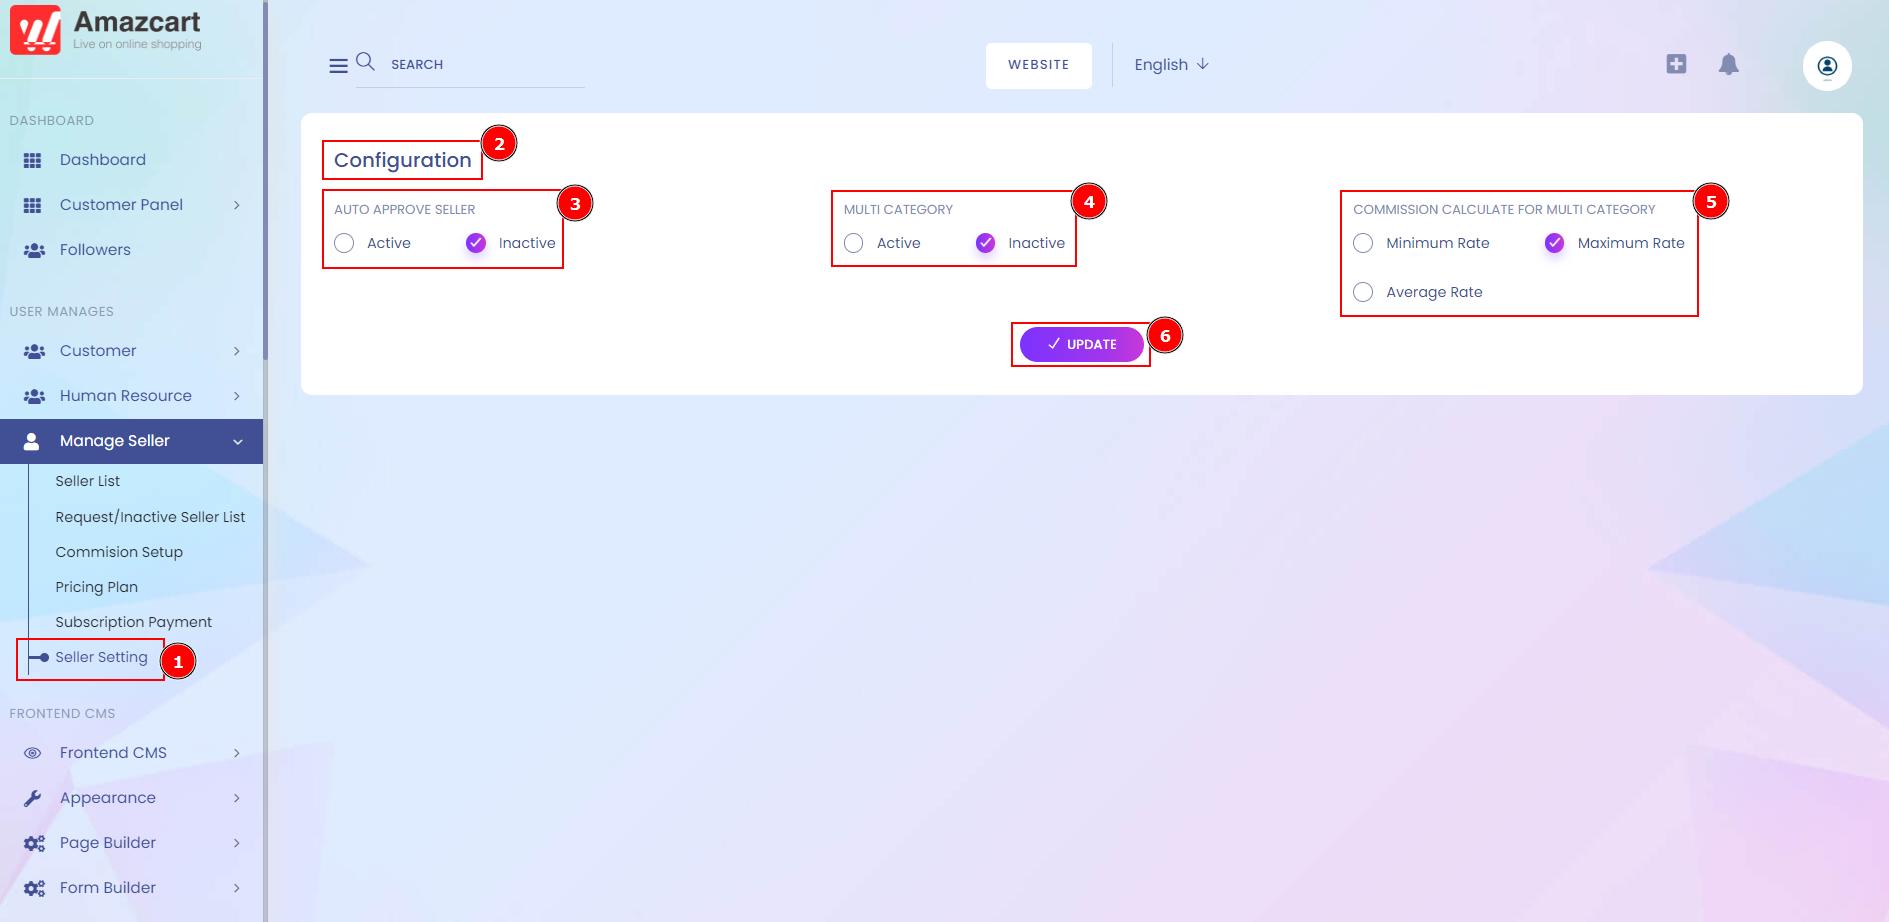
Seller Setting:
Here the admin can manually operate auto approval seller, multi-category or commission calculate for multi-category & hit the save button.
Short Direction: {AmazCart> Dashboard> Manage Seller> Seller Setting> Configuration> Auto Approve Seller can be Active or Inactive> Multi-Category can be Active or Inactive> Commission Calculate Multi-Category can be Minimum Rate, Maximum Rate or Average Rate> Update.}
If you want to manually change the seller setting for activity then go to the AmazCart dashboard to find the seller setting.
1- Seller Setting
2- Configuration
3- Auto Approve Seller can be Active or Inactive
4- Multi-Category can be Active or Inactive
5- Commission Calculate Multi-Category can be Minimum Rate, Maximum Rate or Average Rate
6- Update it.